Configuring Secure Boot for an ECS
Scenarios
Secure boot is used to check the integrity of each component (driver loader, kernel, and kernel driver) during device startup. This prevents security threats to the system and user data caused by loading and running unauthenticated components.
Secure boot is a feature of the Unified Extensible Firmware Interface (UEFI) that requires all low-level firmware and software components to be verified before being loaded. During the boot process, UEFI secure boot checks the signature of each boot software, including the UEFI firmware driver (also called ROM option), Extensible Firmware Interface (EFI) application, OS driver, and binary files. If the signature is valid or recognized by the original equipment manufacturer (OEM), the device will boot, and the firmware will hand over control to the OS.
- After secure boot is enabled, the system verifies component integrity during system startup, which does not affect services.
- After secure boot is disabled, the system does not verify component integrity during system startup, which does not affect services.
Background
UEFI is a standard that describes a new type of interface. It enables an OS to automatically load from a pre-boot operating environment to an OS.
The OSs that use the UEFI boot mode support secure boot. Secure boot provides verification of the boot chain status to ensure that only encrypted and verified UEFI binary files are executed after the firmware is initialized. These binary files include UEFI drivers, primary boot loaders, and chain loading components.
By default, secure boot is disabled and the system is in SetupMode. When the system is in SetupMode, all key variables can be updated without a cryptographic signature. After secure boot is enabled, the system exits SetupMode.

After secure boot is enabled, the system enforces signature validation on any UEFI binary files.
Secure boot uses key databases in a chain of trust, as shown in Table 1. These databases are stored in the UEFI variable storage.
|
Key Database |
Abbreviation |
Mandatory |
Description |
Format Constraints |
|---|---|---|---|---|
|
Platform key database |
PK |
Yes |
The PK database is the root of trust for the secure boot instance. The PK database contains a public PK key, which is used in the chain of trust to update the key exchange key (KEK) database. To change the PK database, you must have the private PK key to sign an update request. This includes deleting the PK database by writing an empty PK key. |
|
|
Key exchange key database |
KEK |
Yes |
The KEK database is a list of public KEK keys used in the chain of trust to update the signature (DB) and denylist (DBX) databases. The private KEK is used to add keys to the DB, which is a list of authorized signatures to be booted on the system. To change the public KEK database, you must have the private PK key to sign an update request. |
|
|
Signature database |
DB |
Yes |
The DB database is a list of public keys and hash values used in the chain of trust to verify all UEFI boot binary files. The DB list contains authorized keys that are authorized to boot on the system. To modify the list, you must have a private KEK. To change the DB database, you must have either the private PK key or any of the private KEK keys to sign an update request. |
|
|
Forbidden signatures database |
DBX |
No |
The DBX database is a list of untrusted public keys and binary hashes used to revoke files in the chain of trust. The DBX database always takes precedence over all other key databases. To change the DBX database, you must have either the private PK key or any of the private KEK keys to sign an update request. You can obtain a publicly available DBX from the UEFI forum. For details, see Unified Extensible Firmware Interface Forum. |
|
|
Timestamp signatures database |
DBT |
No |
The DBT database retains the signature of the code in the timestamp signature database. |
|
Constraints
- UEFI secure boot must be supported by instance flavors, including C7t, kC2, and aC8.
- Keys can be imported only when a private image is being created. Keys cannot be imported on the BIOS boot interface of an ECS.
- Keys or related configurations cannot be imported to an ECS using the mokutil tool.
- BMSs do not support UEFI secure boot.
- For details about the OSs that support UEFI boot, see OSs Supporting UEFI Boot Mode.
- For Windows, you need to download the corresponding certificate from the OS's official website. For details, see Keys Required for Secure Boot on all PCs.
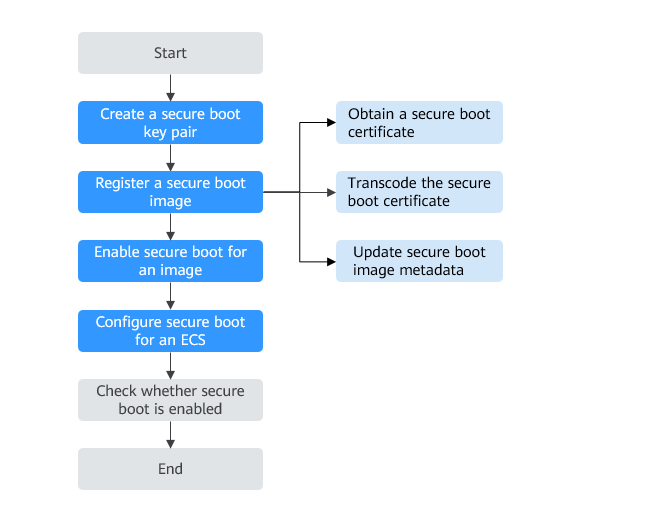
Process Flow

Creating Secure Boot Keys (Linux)
You need to create keys based on the UEFI secure boot standard, create a certificate for each key, convert each certificate into a UEFI signature list (binary file), and sign each certificate using the related key.
- Create a globally unique identifier (GUID).
Before creating a key pair, create a GUID for key generation.
- Connect to an ECS.
- Create a GUID for key generation.
- (Mandatory) Create a platform key (PK).
A PK is the root of trust for the UEFI secure boot instance.
- Create a key and name the variable PK.
openssl req -newkey rsa:4096 -nodes -keyout PK.key -new -x509 -sha256 -days 3650 -subj "/CN=Platform key/" -out PK.crt
Parameters in this command are described as follows:
- keyout PK.key: the private key file
- days 3650: the certificate validity period
- out PK.crt: the certificate for creating a UEFI variable
- CN=Platform key: common name (CN) of the key. You can enter the name of your enterprise instead of the platform key.
- Create a certificate.
- Convert the certificate into a UEFI signature list.
- Use the private PK to sign the UEFI signature list.
sign-efi-sig-list -g "$(< GUID.txt)" -k PK.key -c PK.crt PK PK.esl PK.auth
- Create a key and name the variable PK.
- (Mandatory) Create a key exchange key (KEK).
The private KEK is used to add keys to the signature database (DB), which is the list of authorized signatures to boot on the system.
- Create a key.
openssl req -newkey rsa:4096 -nodes -keyout KEK.key -new -x509 -sha256 -days 3650 -subj "/CN=Key Exchange Key/" -out KEK.crt
- Create a certificate.
- Convert the certificate into a UEFI signature list.
- Use the private PK to sign the signature list.
sign-efi-sig-list -g "$(< GUID.txt)" -k PK.key -c PK.crt KEK KEK.esl KEK.auth
- Create a key.
- (Mandatory) Create a signature database (DB).
The DB list contains authorized keys that are authorized to boot on the system. To modify the list, you must have a private KEK.
Boot images will be signed with the private key that is created in this step.
- Create a key.
openssl req -newkey rsa:4096 -nodes -keyout db.key -new -x509 -sha256 -days 3650 -subj "/CN=Signature Database key/" -out db.crt
- Create a certificate.
- Convert the certificate into a UEFI signature list.
- Use the private KEK to sign the signature list.
sign-efi-sig-list -g "$(< GUID.txt)" -k KEK.key -c KEK.crt db db.esl db.auth
- Create a key.
- (Optional) Create a forbidden signatures database (DBX).
The DBX disables specific DB certificates. It can be a certificate list or a hash list.
- (Optional) Create a timestamp signatures database (DBT).
The DBT database signs signature timestamps. If the DB certificate is in the DBX and the DBX specifies the revocation time, the DB certificate can be used for signature verification only if the signature time is earlier than the revocation time.
Signing an ECS Image Using a Key
For Huawei Cloud EulerOS (HCE), sign the following images:
/boot/efi/EFI/hce/shimx64.efi
/boot/efi/EFI/hce/mmx64.efi
/boot/efi/EFI/hce/grubx64.efi
/boot/vmlinuz-5.10.0-60.18.0.50.r951_39_66.hce2.x86_64

Run uname -a to check the kernel version of the image. For example:
linux-iXZPNN:~ # uname -a
Linux linux-iXZPNN 5.10.0-60.18.0.50.r951_39_66.hce2.x86_64 #1 SMP Sun Jul 30 15:05:32 UTC 2023 x86_64 x86_64 x86_64 GNU/Linux
To sign an image
Use the following syntax to sign an image.
sbsign --key db.key --cert db.crt --output /boot/vmlinuz-5.10.0-60.18.0.50.r951_39_66.hce2.x86_64 /boot/vmlinuz-5.10.0-60.18.0.50.r951_39_66.hce2.x86_64
Refer to the documentation for your distribution to find out about your boot chain and required images.
¹ Thanks to the ArchWiki community for all of the work they have done. The commands for creating the PK, creating the KEK, creating the DB, and signing the image are from Creating keys, authored by the ArchWiki Maintenance Team and/or the ArchWiki contributors.
Obtaining a Secure Boot Certificate
Contact the image provider to obtain a secure boot certificate.
Transcoding the Secure Boot Certificate
- Forbidden Signatures Database (DBX) transcoding
__forbidden_signatures_database=$(cat DBX.der | base64 -w 0)
- Timestamp Signatures Database (DBT) transcoding
__timestamp_signatures_database=$(cat DBT.der | base64 -w 0)

- PK.der is the platform key (PK) certificate.
- KEK.der is the Key Exchange Key (KEK) certificate.
- DB.der is the Signature Database (DB) certificate.
- DBX.der is the Forbidden Signatures Database (DBX) certificate.
- DBT.der is the Timestamp Signatures Database (DBT) certificate.
Creating a Private Image
You can create a private image using IMS. A private image can be created using either of the following methods:
Updating Secure Boot Image Metadata
You can call the following API to update the image metadata:
hw_firmware_type=uefi
__support_secure_boot=true
__platform_key=${__platform_key}
__key_exchange_key=${__key_exchange_key}
__signature_database=${__signature_database}
__forbidden_signatures_database=${__forbidden_signatures_database}
__timestamp_signatures_database=${__timestamp_signatures_database}
Enabling Secure Boot for an Image
- Log in to the management console.
- Choose Compute > Image Management Service to access the IMS console.
- Click the Private Images tab to show the image list.
- Locate the row containing the target image and click Modify in the Operation column.
- In the displayed dialog box, select the UEFI boot mode.
- After secure boot is enabled, specify the key databases.
- Click OK.
Configuring Secure Boot for an ECS
- Log in to the management console.
- Click
 in the upper left corner and select a region and project.
 - Click
 . Under Compute, choose Elastic Cloud Server.
 - Click Buy ECS.
- Set Trusted Settings based on service requirements.
- To enable secure boot, select Secure boot.
- To disable secure boot, deselect Secure boot.
For details about how to configure basic, network, and advanced settings when purchasing an ECS, see Purchasing an ECS in Custom Config Mode.
- Click OK.
Follow-up Operations
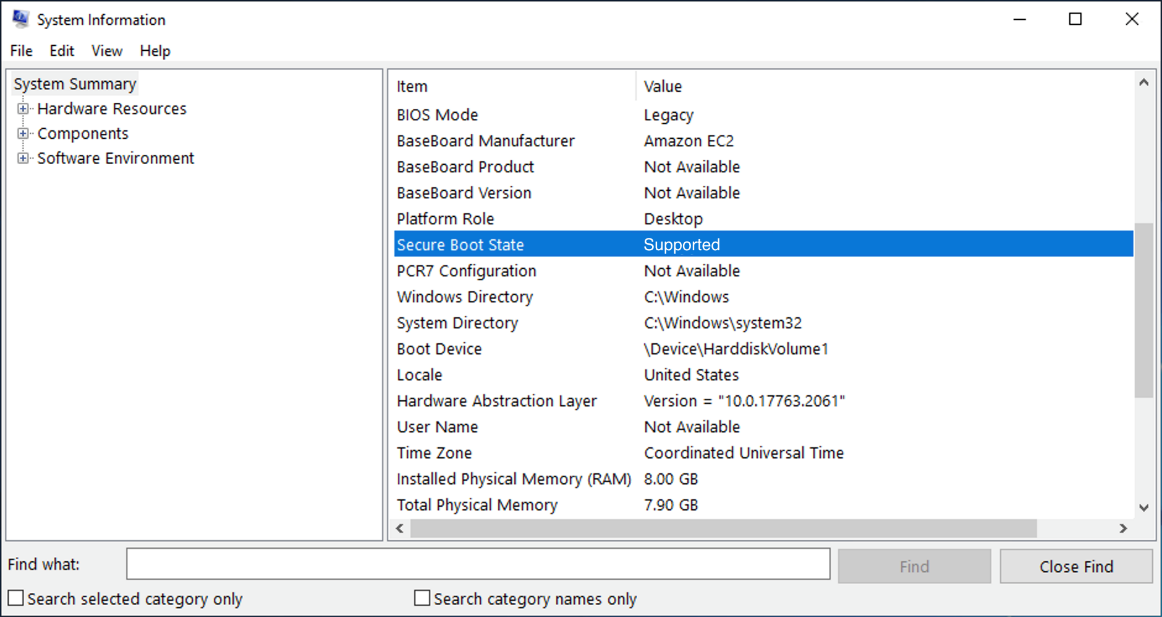
- (Windows) Check whether UEFI secure boot is enabled.
- Open the msinfo32 tool.
- Check the Secure Boot State field.
If the value of Secure Boot State is Supported, UEFI secure boot is enabled.

- (Linux) Check whether UEFI secure boot is enabled.
Feedback
Was this page helpful?
Provide feedbackThank you very much for your feedback. We will continue working to improve the documentation.See the reply and handling status in My Cloud VOC.
For any further questions, feel free to contact us through the chatbot.
Chatbot


