QingTian Enclave Application Development on Linux
QingTian Enclave SDK
The QingTian Enclave SDK consists of a series of open-source libraries for you to develop your own QingTian Enclave applications. It includes the qtsm-lib function library provided by QingTian Security Module (QTSM). In addition, the QingTian Enclave SDK integrates with KMS APIs that provide built-in support for obtaining attestation documents and other KMS-related services. A typical example is provided to show how to call KMS APIs for decryption in QingTian Enclave.
|
Type |
API |
Description |
|---|---|---|
|
libqtsm APIs |
qtsm_describe_pcr |
Queries the PCR value of a specified index. |
|
qtsm_extend_pcr |
Extends the PCR value of a specified index. |
|
|
qtsm_lock_pcr |
Locks the PCR value of a specified index. |
|
|
qtsm_lock_pcrs |
Locks the PCR values of specified indexes in batches. |
|
|
qtsm_get_describe |
Obtains the QTSM information. |
|
|
qtsm_get_attestation |
Obtains the attestation document. |
|
|
qtsm_get_random |
Obtains a random hardware number. |
|
|
KMS APIs |
kms_generate_datakey_blocking |
Generates a new key pair and obtains the public key and private key. |
|
kms_generate_datakey_blocking_with_proxy |
Integrates the qtproxy and obtains the key pair. |
|
|
kms_gen_random_blocking |
Obtains a random number. |
|
|
kms_gen_random_blocking_with_proxy |
Integrates the qtproxy and obtains a random number. |
|
|
kms_decrypt_data_blocking |
Decrypts data. |
|
|
kms_decrypt_data_blocking_with_proxy |
Integrates the qtproxy and decrypts data. |
You can obtain the source code for free from the open-source repository at https://gitee.com/HuaweiCloudDeveloper/huawei-qingtian/tree/master/enclave and develop your own QingTian Enclave application based on the test example.
Vsock Communication Example
The following uses vsock as an example to describe how to develop QingTian Enclave applications on Linux. The vsock application in this example can only run on Linux instances.
The vsock application helps developers know how information is exchanged between the parent instance and the QingTian Enclave instance. The vsock application includes two parameters: Server and Client. You can specify the two parameters to define the roles (client or server application) for the parent instance and the QingTian Enclave instance. In the vsock application, the client application sends a simple text message over the vsock to the server application and the server application listens to the vsock and prints the message to the terminal once it receives the message.
The following describes how a QingTian Enclave instance functioning as the server application receives the hello world message from the parent instance functioning as the client application.
- Compile a SocketCommunication.py program.
#!/usr/local/env python3
import argparse
import socket
import sys

CID_DEFAULT = 3
PORT_DEFAULT = 9999
TIMEOUT = 5
BLACKLOG_DEFAULT = 5

class Client:
    def __init__(self, cid, port):
        self.clientAddr = (cid, port)
        self.connect()

    def connect(self):
        self.socket = socket.socket(socket.AF_VSOCK, socket.SOCK_STREAM)
        self.socket.settimeout(TIMEOUT)
        print("connecting to the server")
        try:
            self.socket.connect(self.clientAddr)
        except socket.error:
            print("client's socket connection err")
            sys.exit(1)

    def send(self, msg):
        print("client sends hello to the server")
        self.socket.sendall(msg)

    def disconnect(self):
        self.socket.close()

    def receiveData(self):
        while True:
            try:
                message = self.socket.recv().decode()
            except (socket.error, UnicodeDecodeError):
                break
            if message:
                print(message, end = " ", flush = True)
        print()

def clientHandler(args):
    client = Client(args.cid, args.port)
    message = "Hello world"
    client.send(message.encode())
    client.disconnect()

class Server:
    def __init__(self, port):
        self.socket = socket.socket(socket.AF_VSOCK, socket.SOCK_STREAM)
        self.serverAddr = (socket.VMADDR_CID_ANY, port)
        self.socket.bind(self.serverAddr)
        self.socket.listen(BLACKLOG_DEFAULT)

    def receiveData(self):
        while True:
            print("waiting for a connection")
            (conn, clientAddr) = self.socket.accept()
            try:
                print("connection from ", clientAddr)
                while True:
                    try:
                        data = conn.recv(256).decode()
                    except (socket.error, UnicodeDecodeError):
                        break
                    if data:
                        print("data: ", data)
                    else:
                        print("connection close")
                        break
            finally:
                conn.close()

def serverHandler(args):
    server = Server(args.port)
    server.receiveData()


def main():
    parser = argparse.ArgumentParser(description = "Hello world demo", prog='SocketCommunication')
    subparsers = parser.add_subparsers(description = "Communication roles")
    parserClient = subparsers.add_parser("Client", description = "Client",
                                        help = "Communicate with server using a given cid and port.")
    parserClient.add_argument("-c", "--cid", default = CID_DEFAULT, type = int, help = "Client's Cid")
    parserClient.add_argument("-p", "--port", default = PORT_DEFAULT, type = int, help = "Client's port")
    parserClient.set_defaults(func = clientHandler)
    parserServer = subparsers.add_parser("Server", description = "Server", help = "Listen on a given port")
    parserServer.add_argument("-p", "--port", default = PORT_DEFAULT, type = int, help = "Server's Port")
    parserServer.set_defaults(func = serverHandler)
    if len(sys.argv) < 2:
        parser.print_usage()
        sys.exit(1)
    args = parser.parse_args()
    args.func(args)


if __name__ == "__main__":
    main()
- Create a file named Dockerfile.
#start the Docker image from ubuntu
FROM ubuntu:22.04
WORKDIR /home/builder
# COPY vsocket example
COPY . vsocket
# install relative dependencies
RUN apt-get update && \
    apt-get install python3 -y && \
    apt-get install gcc -y && \
    apt-get install gawk -y
# Launch a client
CMD ["python3", "/home/builder/vsocket/SocketCommunication.py","Server","-p 9999"]
- Build a Docker image.
sudo docker build -t vsock-sample-client -f Dockerfile .
- Convert the Docker image to a QingTian Enclave image file.
qt enclave make-img --docker-uri vsock-sample-client --eif vsock_sample.eif
- Boot the QingTian Enclave instance in debug mode using the QingTian Enclave image file vsock_sample.eif.
qt enclave start --cpus 2 --mem 4096 --eif vsock_sample.eif --debug-mode --cid 4
Run the qt enclave console command to view the read-only terminal output in the QingTian Enclave instance.qt enclave console --enclave-id 0 waiting for a connection
- Boot a parent instance terminal and start the client program.
python3 SocketCommunication.py Client -c 4 -p 9999
- Check that the following information is displayed on the terminal after the server application receives the message over the vsock.
connection from  (3, 4180219645)
data:  Hello world
connection close
waiting for a connection
KMS API Calling and Permission Configuration Example
The following uses open-source sample code to describe how to call KMS APIs and configure permissions in a QingTian Enclave application. The sample application can only run on Linux instances.
Before the configuration, purchase a C7t ECS and use it as the QingTian Enclave parent instance. Configure the ECS by referring to Getting Started with QingTian Enclave.
- Download the huawei-qingtian-enclave code from the Gitee repository.
- Obtain the required parameters according to the test case.
For details, see https://gitee.com/HuaweiCloudDeveloper/huawei-qingtian/pulls/21/files.
Obtain the parameters listed in Table 2 and enter them in the test file.
Table 2 KMS API parameters Parameter
Meaning
How to Obtain
ak
Access Key ID
For details, see AK/SK Signing and Authentication Guide.
sk
Secret Access Key
project_id
Project ID
For details about how to obtain the project ID, see Obtaining a Project ID.
key_id
Key ID in KMS
None
host
KMS endpoint
None
- Create custom identity policies in IAM.
Use an account with administrator permissions to create a custom identity policy named enclave-test-kms-api. For details, see Creating a Custom Policy.
The following is an example custom identity policy:
{
  "Version": "5.0",
  "Statement": [
    {
      "Effect": "Allow",
      "Action": [
        "kms::generateRandom",
        "kms:cmk:createDataKey",
        "kms:cmk:decryptData",
        "kms:cmk:decryptDataKey"
      ],
      "Condition": {
        "StringEqualsIgnoreCase": {
          "kms:RecipientAttestation/PCR0": [
            "8f2cbfb3930e59c6de5c4caff0a3f4c0457e8956bfb4556a7ca1f5f4614a741eeee39ae10447eb5baee48d49e6c1cb6c",
            "ff7ba807a385b49fc1c3346bb47215aef503dee6df22d32f733e22b90a9bc4b22424ca7de1a3537ac9608d7ebe461d67",
            "a28e765550d6ad1188860d30167b1fdb9e29c8da825543861bc76ef1e8427fac6b444ec6a1847fc2c22deae8170c2e67"
          ],
          "kms:RecipientAttestation/PCR8": [
            "a9add94b0ecbbd992baded2176370ecf3bfed2cb39b2ec547512b5174279799f2036fa0b8577bdaf503836178bd11ee2"
          ]
        }
      }
    },
    {
      "Effect": "Allow",
      "Action": [
        "kms:cmk:encryptData",
        "kms:cmk:encryptDataKey"
      ]
    }
  ]
}
The values of PCR0 and PCR8 need to be configured after the QingTian Enclave image is created.
- Create an IAM user and grant permissions to the user.
- In the upper right corner of the IAM console, click Go to New Console.
- Choose Users from the left navigation pane. On the Users page, create an IAM user named enclave-test-kms-uers and grant permissions defined in the enclave-test-kms-api identity policy to the user.
Figure 1 Creating an IAM user (1)
 Figure 2 Creating an IAM user (2)
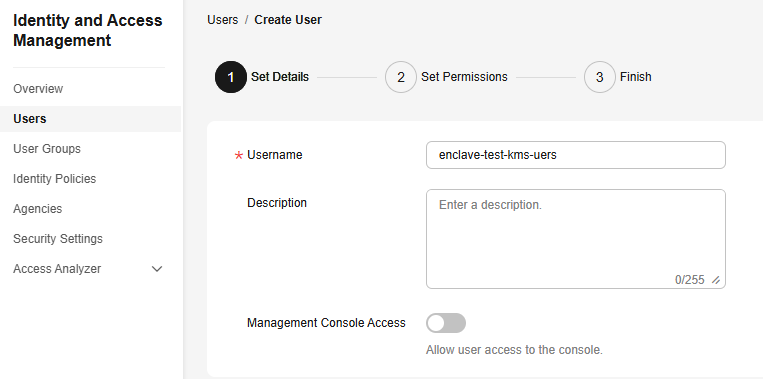 Figure 3 Granting permissions to the user
- Obtain the AK and SK of the enclave-test-kms-uers user.
Click the username to go to the user details page. On the Security Settings tab, create and download access keys. For details, see Creating an Access Key.
Obtain the AK and SK of the user from the downloaded access key file.
- Set the corresponding parameters of the test program to the AK and SK.
Test program: /home/huawei-qingtian/enclave/qtsm-sdk-java/kms-cms-java/com/huawei/src/test/TestKmsCmsProxy.java
Figure 4 Entering the AK and SK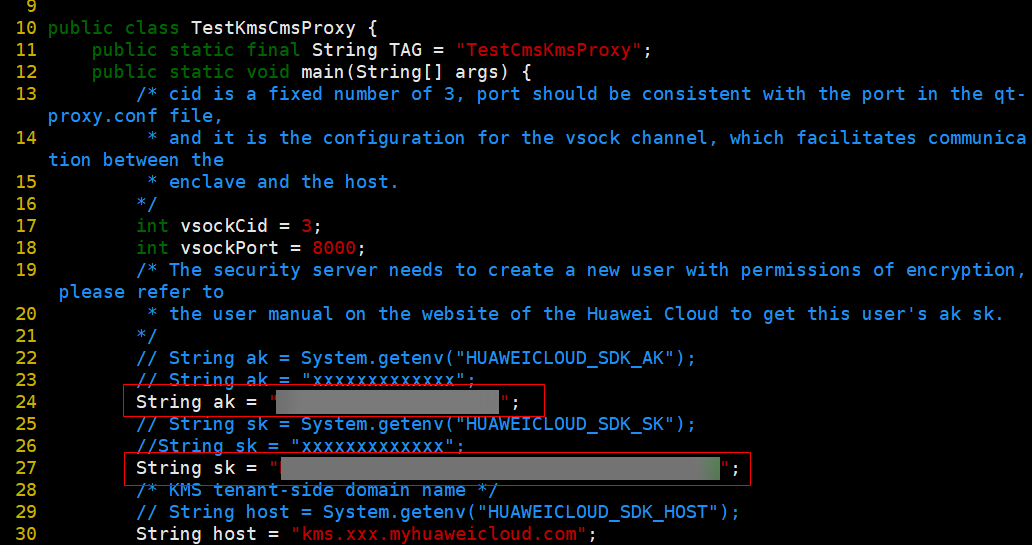
- Obtain the KMS endpoint.
- For details about the KMS endpoints in different regions, see Regions and Endpoints.
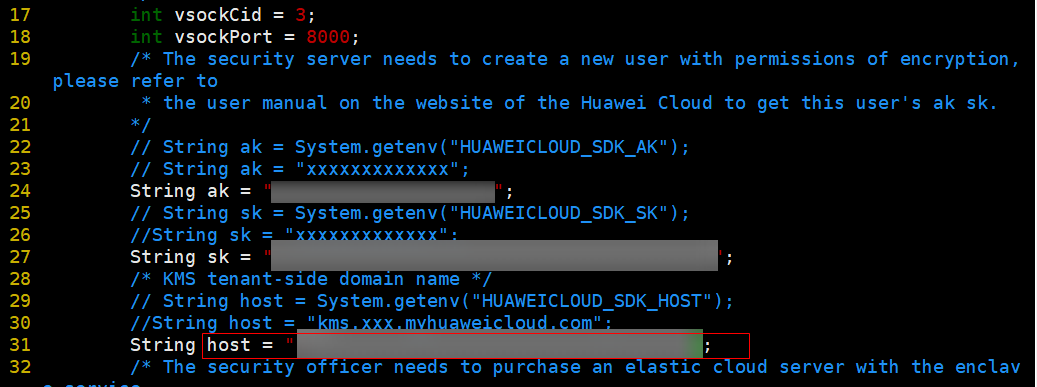
- Set the host parameter in the huawei-qingtian/enclave/qtsm-sdk-java/kms-cms-java/com/huawei/src/test/TestKmsCmsProxy.java file to the KMS endpoint.
Figure 5 Entering the endpoint
- Obtain the project ID.
- Obtain the project ID on the console. For details, see Obtaining a Project ID.
- Set the uriPrefix parameter in the /home/huawei-qingtian/enclave/qtsm-sdk-java/kms-cms-java/com/huawei/src/test/TestKmsCmsProxy.java file to the obtained project ID.
Figure 6 Entering the project ID

- Obtain the key ID.
- Create a key and obtain the key ID on the DEW console. For details, see Creating a Custom Key.
- Set the uriPrefix parameter in the /home/huawei-qingtian/enclave/qtsm-sdk-java/kms-cms-java/com/huawei/src/test/TestKmsCmsProxy.java file to the obtained key ID.
Figure 7 Entering the key ID

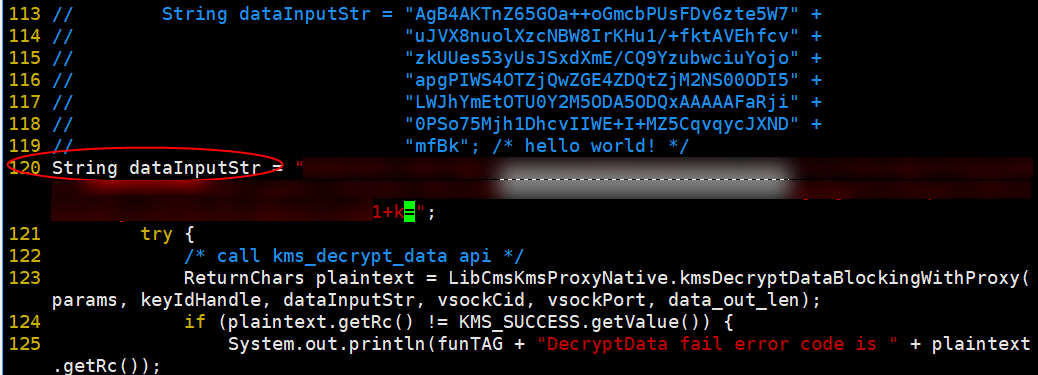
- Use the key to encrypt a piece of plaintext, for example, "hello world!". For details, see Encrypting and Decrypting Small-size Data Online Using a Custom Key.
- Set the dataInputStr parameter in /home/huawei-qingtian/enclave/qtsm-sdk-java/kms-cms-java/com/huawei/src/test/TestKmsCmsProxy.java to the encrypted ciphertext.
Figure 8 Entering the ciphertext
- Go to the /home/huawei-qingtian/enclave/qtsm-sdk-java/kms-cms-java/scripts directory and run the sh build_image.sh script to build a QingTian Enclave image.
Figure 9 Executing a script

In the kms-demo.eif file, you can obtain the values of PCR0 and PCR8.
- Generate the private key and public key for image signature.
openssl ecparam -out private-key.pem -name secp384r1 -genkey
openssl req -new -key private-key.pem -out ssl.csr
openssl x509 -req -days 365 -in ssl.csr -signkey private-key.pem -out server.pem
- Start the proxy tool.
/usr/local/bin/qingtian/enclave/qt_proxy -l 8000 -a kms.ap-southeast-3.myhuaweicloud.com -p 443 &
- Use the nc-vsock tool to log in to the QingTian Enclave instance for debugging.
- Log in to the QingTian Enclave instance from the QingTian Enclave parent instance using the vsock client for debugging. This is because a vsock server (listening on port 9999) has been started in QingTian Enclave.
huawei-qingtian/enclave/qtsm-sdk-java/kms-cms-java/scripts/build_kms_demo.sh
- Use nc-vsock to enter the QingTian Enclave instance.
/home/huawei-qingtian/nc-vsock/nc-vsock 4 9999
Figure 10 Entering the enclave
- Run the following commands in the QingTian Enclave instance:
cd /home/builder/enclave/qtsm-sdk-java/kms-cms-java/target
# We can perform it manually
java -cp .:../lib/lombok-1.18.26.jar:../lib/junit-4.13.1.jar -Djava.library.path=./lib com.huawei.src.test.TestKmsCmsProxy
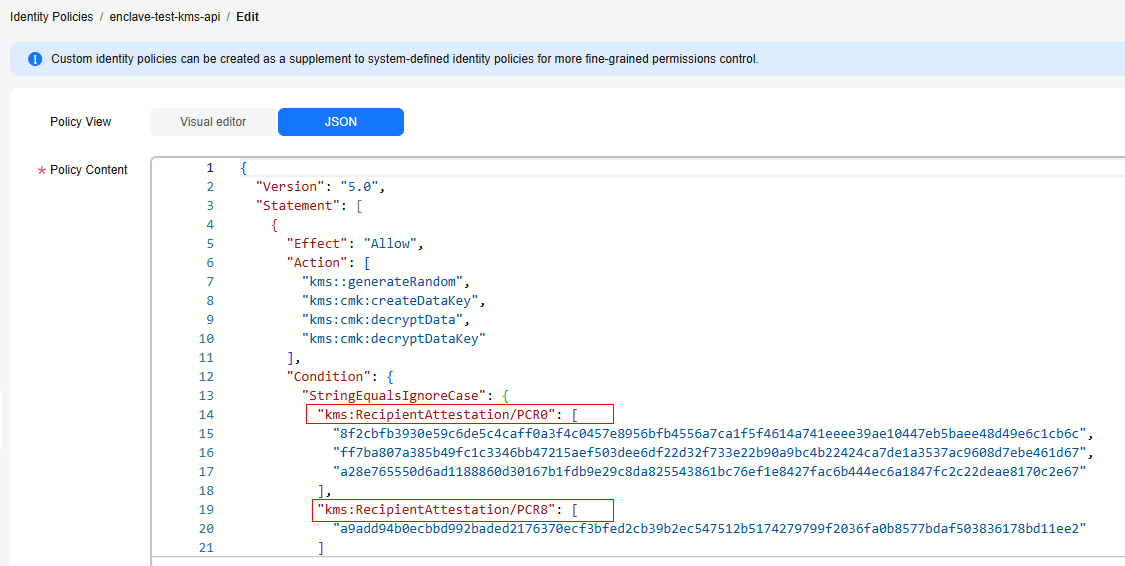
- If the command execution failed, the system displays a message indicating that the user does not have sufficient permissions, as shown in Figure 11. Modify the custom identity policy for the user based on PCR0 and PCR8 of the Enclave image. For details, see step 11.d.
- If the command execution is successful, go to step 11.e.
- (Optional) Modify the custom identity policy. The modification will be applied in about 30 to 90 seconds.
After the command is executed, if the user does not have sufficient permissions, information shown in Figure 11 is displayed. Modify the custom identity policy based on PCR0 and PCR8 of the Enclave image.Figure 12 Modifying a custom identity policy
- Run the following commands in the QingTian Enclave instance to debug the KMS API:
cd /home/builder/enclave/qtsm-sdk-java/kms-cms-java/target
# We can perform it manually
java -cp .:../lib/lombok-1.18.26.jar:../lib/junit-4.13.1.jar -Djava.library.path=./lib com.huawei.src.test.TestKmsCmsProxy
- Verify that the KMS API can be called and check the debugging result.
Figure 13 Decryption API
 Figure 14 Data key API
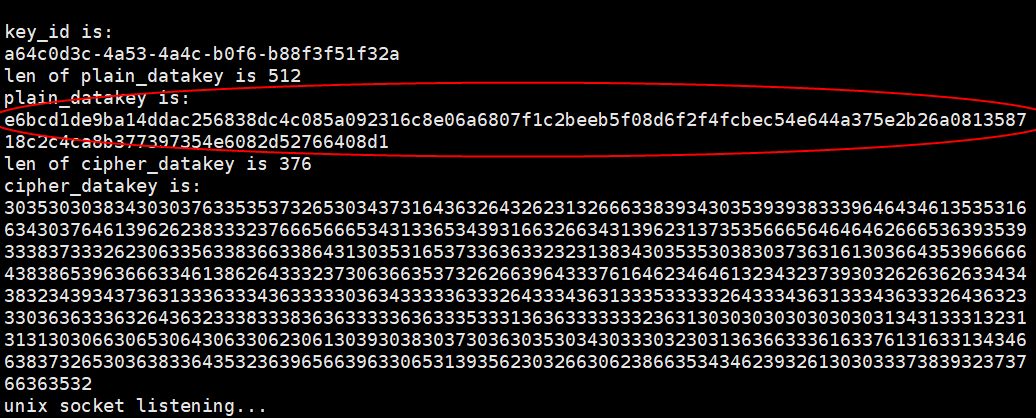 Figure 15 Random number API
- Log in to the QingTian Enclave instance from the QingTian Enclave parent instance using the vsock client for debugging. This is because a vsock server (listening on port 9999) has been started in QingTian Enclave.
Feedback
Was this page helpful?
Provide feedbackThank you very much for your feedback. We will continue working to improve the documentation.See the reply and handling status in My Cloud VOC.
For any further questions, feel free to contact us through the chatbot.
Chatbot


