Cycle Overview
Scenarios
Notifications can be set to specified personnel by day, week, or month, allowing related personnel to regularly understand job scheduling information about the quantity of successfully/unsuccessfully scheduled jobs and failure details.
Prerequisites
- Simple Message Notification (SMN) has been enabled, topics have been configured, and subscriptions have been added to the topics.
- Jobs are not in Not started status and have been submitted.
- OBS has been enabled and a folder has been created in OBS.
Creating a Notification
- Log in to the DLF console.
- In the navigation tree of the Data Development console, choose .
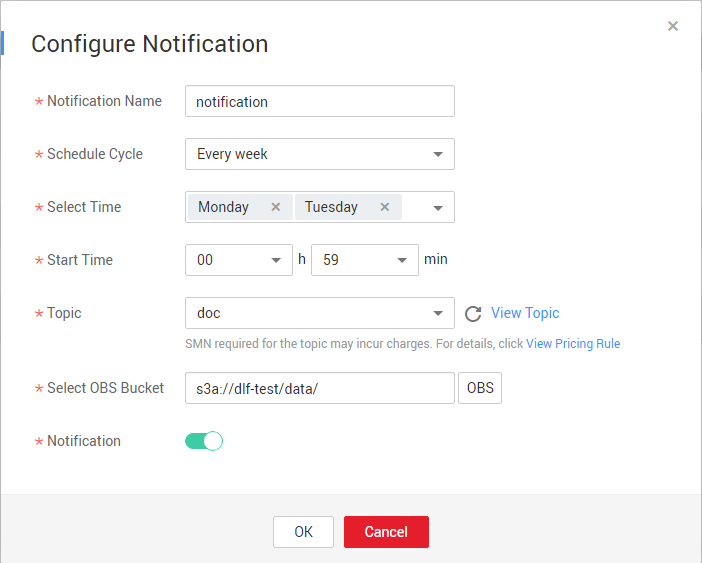
- On the Cycles tab page, click Create Notification. In the displayed dialog box, configure parameters. Table 1 describes the notification parameters.
Figure 1 Create a notification

Table 1 Notification parameters Parameter
Mandatory
Description
Notification Name
Yes
Name of the notification to be sent.
Cycle
Yes
Interval for sending notifications, which can be set to Daily, Weekly, or Monthly.
NOTE:When Cycle is set to Daily, Weekly, or Monthly, a notification is sent every day, week, or month, and the notification content comes from the data generated from the last 24 hours, seven days, or 30 days.
Select Time
Yes
Time when the notification is sent.
- If Cycle is set to Weekly, the value can be any day or any several days from Monday to Sunday in a week.
- If Cycle is set to Monthly, the value can be any day or any several days from 1st to 31st in a month.
Start Time
Yes
Point in time when the notification is sent. The value can be accurate to hour or minute.
Topic
Yes
Select a notification topic from the drop-down list box.
OBS Bucket
Yes
Enter an OBS bucket in the text box or click OBS and select one from the displayed dialog box.
Notification
Yes
Specifies whether to enable the notification function. The function is enabled by default.
- Click OK.

DLF sends notifications through SMN. Using SMN may incur fees. For price details, contact the SMN support personnel.
- After the notification is created, you can perform the following operations on the notification:
- Click Edit. In the Create Notification dialog box, edit the notification again.
- Click View Record. In the View Record dialog box, view the job scheduling details.
- Click Delete. In the Delete Notification dialog box, click OK to delete the notification.
Feedback
Was this page helpful?
Provide feedbackThank you very much for your feedback. We will continue working to improve the documentation.See the reply and handling status in My Cloud VOC.
For any further questions, feel free to contact us through the chatbot.
Chatbot


