Creating a Key Pair
For system security purposes, you should use the key pair authentication mode to authenticate the user who attempts to log in to an ECS. You can create a key pair and use it for authentication when logging in to your ECS.

If you have already created a key pair, you do not need to create one again.
Methods of Creating a Key Pair
Table 1 describes the methods of creating a key pair.
|
Creation Method |
Difference |
|---|---|
|
Creating a Key Pair on the Management Console
NOTE:
|
|
|
Creating a Key Pair Using PuTTYgen
NOTE:
PuTTYgen is a tool for generating public and private keys. You can obtain the tool from https://www.putty.org/. |
Both public and private keys are stored locally. |
|
NOTE:
If multiple IAM users need to use the same key pair, use another tool (such as PuTTYgen) to create a key pair and import it for each IAM user separately. |
|
Creating a Key Pair
There are three ways to create a key pair on KPS.
- Log in to the DEW console.
- Click
 in the upper left corner of the console and select a region or project.
 - In the navigation pane on the left, click Key Pair Service.
- On the displayed page, create a private key pair or account key pair as required.
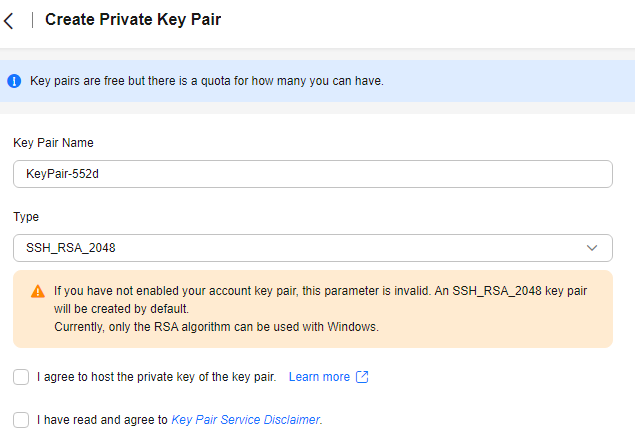
- Click Create Key Pair. On the displayed page, enter the key pair name, as shown in Figure 1.
- (Optional) Select a key pair type.

- When you create a private key pair, this parameter is available only when there is an account key pair under the account. The account key pair can be either created or upgraded from a private key pair. Otherwise, only the default SSH_RSA_2048 key pair is created.
- Currently, only the RSA algorithm can be used with Windows.
- Read and select I agree to host the private key of the key pair if needed. Set KMS Encryption Key and select an encryption key. Skip this step if not needed.
- Select from list: Select this if you want to use the key used or shared by the current account.
- Default Keys: KPS uses the default encryption key kps/default provided by KMS to encrypt private keys.
- Custom Keys: Select a custom key created on KMS to encrypt the private key. For details, see Creating a Key. To use a shared key created using RAM, accept the shared key, and select it from the bottom of the drop-down list, Shared is displayed next to the key name.
- Enter: Select this when you need to use an authorized key. Only the ID of a symmetric key is supported. After a grant is created, you can select this mode, and enter the key ID to use the authorized key for encryption. For details, see Creating a Grant.
Figure 2 Managing private keys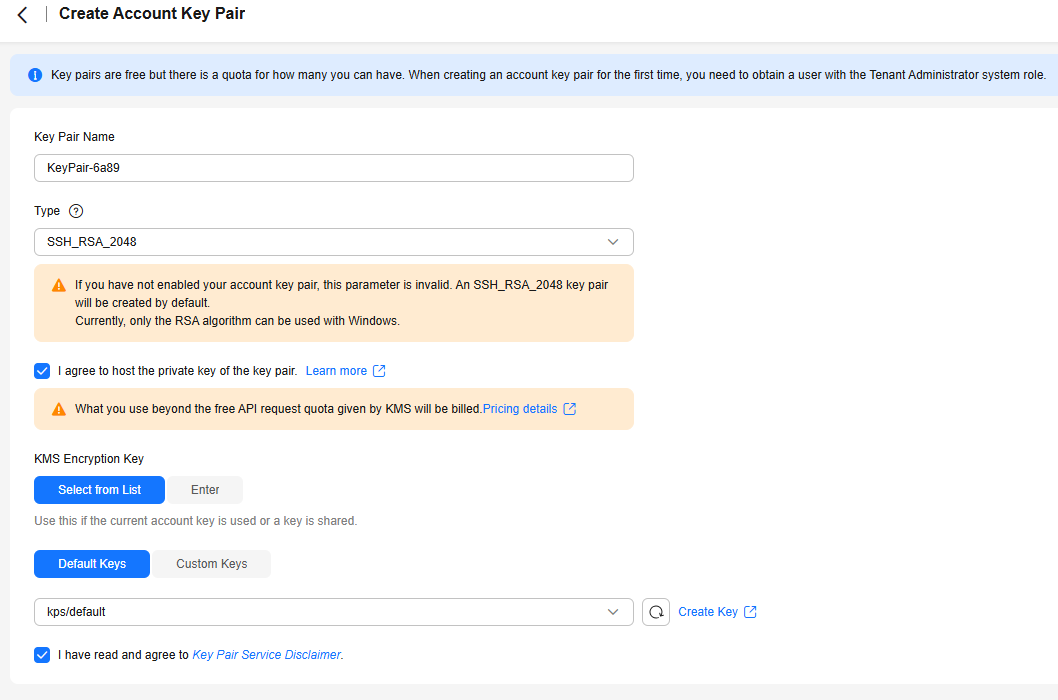
- Select from list: Select this if you want to use the key used or shared by the current account.
- Read the Key Pair Service Disclaimer and select I have read and agree to the Key Pair Service Disclaimer.
- Click OK. The browser automatically downloads the private key file to the local PC.

- If the private key is not managed, it can be downloaded only once. Keep it properly. If the private key is lost, you can bind a key pair to the ECS again by resetting the password or key pair. For details, see How Do I Handle the Failure in Logging In to ECS After Unbinding the Key Pair?
- If you have authorized Huawei Cloud to manage the private key, you can export the private key anytime as required.
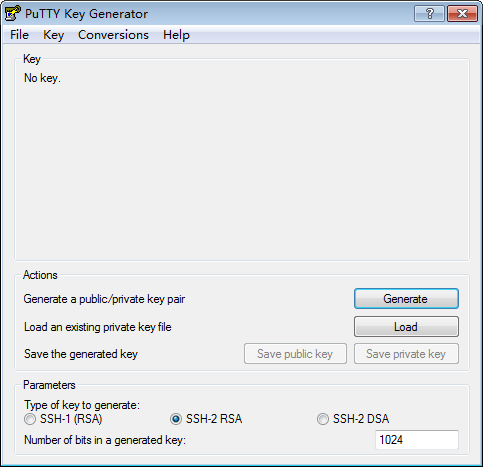
- Generate the public and private keys. Double-click PuTTYgen.exe. The PuTTY Key Generator page is displayed, as shown in Figure 3.
- Configure the parameters as described in Table 2.
Table 2 Parameter description Parameter
Description
Type of key to generate
- The SSH keys imported to the KPS console support the following cryptographic algorithms:
- SSH-DSS (not recommended)
- SSH-ED25519
- ECDSA-SHA2-NISTP256
- ECDSA-SHA2-NISTP384
- ECDSA-SHA2-NISTP521
- SSH_RSA: The length can be 2,048, 3,072, or 4,096 bits.
- PKCS8 is supported for imported private keys. Convert the format if PKCS1 is used.
Number of bits in a generated key
- The SSH keys imported to the KPS console support the following cryptographic algorithms:
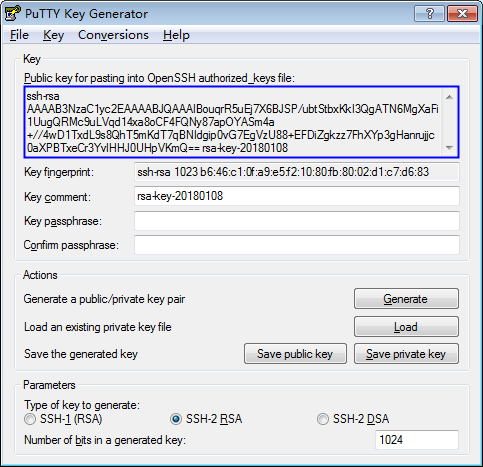
- Click Generate to generate a public key and a private key. See Figure 4.
- Copy the information in the blue square and save it in a local .txt file.

Do not save the public key by clicking Save public key. If you save a public key using Save public key, the public key format will be changed and cannot be imported to the management console directly.
- Save the private key in PPK or PEM format.

For security purposes, the private key can only be downloaded once. Keep it secure.
Table 3 Format of a private key file Private Key File Format
Private Key Usage Scenario
Saving Method
PEM
- Use the Xshell tool to log in to the cloud server running the Linux operating system.
- Manage the private key on the management console.
- Choose Conversions > Export OpenSSH key.
- Save the private key, for example, kp-123.pem, to a local directory.
Obtain the password of a cloud server running the Windows operating system.
- Choose Conversions > Export OpenSSH key.
NOTE:
Do not enter the Key passphrase information. Otherwise, the password fails to be obtained.
- Save the private key, for example, kp-123.pem, to a local directory.
PPK
Use the PuTTY tool to log in to the cloud server running the Linux operating system.
- On the PuTTY Key Generator page, choose File > Save private key.
- Save the private key, for example, kp-123.ppk, to a local directory.
After the public key and private key are correctly saved, you can import the key pair to the management console.
Ensure that there is no private key pair with the same name under the IAM user. If a private key with the same name already exists, a message will be displayed when you import an account key pair, indicating that the key pair name already exists. PKCS8 is supported for imported private keys. Convert the format if PKCS1 is used.
- Log in to the DEW console.
- Click
 in the upper left corner of the management console and select a region or project.
 - In the navigation pane on the left, click Key Pair Service.
- In the displayed Account Key Pairs tab, create or import a key pair as needed.
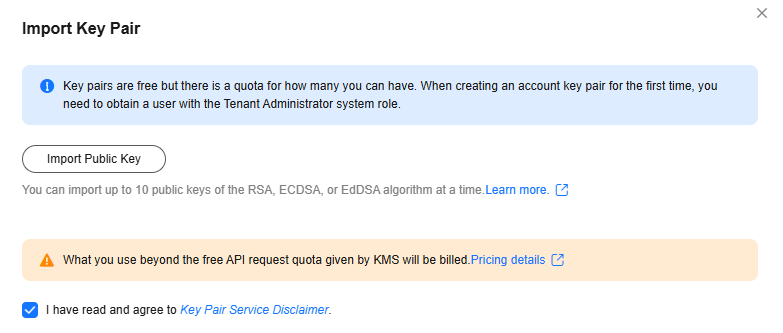
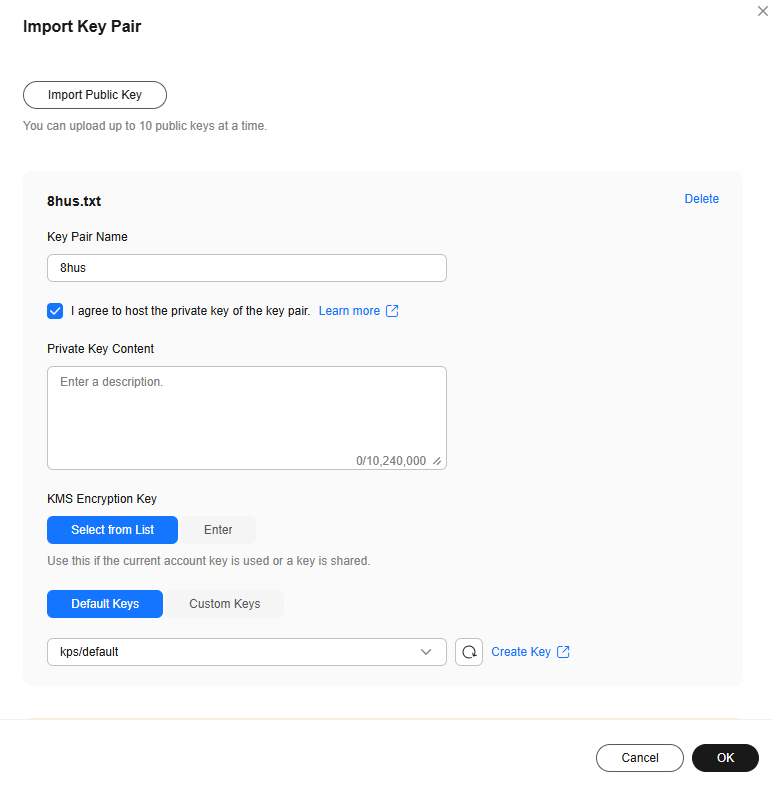
- Click Import Key Pair. In the displayed dialog box, click Import Public Key, as shown in Figure 5.

- Currently, a maximum of 10 public keys can be imported at a time.
- You can customize the name of an imported key pair.
- If a message is displayed, indicating that the name already exists, change the key pair name.
- Read and select I agree to host the private key of the key pair if needed, as shown in Figure 6. Skip this step if not needed.
- Copy and paste the private key content to the Private Key Content text box.
- Select an encryption key from the KMS encryption drop-down list box.
- Select from list: Select this if you want to use the key used or shared by the current account.
- Default Keys: KPS uses the default encryption key kps/default provided by KMS to encrypt private keys.
- Custom Keys: Select a custom key created on KMS to encrypt the private key. For details, see Creating a Key. To use a shared key created using RAM, accept the shared key, and select it from the bottom of the drop-down list, Shared is displayed next to the key name.
- Enter: Select this when you need to use an authorized key. Only the ID of a symmetric key is supported. After a grant is created, you can select this mode, and enter the key ID to use the authorized key for encryption. For details, see Creating a Grant.
- Select from list: Select this if you want to use the key used or shared by the current account.
- Read the Key Pair Service Disclaimer and select I have read and agree to the Key Pair Service Disclaimer.
- Click OK to import the key pair.
Deleting a Key Pair
You can delete a key pair if it is no longer used.
- A deleted key cannot be recovered. Therefore, exercise caution when performing this operation.
- The private key imported for a key pair will be deleted with it.
- If you delete the public key that has been bound to an ECS on the console and the private key has been saved locally, you can use the private key to log in to the ECS. The deletion operation does not affect the ECS login.
- In the navigation pane on the left, click Key Pair Service.
- Locate the target key pair and click Delete.
If you have upgraded the key pair to an account key pair, perform the following steps in the account key pair list.
- Enter DELETE in the confirmation dialog box if deletion verification is disabled and click OK.
If you have enabled deletion verification, select a verification mode, click Get Code, enter the code, and click OK.

To disable operation protection, go to the Security Settings page, click Disable next to Operation Protection in the Critical Operations tab, or click Disable Operation Protection on the deletion page.
Feedback
Was this page helpful?
Provide feedbackThank you very much for your feedback. We will continue working to improve the documentation.See the reply and handling status in My Cloud VOC.
For any further questions, feel free to contact us through the chatbot.
Chatbot

