
Transaction Verification with Homomorphic Encryption (Demo)
This section describes how to use the demo for transaction verification with homomorphic encryption.

This is a demo only and is not for actual use.
Procedure
- Buy a BCS instance.
Select a 4.x.x version (corresponding to Fabric v2.2) for Version, enter a blockchain name, and select ECDSA for Security Mechanism. Retain the default settings for the organization quantity and name.
- Change the chaincode container version.
- Click Instance Management, and click a target instance cluster where the homomorphic encryption chaincode will be installed.
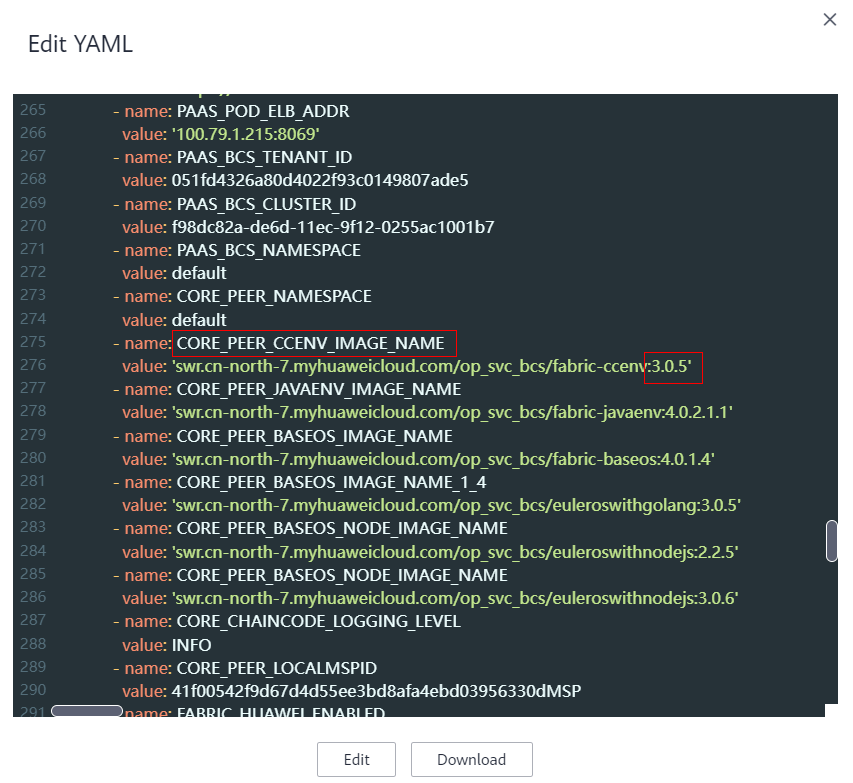
- Choose Workloads > StatefulSets. Select a target cluster, click More in the Operation column of a target peer workload, and click Edit YAML.

- Change the version number of CORE_PEER_CCENV_IMAGE_NAME to 3.0.5.
- Install and instantiate chaincodes.
Install and instantiate the demo chaincodes transaction.zip and IDChaincode.zip.
- To facilitate subsequent operations, name the chaincodes transaction and idchaincode.
- During chaincode installation, enter 1.0 for Chaincode Version (as shown in the demo chaincode), and set Golang for Language.
- If the chaincode is developed by yourself, use the chaincode library interface file api_ahe_cc.tar.gz.
- On the Instance Management page, click Download Client Configuration on an instance card.
- Select configuration files to download and set the parameters as follows:
- Select SDK Configuration File.
Chaincode Name: transaction
Certificate Path: /home/paas
Channel: channel
Member: organization
- Select Orderer Certificate.
- Select Peer Certificates, retain the default selection for Peer Organization, and select Administrator certificate.
- Select SDK Configuration File.
- Click Download.
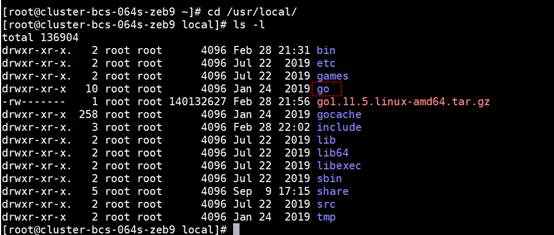
- Install Golang on the local server.
- Download the installation package go1.11.5.linux-amd64.tar.gz, upload it to the /usr/local directory on the local server, and decompress the package.
tar -zxvf go1.11.5.linux-amd64.tar.gz
- Add the following environment variables to the /etc/profile file:
export GOROOT=/usr/local/go
export PATH=$PATH:$GOROOT/bin
export GOPATH=/opt/gopath
export PAAS_CRYPTO_PATH=/opt/hao
export PAAS_SSL_ROOT=/opt/hao
- Run the following command to make the environment variables take effect:
source /etc/profile
- Download the installation package go1.11.5.linux-amd64.tar.gz, upload it to the /usr/local directory on the local server, and decompress the package.
- Compile appdemo.
- Go to the /opt/gopath directory (if this directory does not exist, create it manually), and upload the SDK library (sdk1.11.5.tar.gz), homomorphic encryption library (ahelib1.11.6.tar.gz), and OpenSSL library (openssl.tar.gz). Run the following command to decompress the packages to the current directory:
tar -zxvf xxx

- Go to the /opt/gopath/src/ahe/PSW/deps/lib directory and copy the files in the directory to the /usr/local/include/openssl/ directory (if this directory does not exist, create it manually).
- Go to the /opt/gopath/src/ahe/PSW/example/appdemo/ directory and run the go build command to compile the appdemo file.


- Go to the /opt/gopath directory (if this directory does not exist, create it manually), and upload the SDK library (sdk1.11.5.tar.gz), homomorphic encryption library (ahelib1.11.6.tar.gz), and OpenSSL library (openssl.tar.gz). Run the following command to decompress the packages to the current directory:
- Generate an image.
- Create a folder, for example, mkdir cj, in the /home/paas/ directory to generate an image.
- Decompress the package downloaded in 5. In the /home/paas/cj directory, upload the administrator certificates of the orderer and peers, and copy the appdemo file compiled in Step 6.3, OpenSSL library, SDK library, and Dockerfile to the current directory and decompress them.

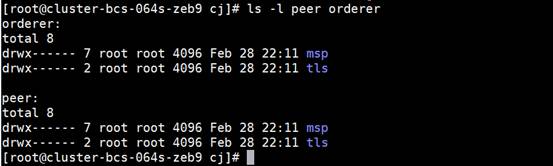
- Run the unzip xxx.zip command to decompress the administrator certificates of the orderer and peers. Move the decompressed certificate files respectively to the /home/paas/cj/orderer and /home/paas/cj/peer directories (if the directories do not exist, create them manually).
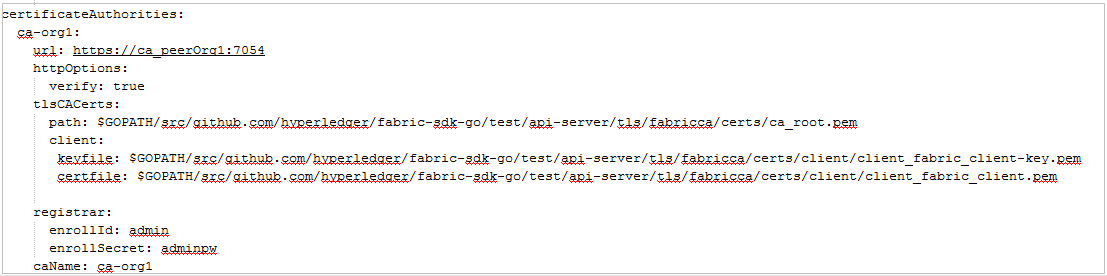
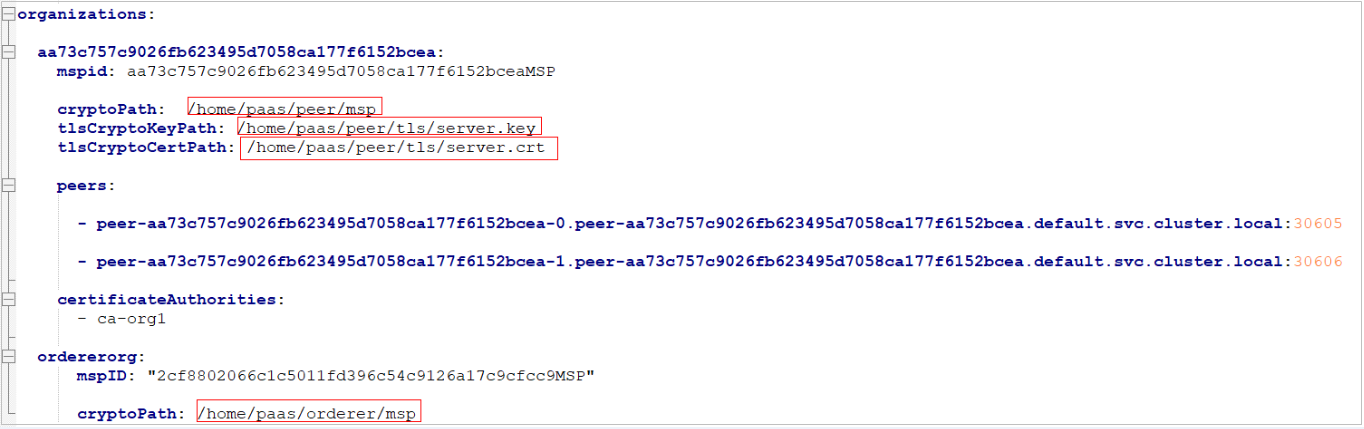
- Decompress the package downloaded in 5 to obtain a .yaml file from the sdk-config folder and modify the certificate path configuration in the file. For example:
- Delete the hash prefixes from the peer addresses in all paths. Change the peer addresses to the addresses shown in the following figure.
- Check the paths of the decompressed certificates. After the modification, the SDK configuration file does not contain paths with hash values.
- Delete the code (if any) in the certificateAuthorities section from the SDK configuration file, save the file, and upload the file to the /home/paas/cj directory.
 The following is an example of the modified SDK configuration file:
name: "global-trade-network"

x-type: "hlfv1"
x-loggingLevel: info

description: "The network to be in if you want to stay in the global trade business"

version: 1.0.0

client:

  organization: aa73c757c9026fb623495d7058ca177f6152bcea

  logging:
    level: info

  peer:
    timeout:
      connection: 10s
      queryResponse: 45s
      executeTxResponse: 120s
  eventService:
    timeout:
      connection: 10s
      registrationResponse: 50s
  orderer:
    timeout:
      connection: 10s
      response: 45s

  cryptoconfig:
    path: /opt/gopath/src/github.com/hyperledger/fabric

  credentialStore:
    path: "/tmp/hfc-kvs"

    cryptoStore:
      path: /tmp/msp

    wallet: wallet-name

  BCCSP:
    security:
     enabled: true
     default:
      provider: "SW"
     hashAlgorithm: "SHA2"
     softVerify: true
     ephemeral: false
     level: 256

channels:

  tongtai:
    orderers:

      - orderer-2cf8802066c1c5011fd396c54c9126a17c9cfcc9-0.orderer-2cf8802066c1c5011fd396c54c9126a17c9cfcc9.default.svc.cluster.local

    peers:

      peer-aa73c757c9026fb623495d7058ca177f6152bcea-0.peer-aa73c757c9026fb623495d7058ca177f6152bcea.default.svc.cluster.local:30605:
        endorsingPeer: true
        chaincodeQuery: true
        ledgerQuery: true
        eventSource: true

      peer-aa73c757c9026fb623495d7058ca177f6152bcea-1.peer-aa73c757c9026fb623495d7058ca177f6152bcea.default.svc.cluster.local:30606:
        endorsingPeer: true
        chaincodeQuery: true
        ledgerQuery: true
        eventSource: true

    chaincodes:
      - transaction:1.0

organization:

  aa73c757c9026fb623495d7058ca177f6152bcea:
    mspid: aa73c757c9026fb623495d7058ca177f6152bceaMSP

    cryptoPath:  /home/paas/peer/msp
    tlsCryptoKeyPath: /home/paas/peer/tls/server.key
    tlsCryptoCertPath: /home/paas/peer/tls/server.crt

    peers:

      - peer-aa73c757c9026fb623495d7058ca177f6152bcea-0.peer-aa73c757c9026fb623495d7058ca177f6152bcea.default.svc.cluster.local:30605

      - peer-aa73c757c9026fb623495d7058ca177f6152bcea-1.peer-aa73c757c9026fb623495d7058ca177f6152bcea.default.svc.cluster.local:30606

    certificateAuthorities:
      - ca-org1

  ordererorg:
      mspID: "2cf8802066c1c5011fd396c54c9126a17c9cfcc9MSP"

      cryptoPath: /home/paas/orderer/msp
orderer-eip: 49.4.81.160
orderers:

  orderer-2cf8802066c1c5011fd396c54c9126a17c9cfcc9-0.orderer-2cf8802066c1c5011fd396c54c9126a17c9cfcc9.default.svc.cluster.local:
    url: grpcs://49.4.81.160:30805

    grpcOptions:
      ssl-target-name-override: orderer-2cf8802066c1c5011fd396c54c9126a17c9cfcc9-0.orderer-2cf8802066c1c5011fd396c54c9126a17c9cfcc9.default.svc.cluster.local
      grpc-max-send-message-length: 15

    tlsCACerts:
      path: /home/paas/orderer/msp/tlscacerts/tlsca.2cf8802066c1c5011fd396c54c9126a17c9cfcc9-cert.pem

peers:


  peer-aa73c757c9026fb623495d7058ca177f6152bcea-0.peer-aa73c757c9026fb623495d7058ca177f6152bcea.default.svc.cluster.local:30605:


    url: grpcs://49.4.81.160:30605

    grpcOptions:
      ssl-target-name-override: peer-aa73c757c9026fb623495d7058ca177f6152bcea-0.peer-aa73c757c9026fb623495d7058ca177f6152bcea.default.svc.cluster.local
      grpc.http2.keepalive_time: 15

    tlsCACerts:
      path: /home/paas/peer/msp/tlscacerts/tlsca.aa73c757c9026fb623495d7058ca177f6152bcea-cert.pem


  peer-aa73c757c9026fb623495d7058ca177f6152bcea-1.peer-aa73c757c9026fb623495d7058ca177f6152bcea.default.svc.cluster.local:30606:


    url: grpcs://49.4.81.160:30606

    grpcOptions:
      ssl-target-name-override: peer-aa73c757c9026fb623495d7058ca177f6152bcea-1.peer-aa73c757c9026fb623495d7058ca177f6152bcea.default.svc.cluster.local
      grpc.http2.keepalive_time: 15

    tlsCACerts:
      path: /home/paas/peer/msp/tlscacerts/tlsca.aa73c757c9026fb623495d7058ca177f6152bcea-cert.pem
- Modify Dockerfile: Change the name to that of the .yaml file decompressed from the downloaded SDK.
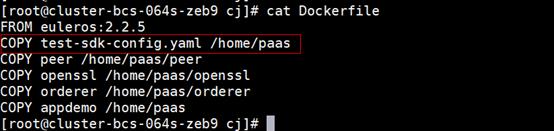
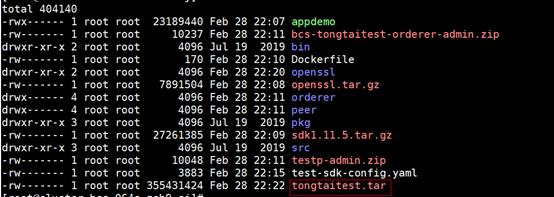
- In the /home/paas/cj/ directory, run the following commands to package all files into an image. Ensure that you have installed Docker in advance.
docker build -t tongtaidemotest:byl1 .
docker save tongtaidemotest:byl1>tongtaitest.tar
Ensure that the EulerOS 2.2.5 image already exists on the local PC. Otherwise, the packaging will fail.

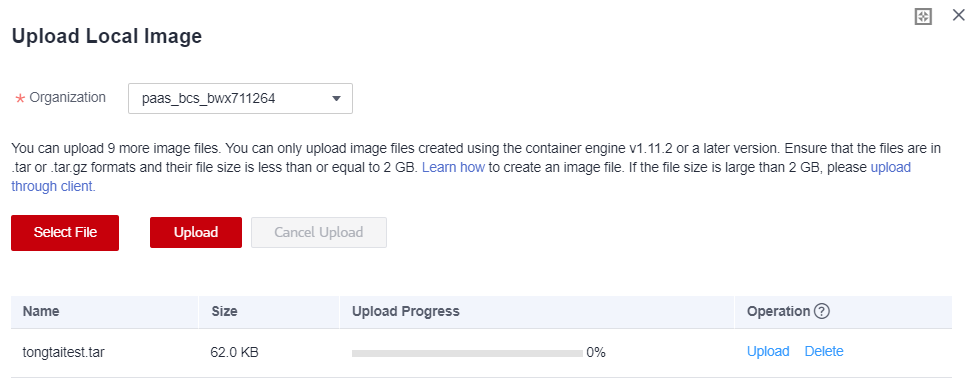
- Upload the image.
- Download the packaged image to the local PC. Log in to Huawei Cloud and go to the CCE console. Create a Deployment in the cluster where the BCS instance is deployed, setting the pod quantity to 1. Switch to the new CCE console in the upper right corner.


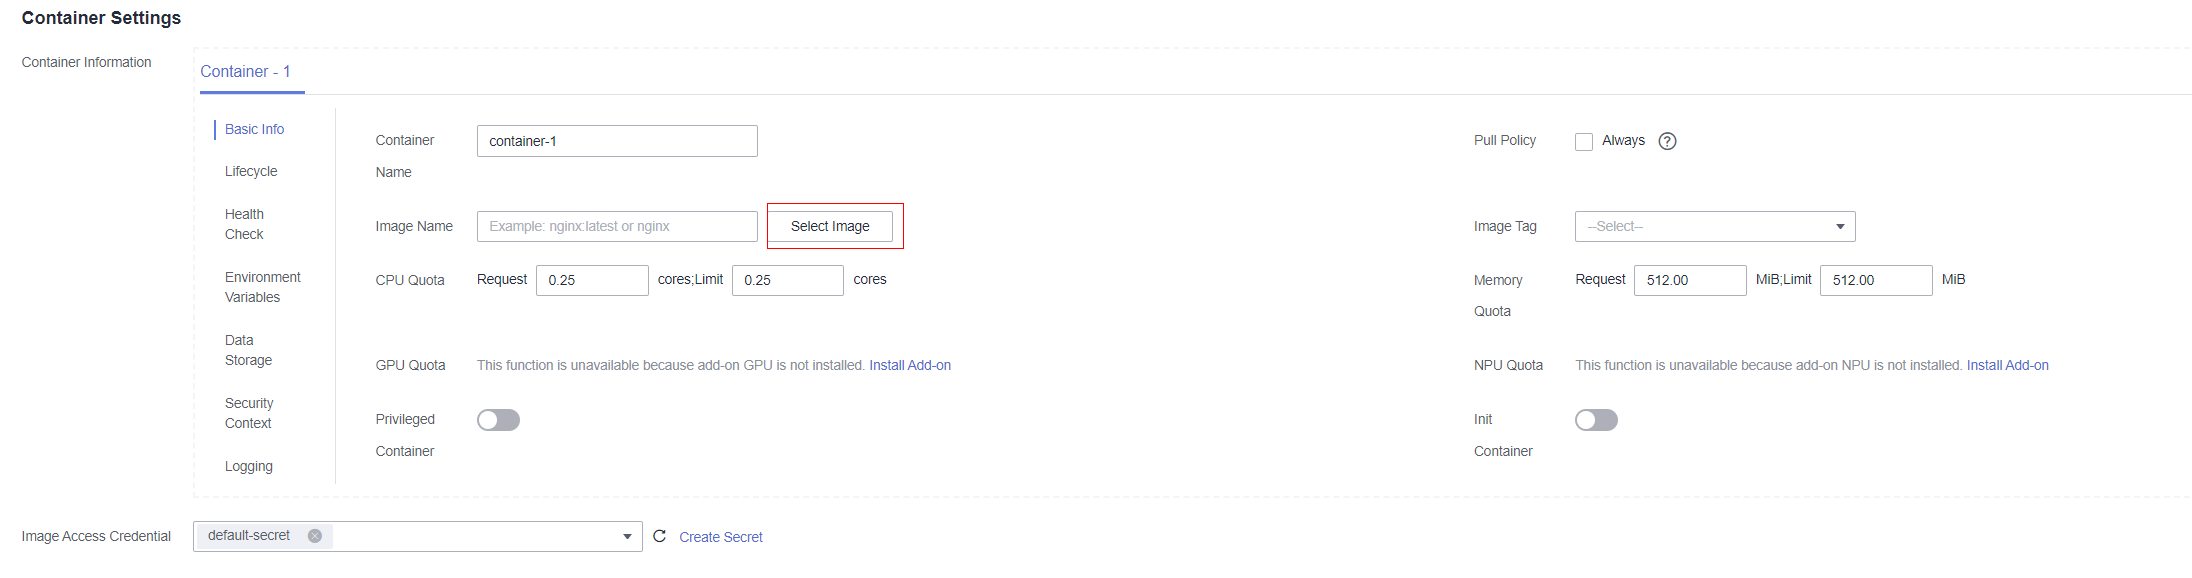
- On the Container Settings tab page, select an image.
- Click Upload Image. On the displayed Dashboard page, click Upload Image.
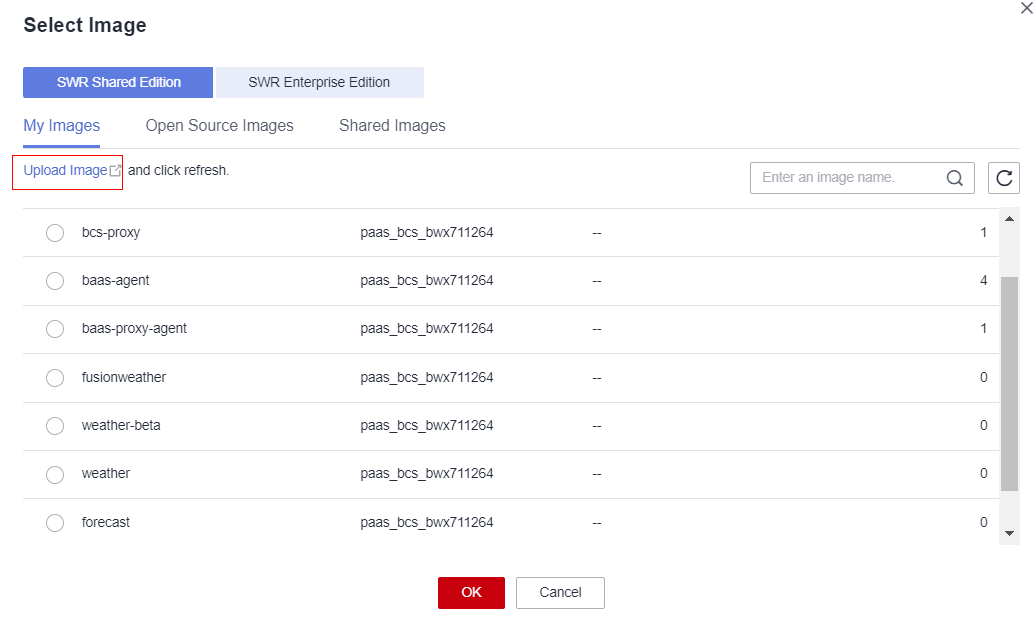

- Select the packaged image file and wait until the upload is completed.
- Then, go to the Select Image page, select the image, and click OK.

- On the Lifecycle tab page, set the Startup Command.
- Command: /bin/sh
- Args:
-c
sleep 10000

- Submit to create a Deployment. Save the settings.
- Download the packaged image to the local PC. Log in to Huawei Cloud and go to the CCE console. Create a Deployment in the cluster where the BCS instance is deployed, setting the pod quantity to 1. Switch to the new CCE console in the upper right corner.
- Verify transactions.
- Log in to the ECS where the cluster is deployed, and run the following command to check whether the application container is normal:
docker ps -a | grep tongtai |grep container

- You can view the name of the deployed application. Run the following command to access the container:
docker exec -it Container ID bash
- Add the domain name mapping between the orderer and peers to the /etc/hosts file.
Query the domains of the orderer and peers in the downloaded sdk.yaml file, and add "IP address + Domain of the orderer" and "IP address + Domain of each peer" to the end of the /etc/hosts file, as shown in the following figure.
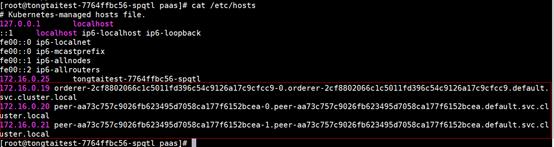
x.x.x.x orderer-2cf8802066c1c5011fd396c54c9126a17c9cfcc9-0.orderer-2cf8802066c1c5011fd396c54c9126a17c9cfcc9.default.svc.cluster.local
x.x.x.x peer-aa73c757c9026fb623495d7058ca177f6152bcea-0.peer-aa73c757c9026fb623495d7058ca177f6152bcea.default.svc.cluster.local
x.x.x.x peer-aa73c757c9026fb623495d7058ca177f6152bcea-1.peer-aa73c757c9026fb623495d7058ca177f6152bcea.default.svc.cluster.local
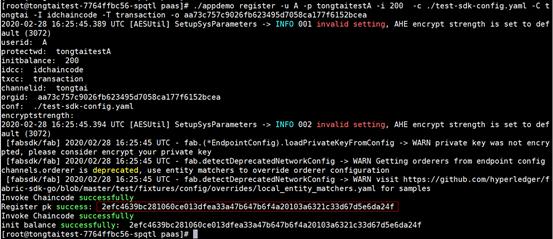
- Run the following commands to configure environment variables and view the registration command:
export LD_LIBRARY_PATH=$LD_LIBRARY_PATH:/home/paas/openssl
cd /home/paas
./appdemo register -h
- If you log out of the container during demo transactions, run the environment variable configuration commands again when logging in to the container next time.
- In the preceding command, ./appdemo register -h is used to view the registration command parameters.

- Log in to the ECS where the cluster is deployed, and run the following command to check whether the application container is normal:


Demo 1: Registering Accounts
- Run the following command to register account B with a balance of 100:
./appdemo register -u B -p tongtaitestB -i 100 -c ./test-sdk-config.yaml -C tongtai -I idchaincode -T transaction -o aa73c757c9026fb623495d7058ca177f6152bcea
-u: the registered user name (B).
-p: user B's password (tongtaitestB). The password must contain at least two types of the following: uppercase letters, lowercase letters, digits, and special characters.
-c: the SDK configuration file name.
-C: the name of a channel for installing the chaincode.
-I: the actual chaincode name used after installing the demo chaincode IDChaincode.
-T: the actual chaincode name used after installing the demo chaincode Transaction.
-o: the organization ID of the peer, which can be queried on the Channel Management page.
The parameter description is the same in the following demos.

The returned value is an encrypted address, for example:
b22edf18d64f57954640c8f3f6cf67d9401f262daead588ddfexxxxx
- Repeat the previous step to register account A with a balance of 200.
./appdemo register -u A -p tongtaitestA -i 200 -c ./test-sdk-config.yaml -C tongtai -I idchaincode -T transaction -o aa73c757c9026fb623495d7058ca177f6152bcea
The returned value is an encrypted address, for example:
2efc4639bc281060ce013dfea33a47b647b6f4a20103a6321c33dxxxxxx
Demo 2: Transferring Money from A to B
- Run the following command to transfer money (10) from A to B:
./appdemo transaction -u A -p tongtaitestA -b b22edf18d64f57954640c8f3f6cf67d9401f262daead588ddfe8178xxxx -t 10 -c ./test-sdk-config.yaml -C tongtai -I idchaincode -T transaction -o aa73c757c9026fb623495d7058ca177f6152bcea
The parameter after -b indicates the address of account B (the receiver), which is the value returned when registering account B.
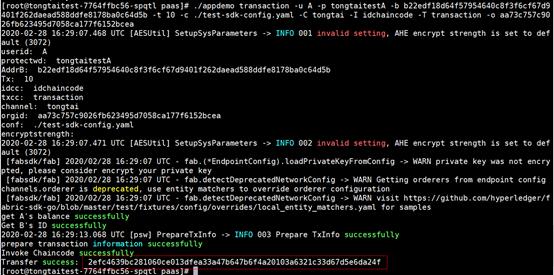
The return value is the address of account A: 2efc4639bc281060ce013dfea33a47b647b6f4a20103a6321c33d67d5xxxx.
Demo 3: Querying the Account Balance
- Run the following command to query the balance of account A:
./appdemo querybalance -p tongtaitestA -u A -c ./test-sdk-config.yaml -C tongtai -I idchaincode -T transaction -o aa73c757c9026fb623495d7058ca177f6152bcea

- Run the following command to query the balance of account B:
./appdemo querybalance -p tongtaitestB -u B -c ./test-sdk-config.yaml -C tongtai -I idchaincode -T transaction -o aa73c757c9026fb623495d7058ca177f6152bcea

Demo 4: Testing Additive Homomorphic Encryption
- Run the following command to test the additive homomorphic encryption:
./appdemo homoadd -c ./test-sdk-config.yaml -a 30 -b 60 -C tongtai -T transaction -o aa73c757c9026fb623495d7058ca177f6152bcea

The parameters after -a and -b are two numbers for additive homomorphic encryption.
Demo 5: Testing Multiplicative Homomorphic Encryption
- Run the following command to test the multiplicative homomorphic encryption:
./appdemo homomulti -c ./test-sdk-config.yaml -a 100 -b 5 -C tongtai -T transaction -o aa73c757c9026fb623495d7058ca177f6152bcea
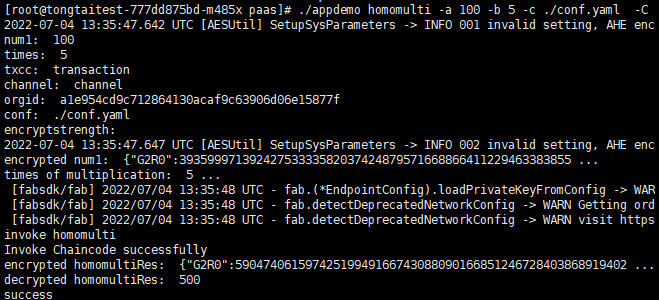
The parameters after -a and -b are multipliers for multiplicative homomorphic encryption. The value after -a is encrypted, while the one after -b is in plaintext.
Feedback
Was this page helpful?
Provide feedbackThank you very much for your feedback. We will continue working to improve the documentation.See the reply and handling status in My Cloud VOC.
For any further questions, feel free to contact us through the chatbot.
Chatbot


