How Can I Drain a GPU Node After Upgrading or Rolling Back the CCE AI Suite (NVIDIA GPU) Add-on?
Symptom
When GPU virtualization workloads are present on a GPU node, upgrading or rolling back the CCE AI Suite (NVIDIA GPU) add-on led to failures in upgrading or rolling back certain components like GPU virtualization and runtime components. To ensure smooth operation of the add-on, a drainage operation must be carried out on the GPU node to clear the GPU virtualization workloads. You are advised to follow the rolling drainage policy, which involves draining only one or a few GPU nodes at a time to avoid disrupting services on a large scale.
Solution
When draining a GPU node, make sure to reserve enough GPU resources on other nodes to meet pod scheduling needs. This helps avoid pod scheduling issues due to inadequate resources and ensures smooth service operation.
- Log in to the CCE console and click the cluster name to access the cluster Overview page.
- In the navigation pane, choose Cluster > Nodes. In the right pane, click the Nodes tab, locate the row containing the target GPU node, and choose More > Drain Node in the Operation column.
Figure 1 Draining a node

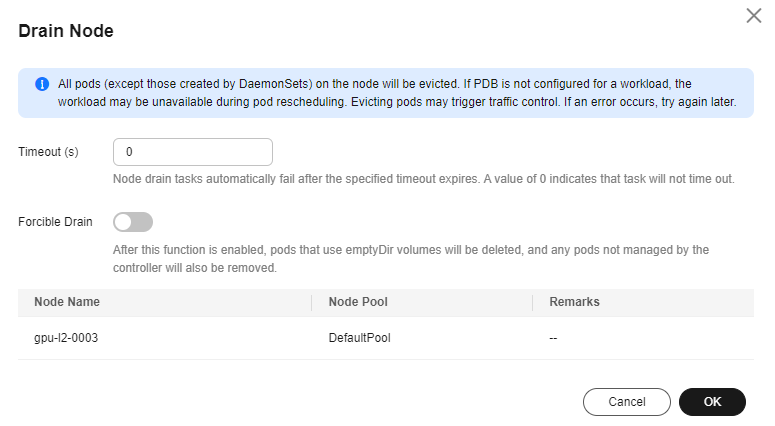
- In the Drain Node dialog box displayed, click OK. If there are pods with emptyDir volumes mounted or pods that are not managed by controllers, enable forcible drainage.
Figure 2 Configuring node drainage

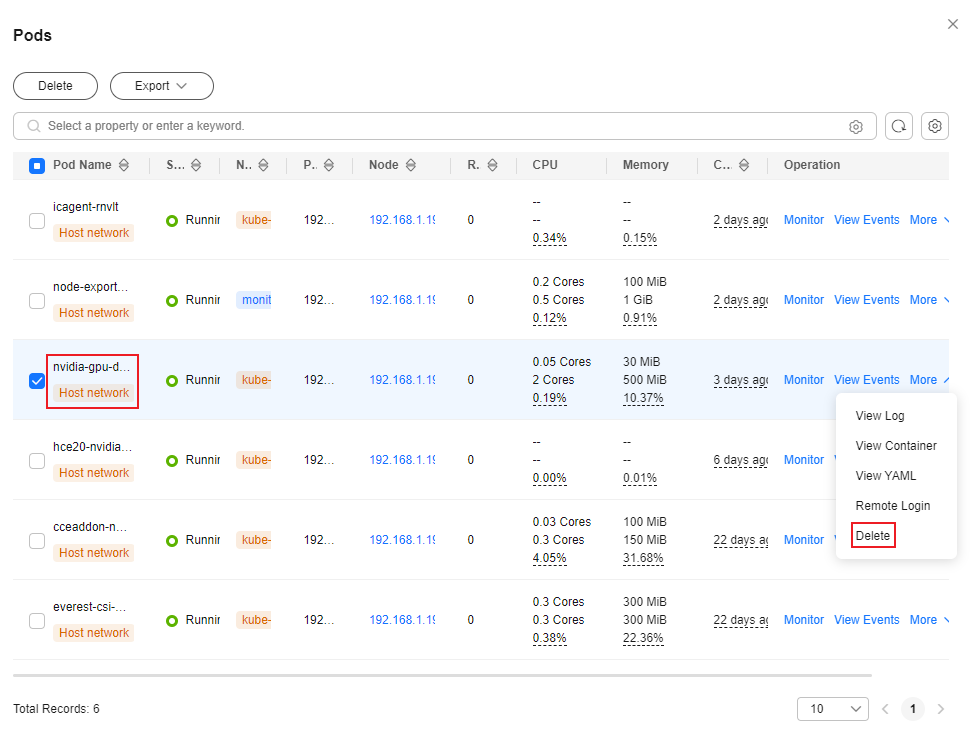
- In the node list, locate the row containing the GPU node and choose More > Pods in the Operation column. In the window that slides out from the right, locate the row containing the nvidia-gpu-device-plugin-xxx pod and choose More > Delete in the Operation column. In the Delete Pod dialog box displayed, click Yes.
You can see that the nvidia-gpu-device-plugin-xxx pod is in the Abnormal state. Once it transitions to the Running state and Drained appears in the Status column, the GPU virtualization workloads on the GPU node have been drained.Figure 3 Deleting the nvidia-gpu-device-plugin-xxx pod

- In the node list, locate the row containing the GPU node and choose More > Enable Scheduling in the Operation column. You can continue repeating the previous steps until all GPU nodes have been drained.
Feedback
Was this page helpful?
Provide feedbackThank you very much for your feedback. We will continue working to improve the documentation.See the reply and handling status in My Cloud VOC.
For any further questions, feel free to contact us through the chatbot.
Chatbot


