Python
Scenarios
To use Python to call an API through App authentication, obtain the Python SDK, create a new project, and then call the API by referring to the API calling example.
This section uses IntelliJ IDEA 2018.3.5 as an example.
Preparing the Environment
- You have obtained the domain name, request URL, and request method of the API as well as the key and secret (or AppKey and AppSecret of the client) of the integration application. For details, see Preparations.
- You have installed Python 2.7 or 3.X. If not, download the Python installation package from the Python official website and install it.
After Python is installed, run the pip command to install the requests library.
pip install requests

If a certificate error occurs during the installation, download the get-pip.py file to upgrade the pip environment, and try again.
- You have installed IntelliJ IDEA 2018.3.5 or later. If not, download IntelliJ IDEA from the IntelliJ IDEA official website and install it.
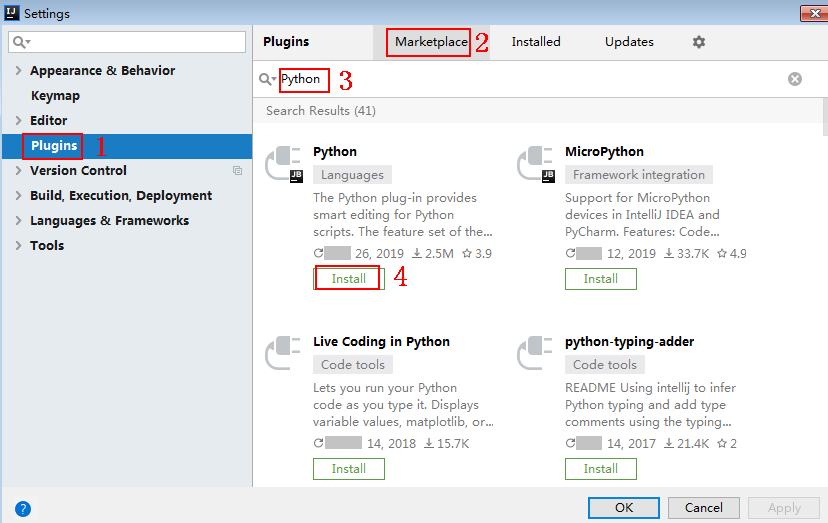
- You have installed the Python plug-in on IntelliJ IDEA. If not, install the Python plug-in according to Figure 1.
Obtaining the SDK
Log in to the ROMA Connect console, choose API Connect > API Calling, and download the SDK. The directory structure after the decompression is as follows:
|
Name |
Description |
|---|---|
|
apig_sdk\__init__.py |
SDK code |
|
apig_sdk\signer.py |
|
|
main.py |
Sample code |
|
backend_signature.py |
Sample code for backend signing |
|
licenses\license-requests |
Third-party licenses |
Creating a Project
- Start IDEA and choose File > New > Project.
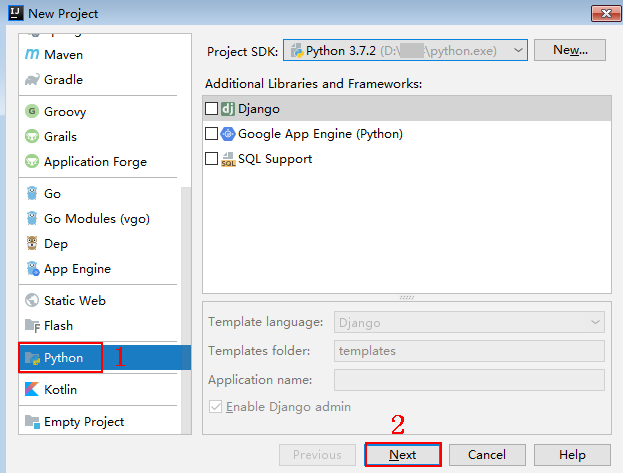
On the displayed New Project page, choose Python and click Next.
Figure 2 New Project
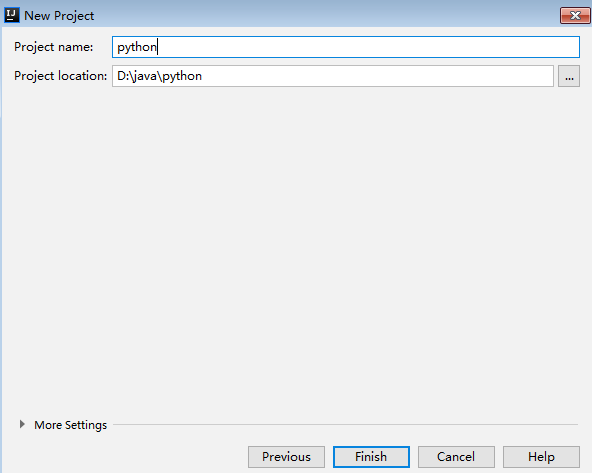
- Click Next. Click ..., select the directory where the SDK is decompressed, and click Finish.
Figure 3 Selecting the SDK directory after decompression

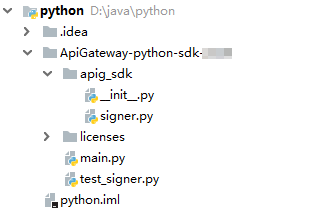
- View the directory structure shown in the following figure.
Figure 4 Directory structure of the new project

Modify the parameters in sample code main.py as required. For details about the sample code, see API Calling Example.
API Calling Example
- Import apig_sdk to the project.
1
2
from apig_sdk import signer
import requests
- Generate a new signer and enter the key and secret of the integration application.
1
2
3
sig = signer.Signer()
sig.Key = "4f5f626b-073f-402f-a1e0-e52171c6100c"
sig.Secret = "******"
- Generate a request, and specify the method, request URI, header, and request body.
1
2
3
4
r = signer.HttpRequest("POST",
                       "https://c967a237-cd6c-470e-906f-a8655461897e.apigw.exampleRegion.com/app1?a=1",
                       {"x-stage": "RELEASE"},
                       "body")
- Execute the following function to add the X-Sdk-Date and Authorization headers for signing:

X-Sdk-Date is a request header parameter required for signing requests.
1sig.Sign(r)
- Access the API and view the access result.
1
2
3
4
//If the subdomain name allocated by the system is used to access the API of HTTPS requests, add ,verify=False to the end of data=r.body to ignore the certificate verification.
resp = requests.request(r.method, r.scheme + "://" + r.host + r.uri, headers=r.headers, data=r.body)
print(resp.status_code, resp.reason)
print(resp.content)
Feedback
Was this page helpful?
Provide feedbackThank you very much for your feedback. We will continue working to improve the documentation.See the reply and handling status in My Cloud VOC.
For any further questions, feel free to contact us through the chatbot.
Chatbot


