
Creating a Notebook Instance (Old Page)
Before developing a model, create a notebook instance and access it for coding.
Constraints
- When a notebook instance is created, auto stop is enabled by default. The notebook instance will automatically stop at the specified time.
- Only running notebook instances can be accessed or stopped.
- By default, each IAM user can create a maximum of 10 notebook instances.
- For single-PU instances powered by Snt9b2x (like Snt9b23) or D310P-300 resource pools, EVS disks cannot be used to create notebook instances (when Storage is set to EVS).
- Notebook does not support open ports for external services.
Precautions
Being a commissioning environment, notebooks support downloading from the public network, but the public network proxy is used. Therefore, do not download large files (larger than 10 GB) in a notebook instance. Notebook provides limited public network access bandwidth, which ensures only network connectivity but not download speed.
Billing
- A running notebook instance will be billed based on used resources. The fees vary depending on your selected resources. For details, see Pricing Details. When a notebook instance is not used, stop it.
- If you select EVS for storage when creating a notebook instance, the EVS disk will be continuously billed if the instance is not deleted. Stop and delete the notebook instance and delete unused EVS resources to avoid unnecessary fees. For details, see Development Environment.
Procedure
- Log in to the ModelArts console. In the navigation pane on the left, choose Permission Management and check whether the access authorization has been configured. If not, configure access authorization. For details, see Configuring Agency Authorization for ModelArts with One Click. Figure 1 Viewing agency configurations

- Log in to the ModelArts console. In the navigation pane on the left, choose Development Workspace > Notebook.
- Click Create Notebook in the upper right corner. On the displayed page, configure the parameters.
- Configure the basic information of the notebook instance, including its name, description, and auto stop status. For details, see Table 1. Figure 2 Basic information of a notebook instance
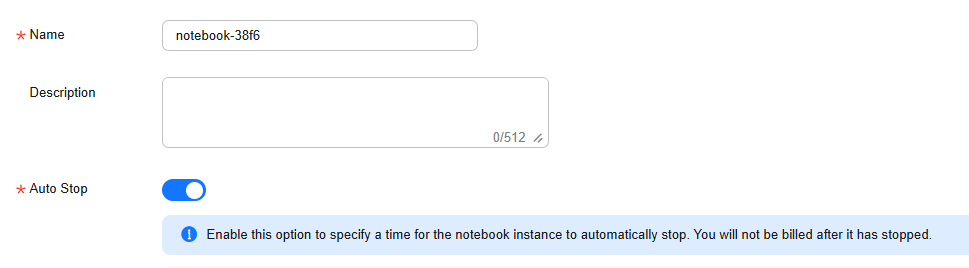
Table 1 Basic parameters Parameter
Description
Name
Name of the notebook instance, which is automatically generated by the system. You can rename it based on service requirements. A name consists of a maximum of 128 characters and cannot be empty. It can contain only digits, letters, underscores (_), and hyphens (-).
Description
Brief description of the notebook instance
Auto Stop
Automatically stops the notebook instance at a specified time. This function is enabled by default. The default value is 1 hour, indicating that the notebook instance automatically stops after running for 1 hour and its resource billing will stop then. The options are 1 hour, 2 hours, 4 hours, 6 hours, and Custom. You can select Custom to specify any integer from 1 to 72 hours.
- Stop as scheduled: If this option is enabled, the notebook instance automatically stops when the running duration exceeds the specified duration.
NOTE:To protect in-progress jobs, a notebook instance does not automatically stop immediately at the auto stop time. Instead, there is a 2 to 5 minutes delay for you to renew the auto stop time.
- Configure notebook parameters, such as the image and instance flavor. For details, see Table 2.
Table 2 Notebook instance parameters Parameter
Description
Image
Preset images and custom images are supported.
- Preset images are the AI engines built in ModelArts.
- You can use a custom image created by yourself. Use either of the following ways to create a custom image:
- Save the instance created using the public image and use it as a custom image. For details, see Saving a Notebook Instance.
- Create a custom image using a base, enterprise, or third-party image. To create a custom image, you must comply with the image specifications. After the build is complete, you must register the image on the Image Management page of ModelArts so that the image can be used in a notebook instance. For details, see Creating a Custom Image.
An image corresponds to an AI engine. When you select an image during instance creation, the AI engine is specified accordingly. Select an image as required. Enter a keyword of the image name in the search box on the right to quickly search for the image.
You can change an image on a stopped notebook instance.
JupyterLab Version
ModelArts notebook supports the following two versions of JupyterLab. The default version is JupyterLab 4.
- JupyterLab 4: This version has significantly improved user experience, functions, and performance. For details, see Upgrading JupyterLab.
- JupyterLab 3: Support for creating new notebook instances using 3.2.3 will be discontinued in October 2026. Additionally, technical support, including updates for new features, vulnerability/issue fixes, patch upgrades, service ticket guidance, and online troubleshooting, will no longer be provided. These services will no longer be applicable to the O&M assurance of ModelArts. You are advised to use JupyterLab 4.
Resource Type
Public and dedicated resource pools are available. A dedicated resource pool allows for mixed deployments using CPU, NPU, and GPU resources. If your node type supports both GPU and CPU, you can choose either GPU or CPU instance specifications.
- Public resource pool: It is billed based on the runtime of your notebook instances.
- Dedicated resource pool: The resources provided in a dedicated resource pool are exclusive and more controllable. In the Resource Pool area, click Select Resource Pool. On the Select Dedicated Resource Pool page, select a dedicated resource pool as required and click OK. If you do not have a dedicated resource pool, click Buy Dedicated Resource Pool in the lower part of the page to purchase a dedicated resource pool. For details about the parameters for purchasing a dedicated resource pool, see Creating a Standard Dedicated Resource Pool.
NOTE:If the dedicated resource pool you purchased is a single-node Tnt004 pool whose specification is GPU: 1*tnt004 | CPU: 8 vCPUs and 32 GiB (modelarts.vm.gpu._tnt004u8), when you use the cluster to create a notebook instance, the Tnt004 card is idle but is displayed as sold out or the creation fails due to insufficient resources, contact technical support.
Type
This parameter is displayed when Resource Type is set to Public resource pool. Processor type, which can be CPU or GPU.
The chips vary depending on the selected image.
GPUs deliver better performance that CPUs but at a higher cost. Select a chip type as needed.
Instance Specifications
The available resource specifications vary among chip types. Select the specifications based on your needs.
Storage
The value can be EVS, SFS, OBS, or PFS. Configure this parameter based on your needs.
NOTE:OBS and PFS are in the restricted use phase. To try them, submit a service ticket to request permission.
- EVS
Set a disk size based on service requirements. The default value is 5 GB. The maximum disk size is displayed on the GUI.
The EVS disk space is charged by GB from the time the notebook instance is created to the time the notebook instance is deleted.
-
Select this type only for a dedicated resource pool. SFS takes effect only after a dedicated resource pool can communicate with your VPC. For details, see Step 1: Creating a Network.
NOTE:For details about how to set permissions to access SFS Turbo folders, see Permissions Management.
- SFS: Select the created SFS Turbo file system (created on the SFS console).
- Cloud Mount Path: Retain the default value /home/ma-user/work/.
- Mounted Subdirectory: Select the storage path on SFS Turbo.
- Mount Method: This parameter is displayed when the folder control permission is granted for the user. The read/write or read-only permission is displayed based on the storage path on SFS Turbo.
- The value can be OBS or PFS.
Storage Path: Click Select to set the OBS path for storing notebook data. If you want to use existing files or data, upload them to the specified OBS path. Storage Path must be set to a specific directory in an OBS bucket rather than the root directory of the OBS bucket.
Secret: Select an existing secret or click Create on the right to create one. On the displayed DEW console, create a secret. Enter accessKeyId and secretAccessKey under Key, and enter the AKs/SKs obtained from My Credentials > Access Keys under Value.
Figure 3 Configuring the secret values NOTE:
NOTE:When using DEW secrets to mount storage, you must include 'accessKeyId' and 'secretAccessKey' (corresponding to your AK and SK, respectively). Ensure the information provided is correct, or the function may not work as expected.
EVS and SFS are all mounted to the /home/ma-user/work directory.
You can add a data storage path during the runtime of a notebook instance by referring to Dynamically Mounting an OBS Parallel File System.
The data is retained in /home/ma-user/work, even if the notebook instance is stopped or restarted.
When a notebook instance is deleted, the EVS storage is released and the stored data is not retained. SFS can be mounted to a new notebook instance and data can be retained.
Extended Storage
If you need multiple data storage paths, click Add Extended Storage to add more storage mount directories. You can add an OBS, PFS, or SFS directory.
Constraints:
- For each type, a maximum of five directories can be mounted.
- The directories must be unique and cannot be mounted to a blacklisted directory. Nested mounting is allowed. Blacklisted directories are those with the following prefixes:
/data/, /cache/, /dev/, /etc/, /bin/, /lib/, /sbin/, /modelarts/, /train-worker1-log/, /var/, /resource_info/, /usr/, /sys/, /run/, /tmp/, /infer/, and /opt/
After this parameter is configured, the notebook instance details page is displayed. Click Storage Storage > Extended Storage to view or edit the extended storage information. If the number of storage devices does not reach the maximum, you can click Add Extended Storage.
Remote SSH
- After you enable this function, you can remotely access the development environment of the notebook instance from your local development environment.
- When a notebook instance is stopped, you can update the SSH configuration on the instance details page.
NOTE:The notebook instances with remote SSH enabled have VS Code plug-ins (such as Python and Jupyter) and the VS Code server package pre-installed, which occupy about 1 GB persistent storage space.
Key Pair
Set a key pair after remote SSH is enabled.
Select an existing key pair.
Alternatively, click Create on the right of the text box to create one on the DEW console. On the displayed Create Account Key Pair page, configure the parameters.
After a notebook instance is created, you can change the key pair on the instance details page.
CAUTION:Download the created key pair and properly keep it. When you use a local IDE to remotely access the notebook development environment, the key pair is required for authentication.
VPC Access
After this function is enabled, the instance can be mounted to your VPC to implement access of multiple network planes.
Before using this function, you need to configure VPC fine-grained access authorization by referring to Creating an IAM User and Granting ModelArts Permissions. If you have the VPC Administrator permission, you do not need to set this parameter.
- VPC: Select an existing VPC from the drop-down list on the right or create a VPC as required.
- Subnet: After you select a VPC, the default subnet is displayed. Select an existing subnet from the drop-down list on the right or create a subnet as required.
- Security Group: Select an existing security group or create a security group.
- (Optional) Add tags to the notebook instance. Enter a tag key and value and click Add.
Table 3 Adding a tag Parameter
Description
Tags
ModelArts can work with Tag Management Service (TMS). When creating resource-consuming tasks in ModelArts, for example, training jobs, configure tags for these tasks so that ModelArts can use tags to manage resources by group.
For details about how to use tags, see How Does ModelArts Use Tags to Manage Resources by Group?
After adding a tag, you can view, modify, or delete the tag on the notebook instance details page.

You can select a predefined TMS tag from the tag drop-down list or customize a tag. Predefined tags are available to all service resources that support tags. Customized tags are available only to the service resources of the user who has created the tags.
- Configure the basic information of the notebook instance, including its name, description, and auto stop status. For details, see Table 1.
- Click Next.
- After confirming the parameter settings, click Submit.
Switch to the notebook instance list. The notebook instance is being created. It will take several minutes before its status changes to Running. Then, the notebook instance is created.
If an error occurs when you create or use a notebook instance, you can rectify the fault by referring to Troubleshooting and FAQs.
- In the notebook instance list, click the instance name. On the instance details page that is displayed, view the instance configuration.
When the SSH remote development feature is enabled and the notebook instance is in the Stopped state, you can click
 to the right of Authentication to update the key pair. For details about how to enable SSH remote development, see Configuring Remote SSH Connection for a Notebook Instance.Figure 4 Updating a key pair
In the Storage tab, click Mount Storage to mount an OBS parallel file system to the instance for reading data. For details, see Dynamically Mounting an OBS Parallel File System.
If an EVS disk is used, click Expansion on the right of Storage Capacity to dynamically expand the EVS disk capacity. For details, see Dynamically Expanding EVS Disk Capacity.
Accessing a Notebook Instance
Access a notebook instance in the Running state for coding.
- Online access: Use JupyterLab. For details, see Using a Notebook Instance for AI Development Through JupyterLab.
- Remotely accessed from a local IDE through VS Code. For details, see Using Notebook Instances Remotely Through VS Code.
- Remotely accessed from a local IDE through SSH. For details, see Using a Notebook Instance Remotely with SSH.
ModelArts notebook instances are started by ma-user by default. After you access the instance, the default working directory is /home/ma-user/work.
Most notebook instances in a dedicated resource pool are started as user root. The details are as follows:
- When you log in to the terminal as user root, the system automatically runs the source /home/ma-user/.bashrc command to synchronize the environment variables of user ma-user. To disable this function, set the environment variable export DISABLE_MA_USER_BASHRC to true in the custom image to prevent the /home/ma-user/.bashrc file from being loaded.
- If the instance is started by user root, only user root can be used for SSH remote connection. On the notebook instance details page, you can view the SSH remote development address. Figure 6 Using user root for SSH remote connection

Mounting Directories of Notebook Containers
When you use EVS storage when creating a notebook instance, the /home/ma-user/work directory is used as the workspace for persistent storage.
The data stored in only the work directory is retained after the instance is stopped or restarted. When you use a development environment, store the data for persistence in /home/ma-user/work.
For details about directory mounting of a notebook instance, see Table 4. The following mounting points are not saved when images are saved.
| Mount Point | Read Only | Remarks |
|---|---|---|
| /home/ma-user/work/ | No | Persistent directory of your data |
| /data | No | Mount directory of your PFS |
| /cache | No | Used to mount the hard disk of the host NVMe (supported by bare metal specifications) |
| /train-worker1-log | No | Compatible with training job debugging |
| /dev/shm | No | Used for PyTorch engine acceleration |
FAQ
- How do I use EVS in a development environment?
When creating a notebook instance, select a small-capacity EVS disk. You can scale out the disk as needed. For details, see Dynamically Expanding EVS Disk Capacity.
- How do I use an OBS parallel file system in a development environment?
When training data in a notebook instance, you can use the datasets mounted to a notebook container, and use an OBS parallel file system. For details, see Dynamically Mounting an OBS Parallel File System.
- How do I switch back to JupyterLab 3 if an error occurs during the startup of JupyterLab 4?
Locate the target instance in the list and click Start in the Operation column. In the displayed dialog box, select JupyterLab 3 and click OK.
- Can I use both JupyterLab 3 and 4 in a project? Not recommended. Each JupyterLab instance runs independently. Therefore, you need to create an instance for each version. To try different versions, you can start them in different containers or environments. Pay attention to the following:
- The configuration file and data path may vary according to the version. Ensure the independence of data and configuration.
- Running multiple versions at the same time may cause port conflicts or other resource competition problems.
- Can I use GDB in a notebook instance?
No. GDB needs Docker with privileged containers. For security purposes, the development environment does not allow privileged containers. Therefore, GDB cannot be used in notebook instances.
Feedback
Was this page helpful?
Provide feedbackThank you very much for your feedback. We will continue working to improve the documentation.See the reply and handling status in My Cloud VOC.
For any further questions, feel free to contact us through the chatbot.
Chatbot


