
Creating a Team Labeling Job
If you enable team labeling when creating a labeling job and assign a team to label the dataset, the system creates a labeling job based on the team by default. After creating the labeling job, you can view the job in the My Creations tab of the dataset.
You can also create a team labeling job and assign it to different members in the same team or to other labeling teams.
Methods
- Choose Data Preparation > Label Data on the console. When creating a labeling job, enable Team Labeling and select a team or task manager.
Figure 1 Enabling team labeling

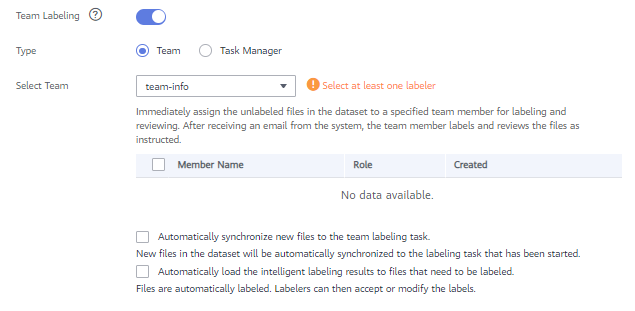
- Log in to the console and choose Asset Management > Datasets. Locate the target dataset and click Labeling in the Operation column. On the displayed Create Labeling Job page, enable Team Labeling. You can create multiple team labeling jobs for the same dataset.
Figure 2 Enabling team labeling


- Team members receive emails for team labeling jobs. No email will be sent when you create a labeling team or add members to a labeling team. Additionally, after all samples are labeled, no email will be sent when you create a team labeling job.
- After a labeling job is created, all unlabeled samples are assigned to the annotators randomly and non-repeatedly.
Procedure
You can create multiple team labeling jobs for the same dataset and assign them to different members in the same team or to other labeling teams.
- Log in to the ModelArts management console. In the navigation pane on the left, choose Asset Management > Datasets.
- In the dataset list, select a dataset that supports team labeling, and click the dataset name to go to the Dashboard tab of the dataset.
- In the Labeling Job area, view existing labeling jobs of the dataset. Click Create to create a job.
Alternatively, you can choose Asset Management > Label Data and click Create Labeling Job.
- On the displayed Create Labeling Job page, set parameters and click Create.
- Name: Enter a job name.
- Labeling Scene: Select the type of the labeling job.
- Label Set: All existing labels and label attributes of the dataset are displayed.
- Team Labeling: Click the button on the right and set the following parameters:
- Type: Select a job type, Team or Task Manager.
- Select Team: If Type is set to Team, select a team and members for labeling. The drop-down list displays the labeling teams and their members created by the current account.
- Select Task Manager: If Type is set to Task Manager, select one Team Manager member from all teams as the task manager.
- Automatically synchronize new files to the team labeling task: New files in the dataset will be automatically synchronized to the labeling job that has been started.
- Automatically load the intelligent labeling results to files that need to be labeled: Files are automatically labeled. Annotators can then accept or modify the labels.
The process of loading auto labeling results to a team labeling job is as follows:
- If you set Type to Team, you are required to create a team labeling task before executing the job.
- If you set Type to Task Manager, select a team labeling job on the My Participations tab page and click Assign Task.
Figure 3 Creating a team labeling task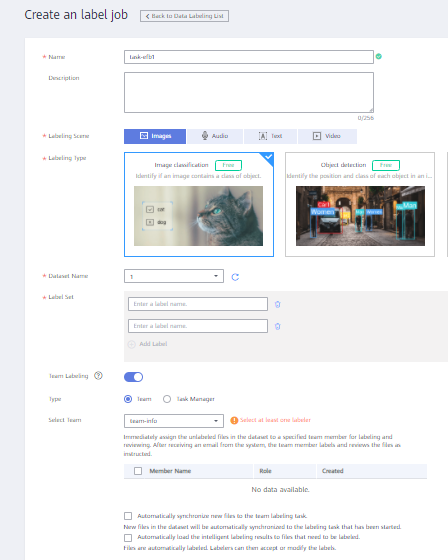
After the job is created, you can view the new job in the My Creations tab.
Logging In to ModelArts
Typically, users label data in Data Preparation of the ModelArts console. ModelArts provides data management capabilities such as dataset management, data labeling, data import and export, auto labeling, and team labeling and management. After a team labeling job is created, team members can log in to the ModelArts console to view the job.
- After a labeling job is created, receive a labeling notification email as a team member to which the job is assigned.
- Click the labeling job link in the email. The Data Preparation > Data Labeling > My Participations tab on the ModelArts console is displayed. If you have not logged in to the console, log in to it first.
- In the My Participations tab, you can view your labeling jobs.
Figure 4 My Participations

The following table lists the data labeling access addresses. If a team member has bound an email address, the team member can receive a job notification email and access the data labeling console using the address provided in the email.
|
Region |
URL of the Data Labeling Console |
|---|---|
|
CN-Hong Kong |
https://console-intl.huaweicloud.com/modelarts/?region=ap-southeast-1&locale=zh-cn#/dataLabel?tabActive=labelConsole |
|
AP-Singapore |
https://console-intl.huaweicloud.com/modelarts/?region=ap-southeast-3&locale=zh-cn#/dataLabel?tabActive=labelConsole |
|
AP-Bangkok |
https://console-intl.huaweicloud.com/modelarts/?region=ap-southeast-2&locale=zh-cn#/dataLabel?tabActive=labelConsole |
Upon your login, only the team labeling jobs and related data of the current user (the mailbox user) are displayed.
Starting a Team Labeling Job
After logging in to the data labeling page on the management console, you can click the My Participations tab to view the assigned labeling job and click the job name to go to the labeling page. The labeling method varies depending on the labeling job type. For details, see the following:
- Image Classification
- Object Detection
- Labeling Text (Text Classification)
- Labeling Text (Named Entity Recognition)
- Labeling Text (Text Triplet)
- Speech Paragraph Labeling
On the labeling page, each member can view the images that are not labeled, to be confirmed, rejected, to be reviewed, approved, and accepted. Pay attention to the images rejected by the administrator and the images to be corrected.
If the Reviewer role is assigned for a team labeling job, the labeling result needs to be reviewed. After the labeling result is reviewed, it is submitted to the administrator for acceptance.

Feedback
Was this page helpful?
Provide feedbackThank you very much for your feedback. We will continue working to improve the documentation.See the reply and handling status in My Cloud VOC.
For any further questions, feel free to contact us through the chatbot.
Chatbot


