Creating a Private Zone
Scenarios
To start hosting your private domain name in Huawei Cloud DNS, you first need to create a private zone to map the private domain name to a private IP address within a VPC.
Constraints
- Select a VPC that you want to associate with the private zone. Only ECSs in the selected VPC can access the private zone.
- The domain name of the private zone you want to create cannot conflict with the domain names configured in the DNS Resolver endpoint rules, and the VPCs to be associated with the private zone cannot conflict with the VPCs associated with the DNS Resolver endpoint rules.
For example, if the example.com domain name is configured in an endpoint rule and VPC A is associated with the endpoint rule, you cannot create a private zone for example.com and associate VPC A with the private zone.
Procedure
- Go to the Private Zones page.
- Click
 in the upper left corner and select the desired region and project.
 - In the upper right corner of the page, click Create Private Zone.
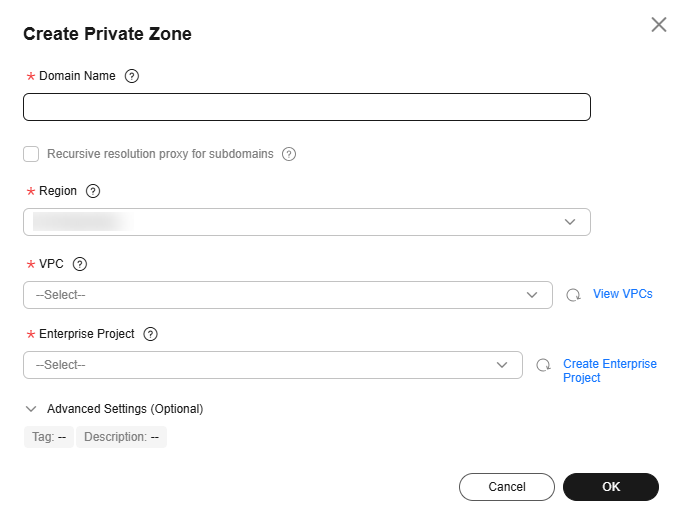
- Configure the parameters.
Figure 1 Creating a private zone
 Table 1 describes the parameters.
Table 1 Parameters for creating a private zone Parameter
Description
Example
Domain Name
Domain name you have planned for the ECS.
You can enter a top-level domain that complies with the domain naming rules.
example.com
Recursive resolution proxy for subdomains
If you select this option, when you query subdomains that are not configured in the zone namespace, DNS will forward the DNS queries to the Internet for recursive resolution and use the result from authoritative DNS servers.
-
Region
Region of the VPC associated with the private zone.
CN-Hong Kong
VPC
VPC to be associated with the private zone.
NOTE:This VPC you choose must be the VPC where your servers (such as ECSs) are. Otherwise, the domain name cannot be resolved.
-
Tag
Optional.
Identifier of the zone. Each tag contains a key and a value. You can add up to 20 tags to a zone.
For details about tag key and value requirements, see Table 2.
NOTE:If your organization has configured tag policies for the DNS service, you need to add tags to your private zones based on the tag policies. If you add a tag that does not comply with the tag policies, private zones may fail to be created. Contact the administrator to learn more about tag policies.
example_key1
example_value1
Description
(Optional) Supplementary information about the zone.
The description can contain a maximum of 255 characters.
This is a zone example.
Table 2 Tag key and value requirements Parameter
Requirements
Example
Key
- Cannot be left blank.
- Must be unique for each resource.
- Can contain a maximum of 128 characters.
- Cannot start or end with a space, or cannot start with _sys_. Only letters, digits, spaces, and the following special characters are allowed: _.:=+-@
example_key1
Value
- Can be left blank.
- Can contain a maximum of 255 characters.
- Can contain letters, digits, spaces, and special characters _ . : / = + - @.
example_value1
- Click OK.
- Switch back to the Private Zones page.
You can view the created private zone on the Private Zones page.
- On the Private Zones page, locate the private zone you created and click the domain name.
On the Record Sets tab, click Add Record Set.

You can click the domain name to view SOA and NS record sets automatically added to the zone.
- The SOA record set includes administrative information about your zone, as defined by the Domain Name System (DNS).
- The NS record set defines the authoritative DNS servers for the domain name.
Follow-up Operations
After a private zone is created, you can perform the following operations:
- Add record sets for it. For details, see Adding Record Sets for a Private Zone.
- Modify or delete the private zone, or view its details. For details, see Managing Private Zones.
Feedback
Was this page helpful?
Provide feedbackThank you very much for your feedback. We will continue working to improve the documentation.See the reply and handling status in My Cloud VOC.
For any further questions, feel free to contact us through the chatbot.
Chatbot


