
Restauração de um banco de dados e uma tabela de conjunto de réplicas para um ponto no tempo
Para garantir a integridade dos dados e reduzir o impacto no desempenho da instância original, o sistema restaura os dados completos e incrementais no ponto de tempo selecionado para uma instância temporária, exporta automaticamente os bancos de dados e tabelas a serem restaurados e, em seguida, restaura os bancos de dados e as tabelas para a instância original. O tempo necessário depende da quantidade de dados para backup e restauração na instância. Por favor, aguarde.
Restaurar bancos de dados e tabelas não substituirá os dados na instância. Você pode selecionar bancos de dados e tabelas a serem restaurados.
Precauções
- Atualmente, apenas as instâncias de conjuntos de réplicas da versão 4.0 ou posterior suportam a recuperação de ponto no tempo ao nível da base de dados e da tabela.
- Antes de executar a restauração, você precisa ativar a política de backup automático.
- Após uma restauração bem-sucedida, uma nova tabela chamada Original table name_bak_Timestamp é gerada na instância por padrão. Se a tabela contiver um índice, o namespace desse índice mudará para Original database name.Original table name_bak_Timestamp. Você poderá renomear a tabela posteriormente conforme necessário.
- Novos bancos de dados e tabelas serão gerados na instância de banco de dados original. Verifique se há espaço de armazenamento suficiente disponível.
- O comprimento de <Database name>.<Table name> não pode exceder 120 caracteres. O comprimento de <Database name>.<Table name>.<Index name> não pode exceder 128 caracteres, senão a restauração pode falhar.
- Certifique-se de que o nome da tabela restaurada é diferente do nome da tabela existente, senão a restauração pode falhar.
- Se você executar uma restauração no nível da tabela e a tabela não existir no ponto de tempo necessário, uma tabela vazia será criada automaticamente. Se você executar uma restauração no nível do banco de dados, a tabela ausente não será criada.
- Se o tráfego incremental de oplog for maior que 250 GB/h, a velocidade incremental de backup poderá não acompanhar a velocidade de geração de oplog. Como resultado, alguns pontos de tempo de restauração podem não estar disponíveis.
- Somente usuários da lista de permissões podem usar essa função. Você precisa enviar um tíquete de serviço para solicitar essa função. No canto superior direito do console de gerenciamento, escolha Service Tickets > Create Service Ticket para enviar um tíquete de serviço.
Restrições
- A restauração em nível de banco de dados e tabela está relacionada às especificações de CPU e memória. Para obter detalhes sobre o tamanho máximo de um único registro de dados que pode ser restaurado para um ponto de tempo especificado, consulte Tabela 1.
- Se uma restauração em nível de tabela e de banco de dados falhar, você poderá atualizar as especificações ou restaurar em lote os bancos de dados e tabelas para um ponto de tempo especificado.
| Tipo de CPU | Especificações | vCPUs | Memória (GB) | Tamanho máximo de um único registro de dados que pode ser restaurado em uma coleção |
|---|---|---|---|---|
| x86 | General-purpose | 2 | 4 | 400 KB |
| 2 | 8 | 800 KB | ||
| 4 | 8 | 1 MB | ||
| 4 | 16 | 1,3 MB | ||
| 8 | 16 | 1,3 MB | ||
| 8 | 32 | 2 MB | ||
| Enhanced II | 1 | 8 | 400 KB | |
| 2 | 8 | 800 KB | ||
| 2 | 16 | 800 KB | ||
| 4 | 16 | 1,3 MB | ||
| 4 | 32 | 1,3 MB | ||
| 8 | 32 | 2 MB | ||
| 8 | 64 | 3 MB | ||
| 16 | 64 | 4 MB | ||
| 16 | 128 | 7 MB | ||
| 32 | 128 | 7 MB | ||
| 32 | 256 | 10 MB | ||
| 64 | 256 | 10 MB | ||
| 64 | 512 | 16 MB | ||
| Kunpeng | - | 2 | 4 | 400 KB |
| - | 2 | 8 | 800 KB | |
| - | 4 | 8 | 1 MB | |
| - | 4 | 16 | 1,3 MB | |
| - | 8 | 16 | 1,3 MB | |
| - | 8 | 32 | 2 MB | |
| - | 16 | 32 | 2 MB | |
| - | 16 | 64 | 4 MB |
Procedimento
- Faça logon no console de gerenciamento.
- Clique em
 no canto superior esquerdo e selecione uma região e um projeto.
 - Clique em
 no canto superior esquerdo da página e escolha Databases > Document Database Service.
 - Na página Instances, clique na instância do conjunto de réplicas.
- No painel de navegação à esquerda, escolha Backups & Restorations.
- Na página Backups & Restorations, clique em Restore Database and Table.
- Na caixa de diálogo exibida, configure os parâmetros conforme necessário. Os dados no novo banco de dados e tabela são os mesmos que no banco de dados e tabela no ponto de tempo selecionado.
Tabela 2 Informações do banco de dados Parâmetro
Descrição
Date
Data em que o backup automático da instância de BD é gerado.
Time Range
Intervalo de tempo durante o qual o backup automático pode ser restaurado.
Time Point
O ponto específico no tempo em que o backup completo automático é gerado.
Base Time Range
Intervalo de tempo durante o qual o banco de dados e a tabela podem ser restaurados com base no backup completo automático.
Database and Table
Bancos de dados e tabelas que foram automaticamente copiados dentro do intervalo de tempo base são exibidos à esquerda. Selecione os bancos de dados e tabelas à esquerda para sincronizar as informações com a área à direita.
Time Point
O ponto no tempo dentro do intervalo de tempo base.
Custom Database and Table
Você pode adicionar bancos de dados e tabelas personalizados conforme necessário.
- Os bancos de dados do sistema não podem ser restaurados. Portanto, o nome do banco de dados não pode ser admin, local ou config.
- O nome do banco de dados não pode conter espaços e os seguintes caracteres especiais: ".$\/*?~#:|
- Um nome de tabela não pode usar "system" como prefixo.
- O comprimento de <Database name>.<Table name> não pode exceder 120 caracteres. O comprimento de <Database name>.<Table name>.<Index name> não pode exceder 128 caracteres, senão a restauração pode falhar.
- Certifique-se de que o nome da tabela restaurada é diferente do nome da tabela existente. Caso contrário, a restauração pode falhar.
- Após uma restauração bem-sucedida, uma nova tabela chamada Original table name_bak_Timestamp é gerada na instância por padrão. Se a tabela contiver um índice, o namespace desse índice mudará para Original database name.Original table name_bak_Timestamp. Você poderá renomear a tabela posteriormente conforme necessário.
Para distinguir o ponto no tempo dos bancos de dados personalizados e tabelas daqueles sincronizados à direita, defina o ponto no tempo para um valor diferente. O sistema restaura os dados para os bancos de dados personalizados e tabelas com base no tempo configurado aqui.
Type
Você pode restaurar dados em um banco de dados ou tabela.
Se você executar uma restauração no nível da tabela e a tabela não existir no ponto de tempo necessário, uma tabela vazia será criada automaticamente. Se você executar uma restauração no nível do banco de dados, os dados serão restaurados no banco de dados separadamente e a tabela não será criada.
Figura 1 Selecionar banco de dados e tabela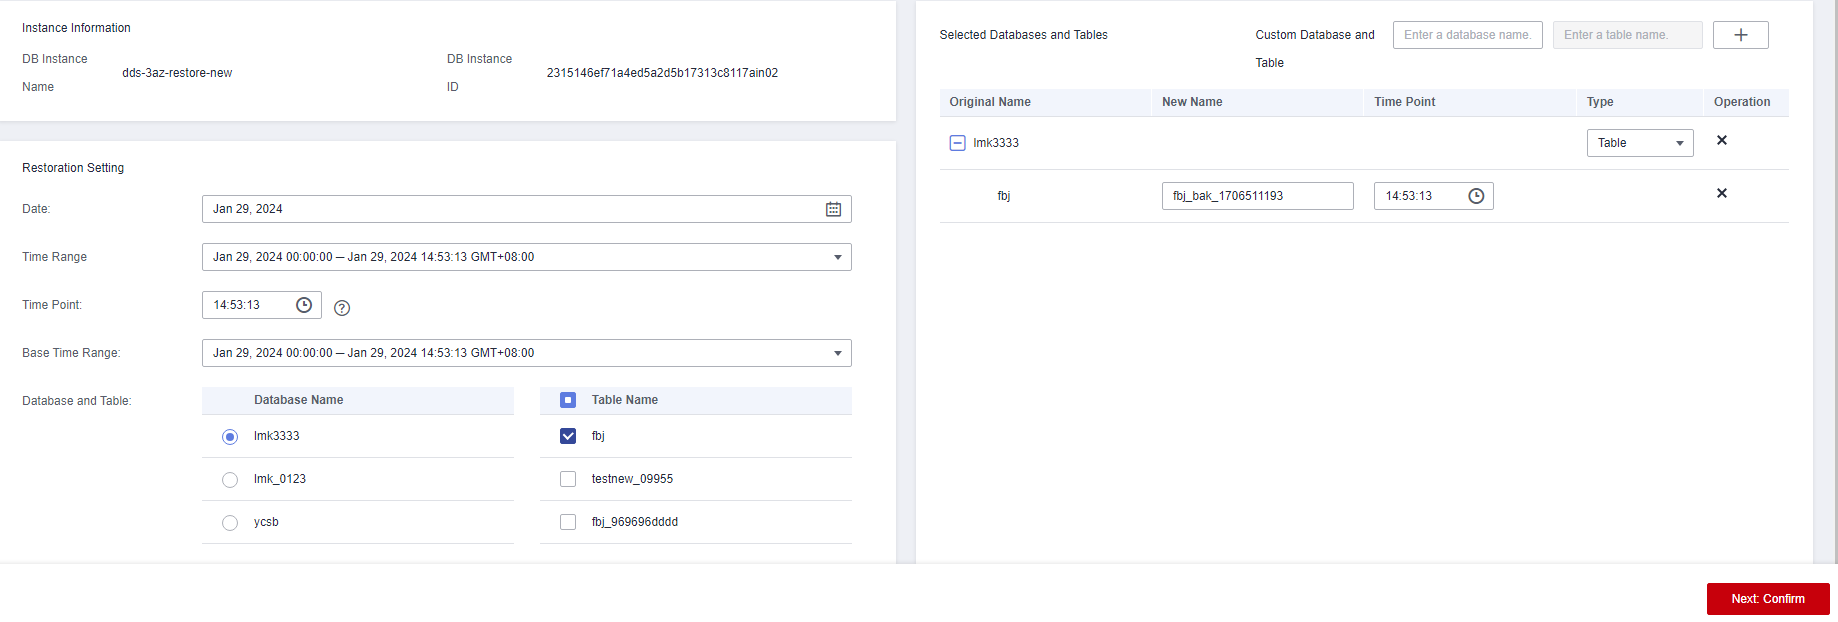
- Clique em Next: Confirm.
- Clique em Submit para iniciar a restauração. Figura 2 Confirmar a informação
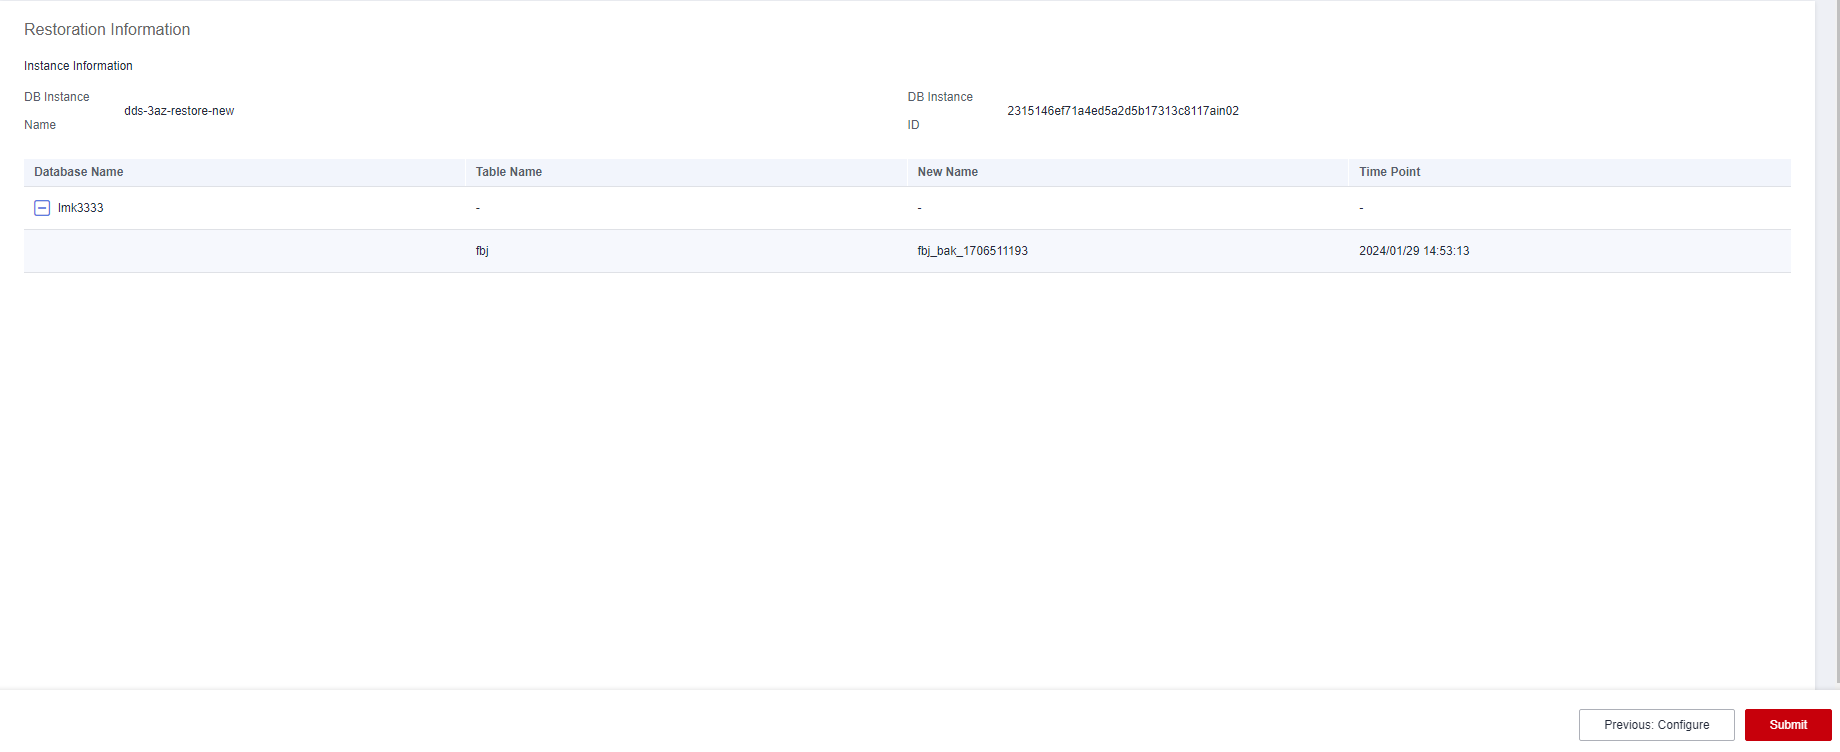
- Na página Instances, o status da instância de BD é Restoring. Durante o processo de restauração, os serviços não são interrompidos.
- Depois que a restauração for bem-sucedida, gerencie os dados no banco de dados e na tabela conforme necessário.
Se você precisar usar o banco de dados original e nomes de tabela, você pode usar uma operação de renomeação para fazer backup do banco de dados original e tabela e alternar o serviço para o banco de dados restaurado e tabela. Em seguida, elimine a base de dados original e tabela depois de garantir que os seus serviços são normais.
Exemplo:
db.adminCommand({renameCollection: "db1.test1", to: "db2.test2"})
O comando acima é usado para mover a tabela test1 do banco de dados db1 para o banco de dados db2 e renomear a tabela para test2.


