
Help Center/ DataArts Studio/ User Guide/ DataArts Factory/ Notebook Development (Old Functions Are Unavailable and New Functions Are Now Available)/ Uploading Files to JupyterLab/ Uploading OBS Files to JupyterLab
Updated on 2025-07-25 GMT+08:00
Uploading OBS Files to JupyterLab
In JupyterLab, you can download files from OBS to a notebook instance. Ensure that the file is not larger than 10 GB. Otherwise, the upload will fail.
- Use JupyterLab to open a running notebook instance.
- Click
 in the navigation bar on the top of the JupyterLab window. In the displayed window, click
  on the left to go to the OBS file upload page. Figure 1 File upload icon
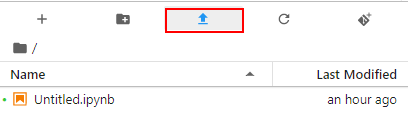 Figure 2 OBS file upload
- Set an OBS file path in either of the following ways:
- Method 1: Enter a valid OBS file path in the text box and click Upload. Figure 3 Entering a valid OBS file path


Enter an OBS file path instead of a folder path. Otherwise, the upload fails.
- Method 2: Open OBS File Browser, select an OBS file path, and click Upload. Figure 4 Uploading an OBS file

- Method 1: Enter a valid OBS file path in the text box and click Upload.
Troubleshooting
There are three typical scenarios in which uploading a file failed.
- Scenario 1
- The OBS path is set to a folder instead of a file path.
- The file in OBS is encrypted. In this case, go to the OBS console and ensure that the file is encrypted.
- The OBS bucket and notebook instance are not in the same region. Ensure that the OBS bucket to be read is in the same region as the notebook instance. You cannot access an OBS bucket in another region. For details, see Checking Whether an OBS Bucket and DataArts Studio Are in the Same Region.
- The OBS file has been deleted. In this case, make sure that the OBS file to be uploaded is available.
- Scenario 2 Figure 5 Upload failure

Possible cause:
The file name contains special characters such as <>'";\`=#$%^&.
- Scenario 3 Figure 6 Upload failure
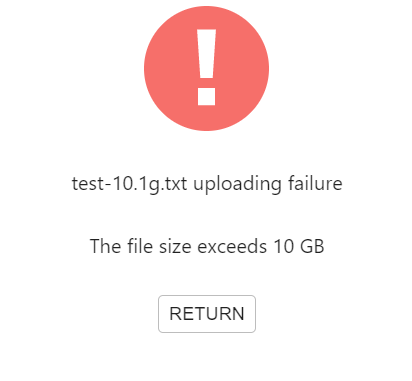
Possible cause:
The uploaded file is larger than 50 GB.
Parent topic: Uploading Files to JupyterLab
Feedback
Was this page helpful?
Provide feedbackThank you very much for your feedback. We will continue working to improve the documentation.See the reply and handling status in My Cloud VOC.
The system is busy. Please try again later.
For any further questions, feel free to contact us through the chatbot.
Chatbot


