
Common Functions
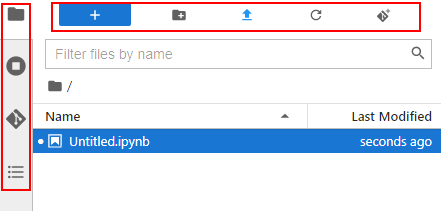
JupyterLab Homepage
To access JupyterLab from a running notebook instance, perform the following operations:
- Log in to the DataArts Studio console. In the navigation pane on the left, choose Data Development > Notebook.
- Click Open in the Operation column of a running notebook instance. The Launcher page is automatically displayed. Perform required operations. For details, see JupyterLab Documentation.Figure 1 JupyterLab homepage


The notebook and console kernels and versions displayed on the Launcher page vary depending on the AI engine based on which a notebook instance is created. The preceding figure shows an example only. Obtain the notebook and console kernels and versions on the management console.
- Notebook: Select a kernel for running notebook, for example, MRS, DLI Spark, or Python.
- Console: Call the terminal for command control.
- Other: Edit other files.
Creating an IPYNB File in JupyterLab
On the JupyterLab homepage, choose a proper AI engine in the Notebook area to create an IPYNB file.
The AI engines supported by each notebook instance vary depending on the runtime environment. The following figure is only an example. Select an AI engine based on site requirements.

The created IPYNB file is displayed in the navigation pane on the left.
Figure 5 Creating a file

Creating a File and Opening the Console
A console is essentially a Python terminal, which is similar to the native IDE of Python, displaying the output after a statement is entered.
On the JupyterLab homepage, click an applicable AI engine in the Console area to create a notebook file with the selected framework.
The AI engines supported by each notebook instance vary depending on the runtime environment. The following figure is only an example. Select an AI engine based on site requirements.

After the file is created, the console page is displayed.

Editing a File in JupyterLab
JupyterLab allows you to open multiple notebook instances or files (such as HTML, TXT, and Markdown files) in the same window and displays them on different tab pages.
In JupyterLab, you can customize the display of multiple files. In the file display area on the right, you can drag a file to adjust its position. Multiple files can be concurrently displayed.
When writing code in a notebook instance, you can create multiple views of a file to synchronously edit the file and view execution results in real time.
To open multiple views, open an IPYNB file and choose File > New View for Notebook.

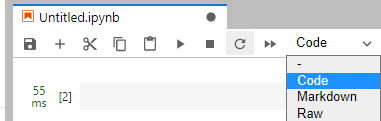
Enter the code in the code bar of the IPYNB file in JupyterLab and run the code.
Common JupyterLab Buttons and Plug-ins
| Button | Description |
|---|---|
|
| Add notebooks, terminals, or launchers. Quickly open the notebook or terminal page. Alternatively, open the Launcher page, on which you can quickly create notebook instances, consoles, or other files. |
|
| Create a folder. You can delete and rename folders. Hover over a folder name and right-click New File to create a .txt task. Hover over a folder name and right-click New Markdown File to create an .md task. |
|
| Upload files. |
|
| Refresh the file directory. |
|
| Git plug-in, which can be used to access the GitHub code library associated with the notebook instance. |


| Plug-in | Description |
|---|---|
|
| File Browser You can filter files by name. You can find files through fuzzy search. You can delete and rename files. Click this button to show all files in the notebook instance. |
|
| Running Terminals and Kernels: the terminals and kernels that are running in the current instance Open Tabs, Kernels, and Terminals are displayed. Open Tabs indicates the files that have been opened. |
|
| Git plug-in, which can be used to quickly access the GitHub code library. NOTE: You are not currently in a Git repository. To use Git, navigate to a local repository, initialize a repository here, or clone an existing repository.
|
|
| Table of Contents (document structure) |
|
| DataSource indicates Data Connections. Currently, only MRS Spark proxy connections are supported. From DataArts Management Center: Data connections are the MRS Spark proxy connections created in Management Center. NOTE: If notebooks are enabled, a connection is available for the MRS data source no matter whether the DataArts Factory module was selected during the creation of a connection in Management Center. |


| Button | Description |
|---|---|
| File | Actions related to files and directories, such as creating, closing, saving, reloading, renaming, exporting, and printing notebooks. |
| Edit | Actions related to editing code blocks in an IPYNB file, including undoing, redoing, cutting, copying, pasting, selecting, moving, merging, clearing, and searching for code blocks. |
| View | View-related actions. |
| Run | Actions for running code blocks, such as running selected code blocks and running all code blocks at a time. |
| Kernel | Actions for managing kernels, such as interrupting, restarting, shutting down, and changing a kernel. |
| Git | Actions on the Git plug-in, which can be used to quickly access the GitHub code library. |
| Tabs | A list of the open documents and activities in the dock panel. |
| Settings | Settings of JupyterLab |
| Help | A list of JupyterLab links. |


| Button | Description |
|---|---|
|
| Save the file. |
|
| Add a new cell. |
|
| Cut the selected cell. |
|
| Copy the selected cell. |
|
| Paste the selected cell. |
|
| Execute the selected cell. |
|
| Terminate a kernel. |
|
| Restart a kernel. |
|
| Restart a kernel and run all code of the current notebook again. |
|
| There are four options in the drop-down list: Code (Python code), Markdown (Markdown code, typically used for comments), Raw (a conversion tool), and - (not modified) |
|
| View historical code versions. |
|
| Git plug-in. The gray button indicates that the plug-in is unavailable in the current region. |
|
| Data connection. |
|
| Code running status. A solid circle indicates that the code is being executed. |
|
| Instance flavor. |
|
| Kernel for you to select. |


Using Code-based Plug-ins
The code parametrization plug-in simplifies notebook cases. You can quickly adjust parameters and train models based on notebook cases without complex code. This plug-in can be used to customize notebook cases for competitions and learning.
- The Add Form and Edit Form buttons are available only to the shortcut menu of code cells, The following figure shows the parameters for creating a main job. Figure 9 Viewing a code cell
- After opening new code, add a form before editing it. Figure 10 Shortcut menu of code cells

- If you click Add Form, a code cell will be split into the code and form edit area. Click Edit on the right of the form to change the default title.
- If you click Edit Form, four sub-options will be displayed: Add new form field, Hide code, Hide form, and Show all.
Table 5 Edit Form sub-options Edit Form Sub-option
Function
Add new form field
- The form field types include dropdown, input, and slider, Each time a field is added, the corresponding variable is added to the code and form areas. If a value in the form area is changed, the corresponding variable in the code area is also changed.
NOTE:When creating a dropdown form, click ADD Item and add at least two items.
- If the form field type is set to dropdown, the supported variable types are raw and string.
- If the form field type is set to input, the supported variable types are boolean, date, integer, number, raw, and string.
- If the form field type is set to slider, the minimum value, maximum value, and step can be set.
Hide code
Hide the code.
Hide form
Hide the forms.
Show all
Display both code and forms.
Feedback
Was this page helpful?
Provide feedbackThank you very much for your feedback. We will continue working to improve the documentation.See the reply and handling status in My Cloud VOC.
For any further questions, feel free to contact us through the chatbot.
Chatbot


