Uploading a Software Package to Release Repos
For details about the restrictions on uploading software packages, see constraints of CodeArts Artifact.
- Only files can be uploaded, folders cannot be uploaded, and directories cannot be automatically created.
For example, the a directory contains the aa file and b directory that contains the bb file, and the build package directory is set to a/**.
When the a directory is scanned, both aa and bb will be uploaded to the same directory, and the system will not create a b directory in release repos.
- To upload a folder, package it before adding the Upload to Release Repo action. You can package the folder by running the packaging command or adding the Run Shell Commands action.
Tutorial Video
This video shows how to build with Maven and upload the resulting software package to the release repo using the GUI.
Build on GUI
Add Upload to Release Repo, when configuring build actions. Set the parameters according to Table 1.
|
Parameter |
Description |
|---|---|
|
Action Name |
Assign a custom name to the build action. The name can contain:
|
|
Package Location |
Directory for storing the build result.
Examples:
|
|
Version |
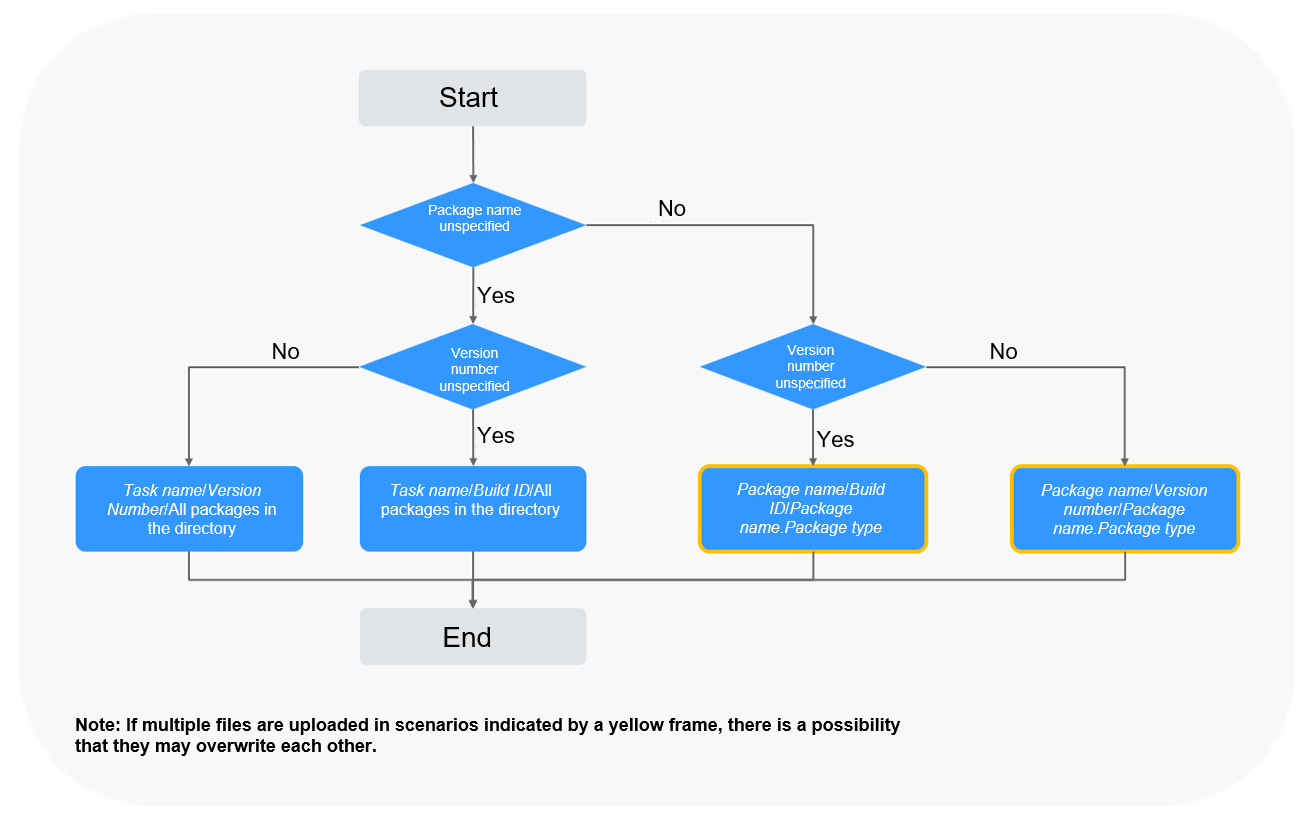
Optional. Set the name of the directory where the software package generated by the build task will be uploaded to the release repo.
|
|
Package Name |
Optional. Set the name for the software package generated by the build task. The name will be used when the package is uploaded to the release repo.
|
|
Custom Directory |
Optional. After you specify the custom upload directory, the uploaded software package is uploaded to the custom upload directory/version number/Software package name directory. |
|
Continue After Failure |
Specify whether to proceed after the current action fails by setting the parameter to either Yes or No. |
Build with Code
Modify the code in the BUILD block in Creating a YAML File for Your Code-based Build by referring to the following sample code:
1 2 3 4 5 6 7 8 9 10 |
version: 2.0 # The value must be 2.0. steps: BUILD: - upload_artifact: inputs: path: "**/target/*.?ar" version: 2.1 name: packageName custom_upload_path: /phoenix-sample-ci/ ignore_fail: true |
|
Parameter |
Type |
Description |
|---|---|---|
|
path |
String |
Directory for storing the build result.
Examples:
|
|
version |
String |
Optional. Enter the release version number. Not specified (recommended): Use the build number to name the directory for storing files uploaded to release repos. Specified: Files in the directory with the same name may be overwritten. |
|
name |
String |
Optional. Enter the name of the package generated during the build. Not specified (recommended): Use the original file name to name the file uploaded to release repos. Specified: A file may be overwritten when another file with the same name is uploaded. |
|
custom_upload_path |
String |
Optional. After you specify the custom upload directory, the uploaded software package is uploaded to the custom upload directory/version number/Software package name directory. |
|
ignore_fail |
String |
Whether to proceed after the current action fails.
|
How Release Versions and Package Names Impact Uploads

Feedback
Was this page helpful?
Provide feedbackThank you very much for your feedback. We will continue working to improve the documentation.See the reply and handling status in My Cloud VOC.
For any further questions, feel free to contact us through the chatbot.
Chatbot


