Adding an Event Source
Scenario
IT administrators can add event sources on the RTD web UI to access data from new event sources.
Procedure
- Log in to the RTD web UI as a service user and select a tenant. For details, see Accessing the RTDService Web UI.
- Choose Business Management > Basic Configuration > Event Source Management.
- Click Add and the parameters by referring to the following table.
You can use a template to create an event source. If the event source is of the stream processing service type, set its input and output to Kafka.
Table 1 Event source parameters Parameter
Description
Input Select
Event source input type. The options are as follows:
- HTTP
- KAFKA
Output Select
(Optional) Event source output type: KAFKANOTE:If this parameter is left blank, HTTP output is used by default.
Input TOPIC1
Topic of the input Kafka
NOTE:This parameter is mandatory when Input Select is set to KAFKA.
Output TOPIC1
Topic of the output Kafka
NOTE:This parameter is mandatory when Output Select is set to KAFKA.
Mode Select
Event source mode
- If Input Select is set to HTTP, the following event source modes are available:
- Real-time rule judgment decision-making flow
- Real-time rule scoring decision making flow
- Quasi-real-time data batch import decision-making flow
- Real-time model rule convergence decision-making flow
- User expansion decision-making flow
- If Input Select is set to KAFKA, the following event source modes are available:
- Quasi-real-time rule judgment decision making flow
- Quasi real-time rule scoring decision making flow
- Quasi-real-time model rule convergence decision making flow
- User expansion decision-making flow
- Customer Executor Configuration
- Customer Executor Plugin
Executor parameters
- Customer Executor Configuration
- Customer Executor Plugin (This parameter is available only when Mode Select is set to User expansion decision-making flow.)
NOTE:- You can click Download Template to download the corresponding template file, modify the file, and then import the parameters.
- Some regular parameters can be modified on the web UI. For details, see Modifying the Event Source Executor Configuration on the Web UI.
Table 2 Event source basic information Parameter
Description
Type
Event source type (transaction or behavior), which must be unique.
Trace Flag
Whether the output packet contains the calculation results of real-time query variables and batch variables.
- Variable calculation result
- Execution statistics
- Variable and rule exceptions
NOTE:
The parameters of the debugging configuration items of different types of event sources may be different.
Automatic Deployment
Whether the RTDExecutor corresponding to the event source is automatically deployed.- true: This function is enabled.
- false: This function is disabled.
Maximum Retention Period
Maximum retention period of real-time event data in MOTService. The default value is 7 days
Maximum Number of Records
Maximum number of real-time event data records each time deleted from a single partition in MOTService
The value must be an integer ranging from 100 to 10000. The default value is 1000.
Clearing Period
Clearing cycle of real-time event data in MOTService. The default value is 30 minutes.
HA DB
Select the MOT cluster you want to bind.
NOTE:- In active-active mode, you must specify the active/standby group. In active/standby mode, the active MOT cluster is used by default.
- The BLU preferentially processes service data in the bound MOT cluster. This improves service reliability and reduces loss caused by faults.
Description
Description of an event source.
Define Message Field
Custom message
Sharing
Whether the template is shared externally
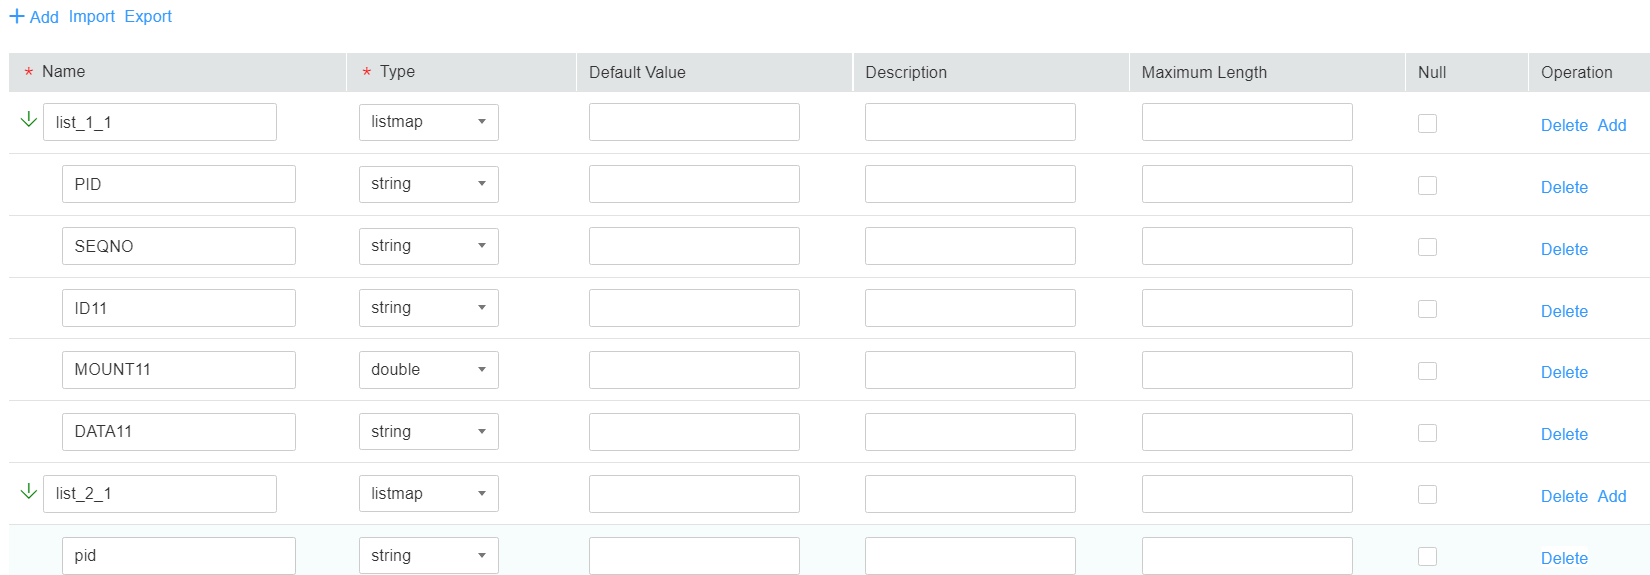
Click Define Message Field. In the Define Message Field pane, click Add to add a message field (including the name, type, and default value). Multi-level message fields can be added.
You can also click Import to import a definition file to create message fields.

- The file must be in *.json format and the encoding method must be UTF-8.
- If the type of a new message field in the event source is boolean, the field mapping type for table creation in the background database must be smallint.
Figure 1 Defining message fields
- Click Submit and Create Dimension Mapping to submit the event source and create a dimension mapping.
Click Add under Dimension Mapping.
- Specify parameters including Dimension Name, and specify Parent Dimension, Import or Not, Dimension Key, and Dimension Time, and Dimension Import Table.
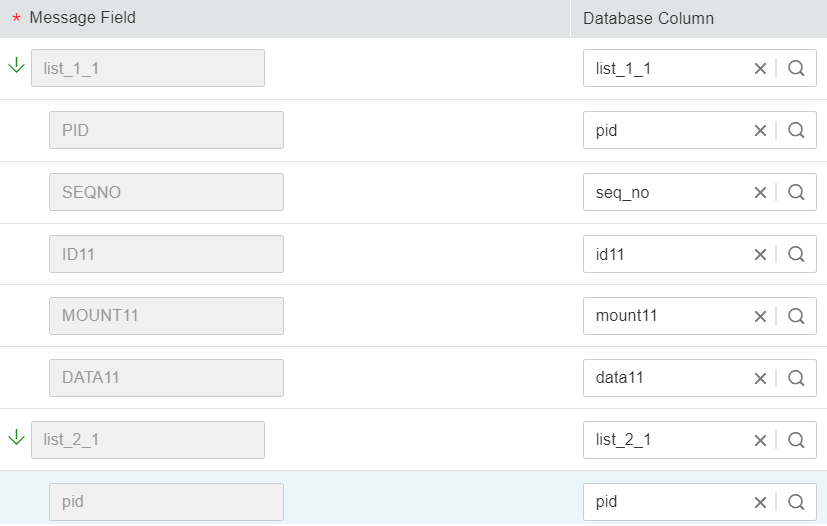
- Click Map Field. On the page that is displayed, you can view the mappings between message fields and database columns. Figure 2 shows mappings of multi-level message fields.
In the Map Field page, click Import to import a file to create event source dimension mappings.

- The file must be in *.json format and the encoding method must be UTF-8.
- If the type of a new message field in the event source is boolean, the field mapping type for table creation in the background database must be smallint.
- Click OK to complete the configuration, and then enter the name of the batch variable table.
- Click OK. You can view the event source list on the Event Source Management page, modify the dimension mappings, enable the traffic control function and the service maintenance function, and share templates.
Precautions for modifying dimension mappings:
Before you take a dimension mapping offline, you need to take all variables and rules associated with the event source mapped to the dimension offline. The sequence of taking variable and rule configuration offline is as follows:
Figure 3 Procedure
- (Optional) Configure the dimension filter.
A service administrator can configure hot data filter in each dimension and update the configuration to the BLU configuration file when the service is brought online. The decision-making service can match the data based on the configuration.
- On the Event Source Management page, click the name in the Map Operation column of the specified event source.
- In the displayed Dimension Operation window, click Dimension Filtering Configuration in the Operation column.
- In the displayed Dimension Mapping Filter dialog box, enter the parameters to search for hot data.

- The values can contain only digits, letters, and commas (,), and cannot start or end with a comma (,). Use commas (,) to separate multiple values, for example, 123, 321.
- These parameters will be used to match hot data in each dimension. If service data is matched, the system will not import the data to the database and variable and rule based calculations will be skipped. If service data is not matched, the system executes the operation normally.
- The result is recorded in the RTDExecutor_result.log file for tracing and locating.
- The dimension filtering function cannot be brought online or taken offline independently. Whether the function is available depends on the dimension mapping. When the function is brought online, the dimension filtering function is enabled. When the function is taken offline, the dimension filtering function is disabled.
- Click OK to save the dimension filtering configuration.
Feedback
Was this page helpful?
Provide feedbackThank you very much for your feedback. We will continue working to improve the documentation.See the reply and handling status in My Cloud VOC.
For any further questions, feel free to contact us through the chatbot.
Chatbot


