
Activating a Private CA
To use private CAs, you need to activate it first. Only activated private CAs can issue private certificates.
This topic describes how to activate a CA. You can activate a private CA instance and use it as root CA or a subordinate CA. If you activate a CA instance for the first time, you need to activate it as the root CA.
Prerequisites
- You have purchased a private CA instance. For details, see Buying a Private CA.
- The private CA is in the Pending activation state.
Activating a Root CA.
- Log in to the CCM console.
- In the navigation pane on the left, choose .
- Locate the row of the target CA and click Activate in the Operation column. On the Activate CA page, configure the required parameters.
Figure 1 CA settings
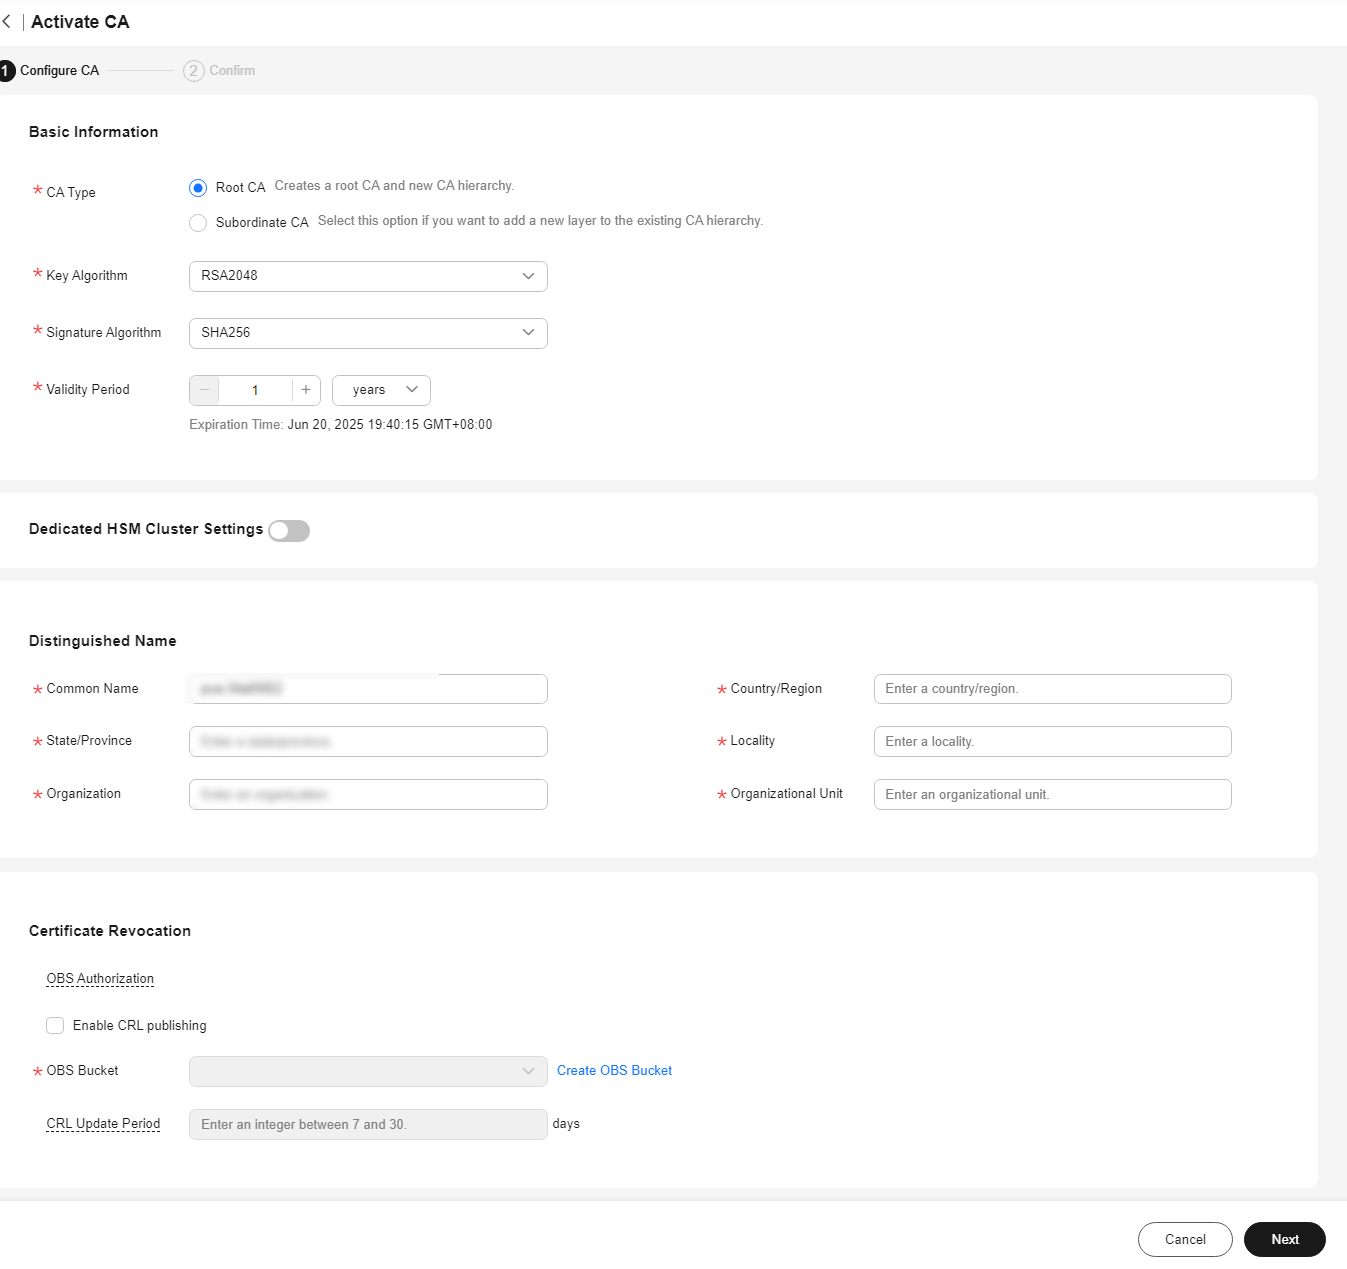
- CA Type: Select Root CA.
Root CA: Select this option if you want to create a CA hierarchy.
- Configure the following parameters.
Table 1 Parameters for activating a root CA Parameter
Description
Basic Information
Key Algorithm
Select a key algorithm from the drop-down list.
- RSA2048
- RSA3072
- RSA4096
- EC256
- EC384
Signature Algorithm
You can select any of the following hash algorithms:
- SHA256
- SHA384
- SHA512
- SHA256_PSS
- SHA384_PSS
- SHA512_PSS
Validity Period
The validity period of the private CA. Maximum validity period: 30 years.
Distinguished Name (DN)
Common Name
CA name you specify.
-
Country/Region
The country or region where your organization belongs. Enter the two-letter code of the country or region. For example, enter CN for China.
CN
State/Province
The name of the province or state where your organization is located.
ShenZhen
Locality
The name of the city where your organization is located.
GuangZhou
Organization
The legal name of your company.
-
Organizational Unit
The department of your company that the applicant belongs to.
Cloud Dept.
(Optional) Certificate Revocation
OBS Authorization
Whether to authorize PCA to access your OBS bucket and upload the CRL file.
If you want to authorize, click Authorize Now and complete the authorization as prompted.
If you want to cancel the authorization, go to the IAM console to delete the PCAAccessPrivateOBS agency from the agency list.
Once you complete the authorization, it will not be required again in the subsequent operations.
Enable CRL publishing
Whether to enable CRL publishing.
OBS Bucket
Select an OBS bucket you already have or click Create OBS Bucket to create one.
CRL Update Period
How often the CRL is updated. PCA will generate a new CRL at the specified time.
You can set the period to an integer between 7 and 30. If you do not specify a value, it is set to 7 days by default.
- CA Type: Select Root CA.
- Check the information and click Next.
- On the confirmation page, check the parameter settings again. Make sure all parameters are set correctly and click Confirm & Activate.
Activating a Subordinate CA through an Existing CA
- Log in to the CCM console.
- In the navigation pane on the left, choose .
- Locate the row of the subordinate CA and click Activate in the Operation column. On the Install CA Certificate and Activate CA page, configure the required parameters.
- To activate a subordinate CA, set the CA Type to Subordinate CA.
Subordinate CA: Select this option if you want to add a layer to the existing CA hierarchy.
- To activate a subordinate CA, you need to specify its parent CA.
Figure 2 Parent CA
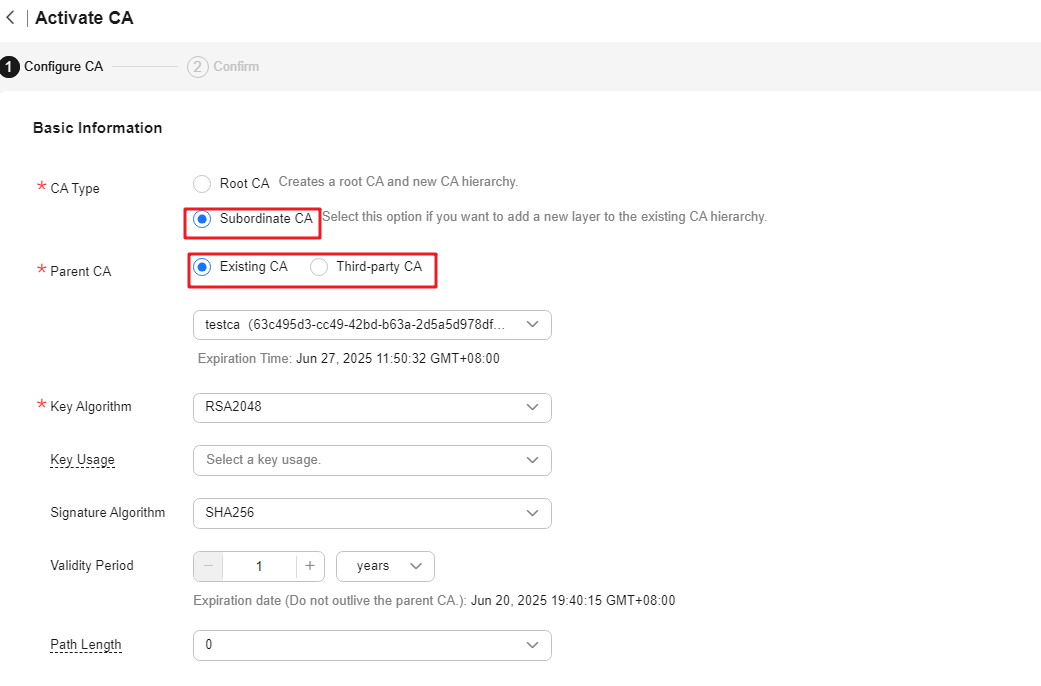
- Select Existing CA, select a CA you have created from the drop-down list box, and set the following parameters.
Parameter
Description
Basic Information
Key Algorithm
Select a key algorithm from the drop-down list.
- RSA2048
- RSA3072
- RSA4096
- EC256
- EC384
(Optional) Key Usage
Select a key usage.
- digitalSignature
- nonRepudiation
- keyEncipherment
- dataEncipherment
- keyAgreement
- keyCertSign
- cRLSign
- encipherOnly
- decipherOnly
Signature Algorithm
You can select any of the following hash algorithms:
- SHA256
- SHA384
- SHA512
- SHA256_PSS
- SHA384_PSS
- SHA512_PSS
Validity Period
The validity period of the private CA. Maximum validity period: 20 years.
Path Length
The path length of the subordinate CA. The path length controls how many layers of subordinate CAs the current subordinate CA can issue. (The last layer of the certificate chain is a private certificate).
NOTE:A certificate chain is made up of root CAs, subordinate CAs, and private certificates in a fixed sequence to validate the trust of a certificate at a lower layer.
Distinguished Name (DN)
Common Name
CA name you specify.
-
Country/Region
The country or region where your organization belongs. Enter the two-letter code of the country or region. For example, enter CN for China.
CN
State/Province
The name of the province or state where your organization is located.
ShenZhen
Locality
The name of the city where your organization is located.
GuangZhou
Organization
The legal name of your company.
-
Organizational Unit
The department of your company that the applicant belongs to.
Cloud Dept.
(Optional) Certificate Revocation
OBS Authorization
Whether to authorize PCA to access your OBS bucket and upload the CRL file.
If you want to authorize, click Authorize Now and complete the authorization as prompted.
If you want to cancel the authorization, go to the IAM console to delete the PCAAccessPrivateOBS agency from the agency list.
Once you complete the authorization, it will not be required again in the subsequent operations.
Enable CRL publishing
Whether to enable CRL publishing.
OBS Bucket
Select an OBS bucket you already have or click Create OBS Bucket to create an OBS bucket.
CRL Update Period
How often the CRL is updated. PCA will generate a new CRL at the specified time.
You can set the period to an integer between 7 and 30. If you do not specify a value, it is set to 7 days by default.
- Select Existing CA, select a CA you have created from the drop-down list box, and set the following parameters.
- To activate a subordinate CA, set the CA Type to Subordinate CA.
- Check the information and click Next.
- On the confirmation page, check the parameter settings again. Make sure all parameters are set correctly and click Confirm & Activate.
Activating a Subordinate CA from a Third-Party CA
- Log in to the CCM console.
- In the navigation pane on the left, choose .
- Locate the row of the subordinate CA and click Activate in the Operation column. On the Activate CA page, configure the required parameters.
- To activate a subordinate CA, set the CA Type to Subordinate CA.
Subordinate CA: Select this option if you want to add a layer to the existing CA hierarchy.
- To activate a subordinate CA, you need to specify its parent CA.
Figure 3 Parent CA
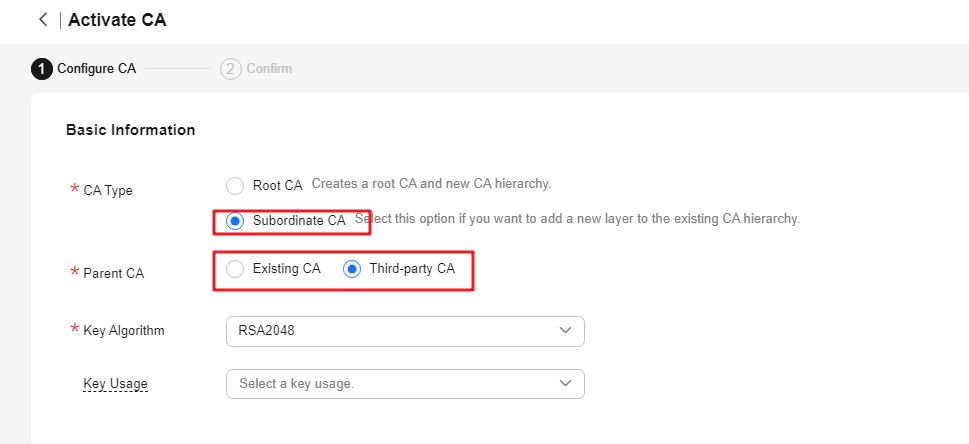
- Select Third-party CA and set the following parameters.
Parameter
Description
Basic Information
Key Algorithm
Select a key algorithm from the drop-down list.
- RSA2048
- RSA3072
- RSA4096
- EC256
- EC384
(Optional) Key Usage
Select a key usage.
- digitalSignature
- nonRepudiation
- keyEncipherment
- dataEncipherment
- keyAgreement
- keyCertSign
- cRLSign
- encipherOnly
- decipherOnly
Signature Algorithm
You can select any of the following hash algorithms:
- SHA256
- SHA384
- SHA512
- SHA256_PSS
- SHA384_PSS
- SHA512_PSS
Validity Period
The validity period of the private CA. Maximum validity period: 20 years.
Path Length
The path length of the subordinate CA. The path length controls how many layers of subordinate CAs the current subordinate CA can issue. (The last layer of the certificate chain is a private certificate).
NOTE:A certificate chain is made up of root CAs, subordinate CAs, and private certificates in a fixed sequence to validate the trust of a certificate at a lower layer.
Distinguished Name (DN)
Common Name
CA name you specify.
-
Country/Region
The country or region where your organization belongs. Enter the two-letter code of the country or region. For example, enter CN for China.
CN
State/Province
The name of the province or state where your organization is located.
ShenZhen
Locality
The name of the city where your organization is located.
GuangZhou
Organization
The legal name of your company.
-
Organizational Unit
The department of your company that the applicant belongs to.
Cloud Dept.
(Optional) Certificate Revocation
OBS Authorization
Whether to authorize PCA to access your OBS bucket and upload the CRL file.
If you want to authorize, click Authorize Now and complete the authorization as prompted.
If you want to cancel the authorization, go to the IAM console to delete the agency from the agency list.
Once you complete the authorization, it will not be required again in the subsequent operations.
Enable CRL publishing
Whether to enable CRL publishing.
OBS Bucket
Select an OBS bucket you already have or click Create OBS Bucket to create an OBS bucket.
CRL Update Period
How often the CRL is updated. PCA will generate a new CRL at the specified time.
You can set the period to an integer between 7 and 30. If you do not specify a value, it is set to 7 days by default.
- Select Third-party CA and set the following parameters.
- To activate a subordinate CA, set the CA Type to Subordinate CA.
- Check the information and click Save and Next.
- Check the information again and complete required parameters.
Figure 4 Third-Party CA
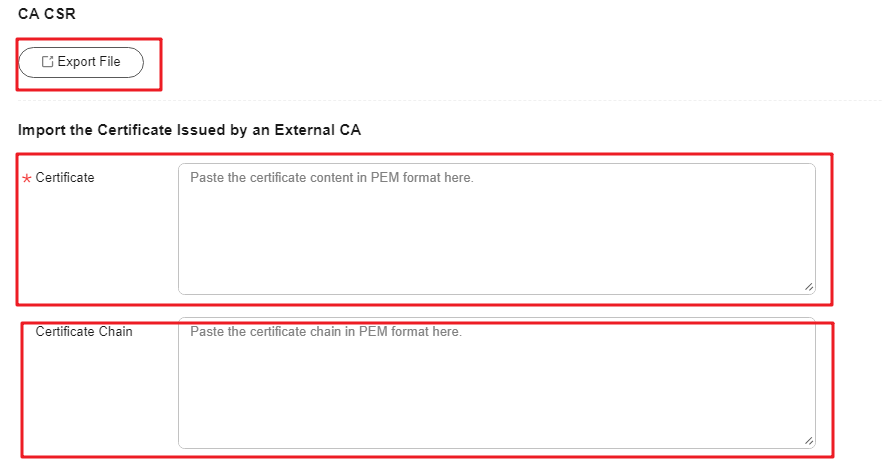
- Export the CSR.
On the CA CSR pane, click Export File.
The PEM CSR is exported to a file and is signed by a parent CA.
- Use an external CA to issue a certificate.
Use your private CA to issue a certificate for the subordinate private CA you want to activate.
- Import the certificate.
Import the certificate and certificate chain in the Import the Certificate Issued by an External CA pane.
Table 2 Parameter descriptions Parameter
Description
Certificate
Open the PEM file in the certificate to be uploaded as a text file with the extension .pem and copy the certificate content to this text box.
Certificate Chain
Open the PEM file in the certificate to be uploaded as a text file with the extension .pem and copy the certificate chain to this text box.
- Export the CSR.
- Check the settings and click Confirm & Activate. The subordinate CA is activated.
Follow-up Operations
You can use an activated subordinate CA to issue private certificates. For details, see Applying for a Private Certificate.
Feedback
Was this page helpful?
Provide feedbackThank you very much for your feedback. We will continue working to improve the documentation.See the reply and handling status in My Cloud VOC.
For any further questions, feel free to contact us through the chatbot.
Chatbot


