Registering an ISO File (Linux)
Scenarios
This section describes how to register an external ISO file as a private image (ISO image) on the cloud platform. Before registering an image, upload the ISO file to an OBS bucket.
Constraints
- To create a Kunpeng server image, set Architecture to ARM and ensure that Kunpeng ECSs can be created in the current region.
- To create an x86 server image that supports V6 CPUs, set Boot Mode to UEFI.
Prerequisite
- The file to be registered must be in ISO format.
- The ISO image file has been uploaded to an OBS bucket.

The name of the ISO image file can contain only letters, digits, hyphens (-), and underscores (_). If the name does not meet requirements, change it.
Procedure
- Log in to the management console.
- Under Compute, click Image Management Service.
The IMS console is displayed.
- Click Create Image in the upper right corner.
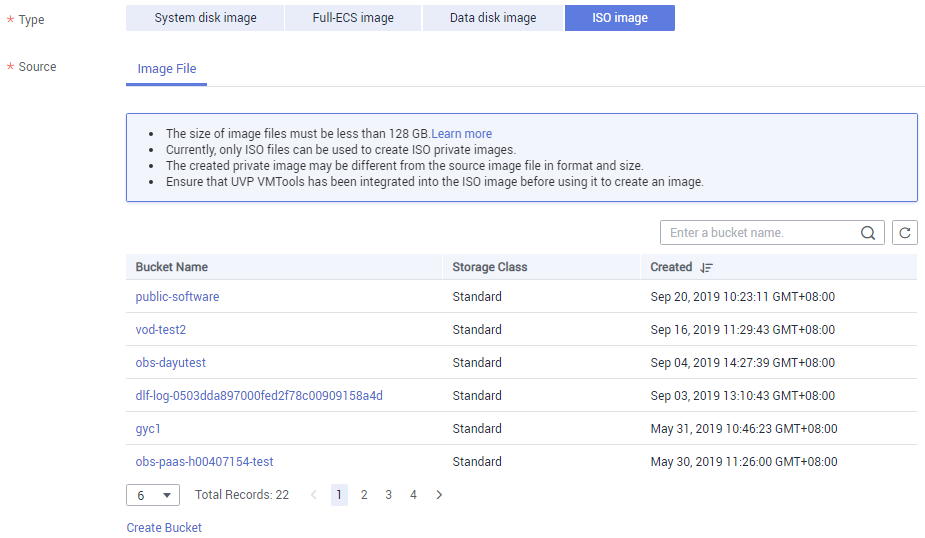
- In the Image Type and Source area, select ISO image for Type.
- In the image file list, select the bucket and then the image file.
Figure 1 Creating a private image from an ISO file

- In the Image Information area, set the following parameters.
- Boot Mode: Select BIOS or UEFI. Ensure that the selected boot mode is the same as that in the image file, or the BMSs created from this image will not be able to boot up.
- OS: Select the OS specified in the ISO file. To ensure that the image can be created and used properly, select an OS consistent with that in the image file.
- System Disk: Set the system disk capacity, which must be no less than the size of the system disk in the image file.
- Name: Enter a name for the image to be created.
- Enterprise Project: Select the enterprise project to which the image belongs.
- Tag: (Optional) Add a tag to the image to be created.
- Description: (Optional) Enter image description as needed.
- Click Next.
- Confirm the settings. Select Statement of Commitment to Image Creation and Huawei Image Disclaimer. Click Submit.
- Switch back to the Image Management Service page to monitor the image status.
When the image status changes to Normal, the image is registered successfully.
Feedback
Was this page helpful?
Provide feedbackThank you very much for your feedback. We will continue working to improve the documentation.See the reply and handling status in My Cloud VOC.
For any further questions, feel free to contact us through the chatbot.
Chatbot


