Using VPN and VPC Peering to Enable Communication Between an On-Premises Data Center and Multiple VPCs in the Same Region
Scenario
Two VPCs are created in the same region on Huawei Cloud. The on-premises data center is connected to one of the VPCs through VPN. This section describes how to create a VPC peering connection between the two VPCs to enable communication between the on-premises data center and the two VPCs.
Prerequisites
- Prepared resources
- You have purchased VPN connections to connect your on-premises data center to a Huawei Cloud VPC.
- You have created two VPCs, and the subnets of each VPC do not conflict with each other. ECSs in each VPC are running properly.
- Topology
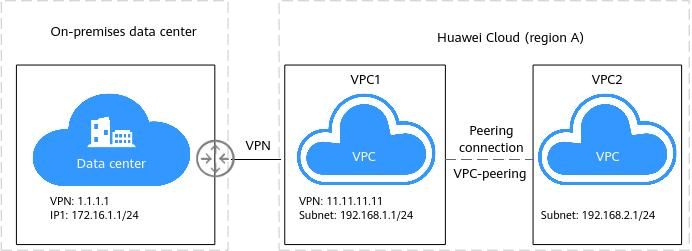
Figure 1 Using VPN with VPC peering


- Subnet of your on-premises data center: 172.16.1.0/24; VPN gateway IP address: 1.1.1.1
- VPC1 subnet: 192.168.1.0/24, VPN gateway IP address: 11.11.11.11
- VPC2 subnet: 192.168.2.0/24
- Configuration overview
Table 1 Configuration description Item
On-premises Data Center
VPC1
VPC2
VPN connection subnet configuration
Local gateway: 1.1.1.1
Local subnet: 172.16.1.0/24
Remote subnets: 192.168.1.0/24
192.168.2.0/24
Remote gateway: 11.11.11.11
NOTE:- The local and remote gateway IP addresses in the on-premises data center and VPC1 are reversed.
- The VPN configurations in the on-premises data center are consistent with those of VPC1.
Local gateway: 11.11.11.11
Local subnets: 192.168.1.0/24
192.168.2.0/24
Remote gateway: 1.1.1.1
Remote subnet: 172.16.1.0/24
-
Routes for the VPC peering connection
-
Destination address: 192.168.2.0/24
Destination addresses:
172.16.1.0/24 and 192.168.1.0/24
Remarks
- In this example, VPC1 is specified as the local end and VPC2 as the remote end when a VPC peering connection is created.
- Cloud Connect network instances can be configured at any region. You can check the route information to verify the network instance configuration.
- Configuration roadmap
- Create a VPC peering connection between VPC1 and VPC2.
- Keep the local subnet of the VPN connection in your on-premises data center unchanged, and change the remote subnets to 192.168.1.0/24 and 192.168.2.0/24.
- Change the local subnets of the VPN connection in VPC1 to 192.168.1.0/24 and 192.168.2.0/24, and keep the remote subnet unchanged.
- For the peering connection of VPC1, configure a local route to the subnet of VPC2, which is 192.168.2.0/24.
- For the peering connection of VPC2, configure a remote route to the subnet of VPC1 (192.168.1.0/24) and another remote route to the subnet of the customer network (172.16.1.0/24).
Procedure
- Create a VPC peering connection.
- Log in to the management console, select the region where the VPCs are located, and choose Virtual Private Cloud in the service list. Choose VPC Peering Connections from the navigation tree, and click Create VPC Peering Connection. On the displayed page, configure the local and peer VPCs, and click OK.
When creating a VPC peering connection, check whether the CIDR blocks of the specified local and remote VPCs match. After the VPC peering connection is created, the VPC information cannot be modified, and you can only modify the VPC peering connection name and configure VPC routes.
- Query information about the created VPC peering connection, including the local and remote VPC CIDR blocks. You need to add routes to enable communication between the local and remote VPC CIDR blocks.
In this example, VPC1 connected to the on-premises data center through VPN is the local VPC, and VPC2 is the remote VPC.
- Log in to the management console, select the region where the VPCs are located, and choose Virtual Private Cloud in the service list. Choose VPC Peering Connections from the navigation tree, and click Create VPC Peering Connection. On the displayed page, configure the local and peer VPCs, and click OK.
- Add routes for the VPC peering connection.
- For a common VPC peering connection, you only need to add routes to the subnets of the two VPCs. In this example, you also need to add a route to the on-premises data center because the local VPC is connected to the on-premises data center network through VPN. On the VPC Peering Connections page, click the name of the VPC peering connection to be edited. The page for adding routes is displayed.
- Click Add Route in the Associated Routes area.
On the page that is displayed, enter the destination network information. You can add multiple routes one by one.

Although VPC1 connects to the on-premises data center through VPN, VPC2 connects to the on-premises data center through a VPC peering connection. As such, when configuring remote routes, you need to configure a route to the on-premises data center in addition to a route to the local subnet.
The next-hop address of a route is automatically generated and does not need to be manually configured.
- Modify the VPN configuration.
- After VPC 1 and VPC 2 are connected through the VPC peering connection, the VPN subnets between the on-premises data center network and VPC 1 change. From the perspective of the VPN connection, the local subnets of VPC 1 contain the subnet of VPC 1 and the subnet of VPC 2 that is connected through the VPC peering connection, and the remote subnet of the client VPN also needs to be adjusted accordingly.

On-premises data center: Keep the local subnet unchanged, and add the subnet of VPC2 as a remote subnet, which is 192.168.2.0/24 in this example.
VPC1: Add a subnet of VPC2 to the local subnet. In this example, the subnet is 192.168.2.0/24, and the remote subnet remains unchanged.
- Choose Virtual Private Network > Classic, locate the VPN connection created for VPC1, and choose More > Modify in the Operation column.
- On the Modify VPN Connection page, select Specify CIDR block for Local Subnet, and enter the subnets of VPC1 and VPC2. Use a comma (,) to separate the two subnets. Keep the remote subnet and other information unchanged.
For the VPN configuration in the on-premises data center, you need to add the subnets of VPC1 and VPC2 to the remote subnet configuration.
- After VPC 1 and VPC 2 are connected through the VPC peering connection, the VPN subnets between the on-premises data center network and VPC 1 change. From the perspective of the VPN connection, the local subnets of VPC 1 contain the subnet of VPC 1 and the subnet of VPC 2 that is connected through the VPC peering connection, and the remote subnet of the client VPN also needs to be adjusted accordingly.
Verification
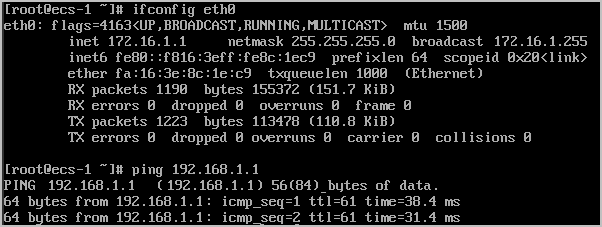
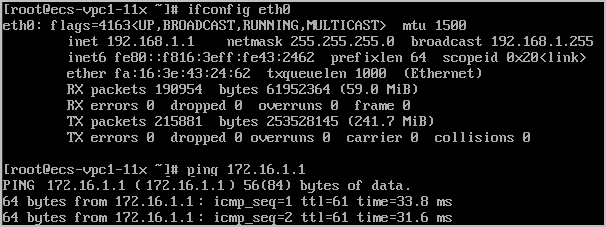
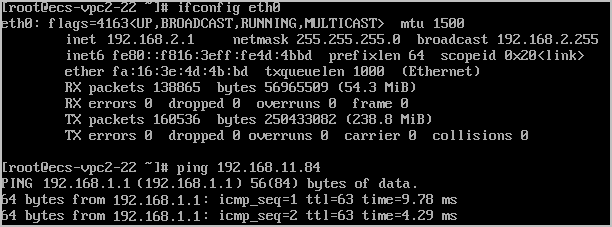
In this environment, the IP address of the ECSs in the on-premises data center, VPC1, and VPC2 are 172.16.1.1, 192.168.1.1, and 192.168.2.1, respectively. ECS1 (172.16.1.1) can communicate with ECS2 (192.168.1.1) through VPN. ECS3 (192.168.2.1) cannot communicate with the other two ECSs. After the VPC peering connection is established, ECS3 can communicate with ECS2 but cannot communicate with ECS1.
After the configuration adjustment in 3 is complete, ECS1, ECS2, and ECS3 can communicate with each other. The verification result is as follows:
- On-premises data center
ECS1 can access ECS2 in the VPC1 subnet through the VPN connection.

ECS1 can access ECS3 in the VPC2 subnet.

- Huawei Cloud VPC1
ECS2 in the VPC1 subnet can access ECS1 in the subnet of the on-premises data center.

ECS2 in the VPC1 subnet can access ECS3 in the VPC2 subnet.

- Huawei Cloud VPC2
ECS3 in the VPC2 subnet can access ECS2 in the VPC1 subnet.

ECS3 in the VPC2 subnet can access ECS1 in the subnet of the on-premises data center.

Feedback
Was this page helpful?
Provide feedbackThank you very much for your feedback. We will continue working to improve the documentation.See the reply and handling status in My Cloud VOC.
For any further questions, feel free to contact us through the chatbot.
Chatbot


