Enabling High-Speed Access to an Inference Service Through VPC Peering
Context
When accessing a real-time service, you may require:
- High throughput and low latency
- TCP or RPC requests
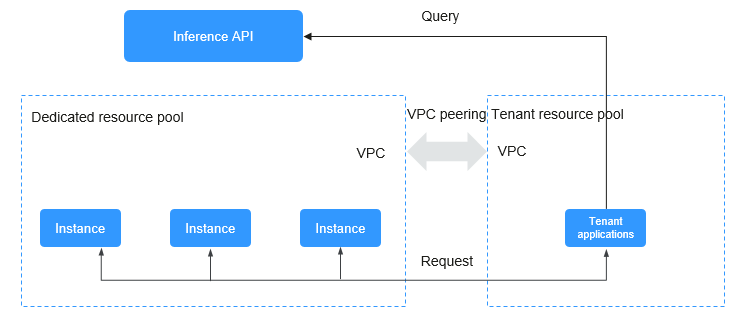
To meet these requirements, ModelArts enables high-speed access through VPC peering.
In high-speed access through VPC peering, your service requests are directly sent to instances through VPC peering but not through the inference platform. This accelerates service access. This method works best when you need high bandwidth with minimal delays, like handling real-time data or video streams.

When using a high-speed VPC access channel for a real-time service, requests do not reach the inference platform, making these features inaccessible:
- Authentication
- Traffic distribution by configuration
- Load balancing
- Alarm, monitoring, and statistics

Constraints
- The size of a request body cannot exceed 12 MB. Otherwise, the request will fail.
- Due to the limitation of API Gateway, the prediction duration of each request does not exceed 40 seconds.
- Only the services deployed in a dedicated resource pool support high-speed access through VPC peering.
- High-speed access through VPC peering is available only for real-time services.
- Due to traffic control, there is a limit on how often you can get the IP address and port number of a real-time service. The number of calls of each tenant account cannot exceed 2000 per minute, and that of each IAM user account cannot exceed 20 per minute.
- High-speed access through VPC peering is available only for the services deployed using the AI applications imported from custom images.
Preparations
Deploy a real-time service in a dedicated resource pool and ensure the service is running.
Procedure
To enable high-speed access to a real-time service through VPC peering, perform the following operations:
- Interconnect the dedicated resource pool to the VPC.
- Create an ECS in the VPC.
- Obtain the IP address and port number of the real-time service.
- Access the service through the IP address and port number.
- Interconnect the dedicated resource pool to the VPC.
Log in to the ModelArts console, choose Resource Management > Standard Cluster, find the dedicated resource pool where the service is deployed, and click its name/ID to go to the resource pool details page. Obtain the network configuration. Return to the homepage, choose Network in the navigation pane, find the network associated with the dedicated resource pool, and interconnect your VPC. After the VPC is accessed, the VPC will be displayed on the network list and resource pool details pages. Click the VPC to go to the details page.
Figure 2 Obtaining the network configuration Figure 3 Interconnecting the VPC
- Create an ECS in the VPC.
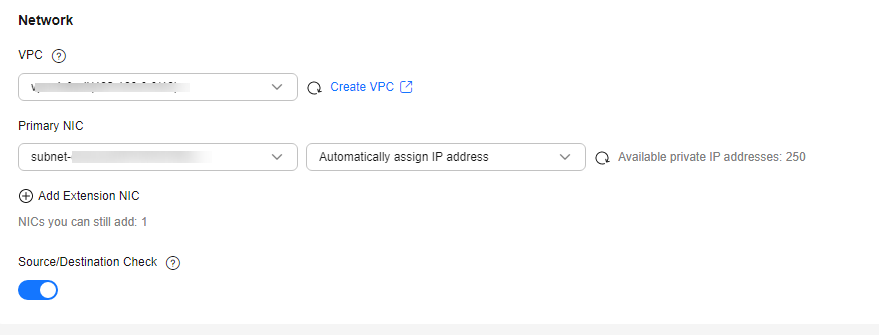
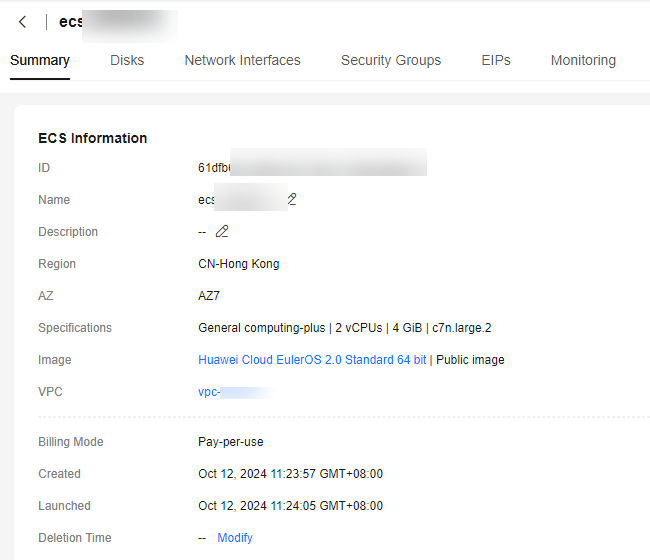
Log in to the ECS management console and click Buy ECS in the upper right corner. On the Buy ECS page, configure basic settings and click Next: Configure Network. On the Configure Network page, select the VPC connected in 1, configure other parameters, confirm the settings, and click Submit. When the ECS status changes to Running, the ECS has been created. Click its name/ID to go to the server details page and view the VPC configuration.
Figure 4 Selecting a VPC when purchasing an ECS Figure 5 Viewing VPC information
- Obtain the IP address and port number of the real-time service.
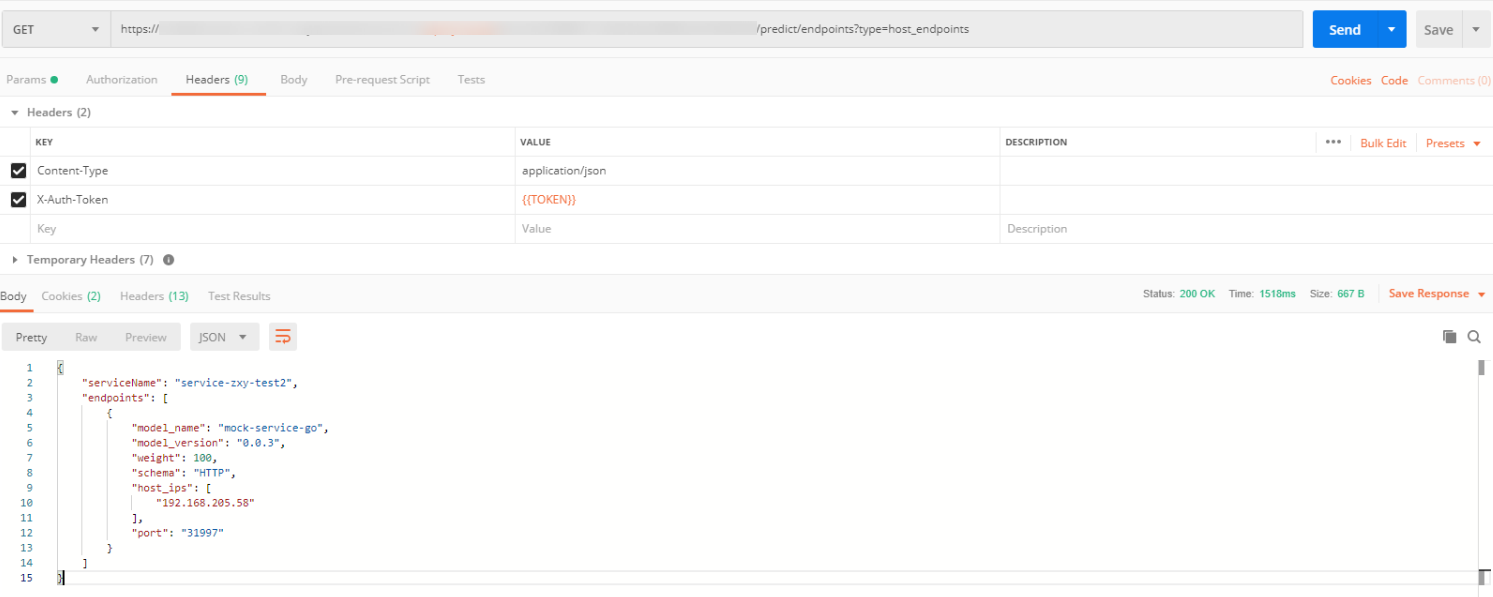
GUI software, for example, Postman can be used to obtain the IP address and port number. Alternatively, log in to the ECS, create a Python environment, and execute code to obtain the service IP address and port number.
API:
GET /v1/{project_id}/services/{service_id}/predict/endpoints?type=host_endpoints- Method 1: Obtain the IP address and port number using GUI software.
Figure 6 Example response

- Method 2: Obtain the IP address and port number using Python.
The following parameters in the Python code below need to be modified:
- project_id: your project ID. To obtain it, see Obtaining a Project ID and Name.
- service_id: service ID, which can be viewed on the service details page.
- REGION_ENDPOINT: service endpoint. To obtain it, see Endpoint.
def get_app_info(project_id, service_id):
    list_host_endpoints_url = "{}/v1/{}/services/{}/predict/endpoints?type=host_endpoints"
    url = list_host_endpoints_url.format(REGION_ENDPOINT, project_id, service_id)
    headers = {'X-Auth-Token': X_Auth_Token}
    response = requests.get(url, headers=headers)
    print(response.content)
- Method 1: Obtain the IP address and port number using GUI software.
- Access the service through the IP address and port number.
Log in to the ECS and access the real-time service either by running Linux commands or by creating a Python environment and executing Python code. Obtain the values of schema, ip, and port from 3.
- Run the following command to access the real-time service:
curl --location --request POST 'http://192.168.205.58:31997' \
--header 'Content-Type:  application/json' \
--data-raw '{"a":"a"}'
Figure 7 Accessing a real-time service
- Create a Python environment and execute Python code to access the real-time service.
def vpc_infer(schema, ip, port, body):
    infer_url = "{}://{}:{}"
    url = infer_url.format(schema, ip, port)
    response = requests.post(url, data=body)
    print(response.content)

High-speed access does not support load balancing. You need to customize load balancing policies when you deploy multiple instances.
- Run the following command to access the real-time service:
Feedback
Was this page helpful?
Provide feedbackThank you very much for your feedback. We will continue working to improve the documentation.See the reply and handling status in My Cloud VOC.
For any further questions, feel free to contact us through the chatbot.
Chatbot


