Performing Graceful Rolling Upgrades for CCI 2.0 Applications
Scenario
When you deploy a workload in CCI 2.0 to run an application, the application is exposed through a LoadBalancer Service, which has a dedicated load balancer associated to allow traffic to the containers. When there is a rolling upgrade or auto scaling, the pods may fail to work with the load balancer, and 5xx errors are returned. This topic guides you to configure container probes and readiness time for graceful rolling upgrades and auto scaling.
|
Scenario |
Solution |
|---|---|
|
Deployment upgrade |
Rolling upgrade + Liveness or readiness probe + Graceful termination |
|
Deployment scale-in |
Liveness or readiness probe + Graceful termination |
- Rolling upgrade
Perform a rolling upgrade to update the pods for the Deployment. In this mode, pods are updated one by one, not all at once. In this way, you can control the update speed and the number of concurrent pods to ensure that services are not interrupted during the upgrade. For example, you can configure the maxSurge and maxUnavailable parameters to control the number of new pods and the number of old pods concurrently. Ensure that there is always a workload that can provide services during the upgrade.
Here is an example. Suppose that maxSurge and maxUnavailable are set to 25% and the number of replicas of a Deployment is 2. In the actual upgrade, maxSurge allows a maximum of three pods (rounded up to 3 from 2 × 1.25 = 2.5), and maxUnavailable does not allow any unavailable pods (rounded down to 0 from 2 × 0.25 = 0.5). This means that two pods are running during the upgrade. Each time a pod is created, an old pod will be deleted until all pods are replaced by new ones.
- Liveness or readiness probe
A liveness probe can be used to determine when to restart a container. If the liveness check of a container fails, CCI 2.0 restarts the container to improve application availability.
A readiness probe can know when the container is ready to receive traffic. If the pod is not ready, it will be disassociated from the load balancer.
- Graceful termination
During workload upgrade or scale-in, the pod is disassociated from the load balancer, but the connections of the requests that are still being handled will be retained. If the backend service pods exit immediately after receiving the end signal, the in-progress requests may fail or some traffic may be forwarded to pods that have already exited, leading to traffic loss. To avoid this problem, you are advised to configure the graceful termination time (terminationGracePeriodSeconds) and PreStop hook for the pod.
The default value of terminationGracePeriodSeconds is 30 seconds. When a pod is deleted, the SIGTERM signal is sent, and the system waits for the application in the container to terminate. If the application is not terminated within the period specified by terminationGracePeriodSeconds, an SIGKILL signal is sent to forcibly terminate the application.
If the SIGTERM signal is not handled in the service code, you can configure a PreStop hook for the pod to continue working for a period of time after the pod is removed to avoid traffic loss.
The SIGTERM signal should be handled in the service code for graceful termination. You can also use a PreStop to make the pod to sleep for a while and stop the processes in the container until kube-proxy completes rule synchronization. Because the sum of the time required by the PreStop hook and the time when the processes are stopped may exceed 30s, you can specify terminationGracePeriodSeconds as needed to prevent the pod from being forcibly stopped by the SIGKILL signal too early.
Procedure
An Nginx Deployment is used as an example to describe how to perform a graceful rolling upgrade or auto scaling in CCI 2.0.
- Log in to the CCI 2.0 console. In the navigation pane, choose Workloads. On the Deployments tab, click Create from YAML.

- Create a Deployment. The following is an example YAML file:
kind: Deployment
apiVersion: cci/v2
metadata:
  name: nginx
spec:
  replicas: 1
  selector:
    matchLabels:
      app: nginx
  template:
    metadata:
      labels:
        app: nginx
    spec:
      containers:
        - name: nginx
          image: nginx:latest
          ports:
          - containerPort: 80
          resources:
            limits:
              cpu: 500m
              memory: 1Gi
            requests:
              cpu: 500m
              memory: 1Gi
          livenessProbe:            # Liveness probe
            httpGet:                # An HTTP request is used to check the containers.
              path: /               # The HTTP health check path is /.
              port: 80                   # The health check port is 80.
            initailDelySeconds: 5
            periodSeconds: 5
          readinessProbe:           # Readiness probe. This is used to check whether the container is ready. If the container is not ready, traffic is not forwarded to it.
            httpGet:
              path: /
              port: 80
            initialDelaySeconds: 5
            periodSeconds: 5
          lifecycle:
            preStop:               # PreStop hook. This configuration ensures that the container can provide services for external systems during the exit.
              exec:
                command:
                - /bin/bash
                - '-c'
                - sleep 30
      dnsPolicy: Default
      imagePullSecrets:
        - name: imagepull-secret
  strategy:
    type: RollingUpdate
    rollingUpdate:
      maxUnavailable: 0           # Maximum number of unavailable pods that can be tolerated during the rolling upgrade
      maxSurge: 100%              # Percentage of redundant pods during the rolling upgrade
  minReadySeconds: 10             # Minimum readiness time. A pod is considered available only when the minimum readiness time is exceeded without any of its containers crashing.
- The recommended value of minReadySeconds is the sum of the expected time for starting the container and the duration from the time when the pod is associated with the load balancer to the time when the pod receives the traffic.
- The value of minReadySeconds must be smaller than that of sleep to ensure that the new container is ready before the old container stops and exits.
- Test the upgrade and auto scaling.
Prepare a client outside the cluster and configure the script detection_script.sh with the following content (100.85.125.90:80 indicates the public network address for accessing the Service):
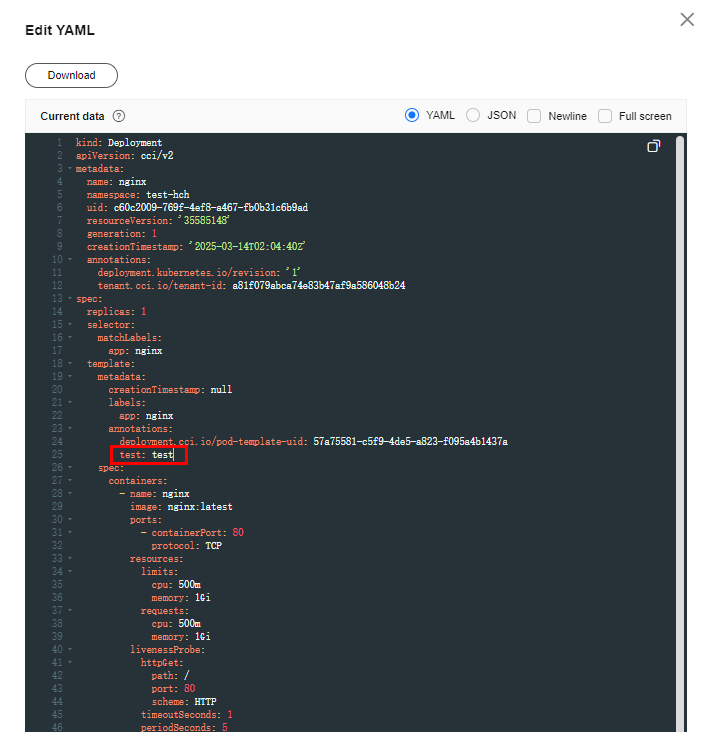
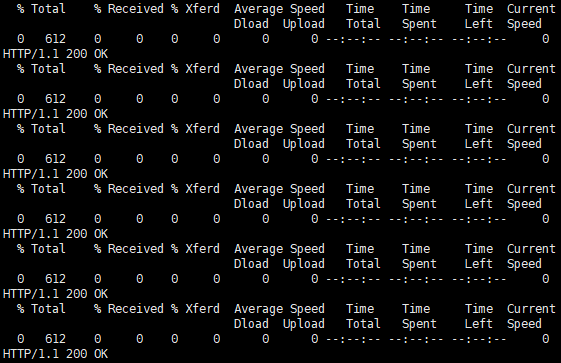
#! /bin/bash for (( ; ; )) do curl -I 100.85.125.90:80 | grep "200 OK" if [ $? -ne 0 ]; then echo "response error!" exit 1 fi done - Run the script bash detection_script.sh. Log in to the CCI 2.0 console. In the navigation pane, choose Workloads. On the Deployments tab, select the target workload and click Edit YAML to trigger a rolling upgrade.

If the access to the application is not interrupted and the returned responses are all 200 OK, a graceful upgrade is performed.

Feedback
Was this page helpful?
Provide feedbackThank you very much for your feedback. We will continue working to improve the documentation.See the reply and handling status in My Cloud VOC.
For any further questions, feel free to contact us through the chatbot.
Chatbot


