
Managing Workflow Versions
Scenario
This section describes how to manage workflow versions, including Copying a Workflow Version, Editing a Workflow Version, Submitting a Workflow Version, Activating/Deactivating a Workflow Version, and Deleting a Workflow Version.
Copying a Workflow Version
- Log in to the management console.
- Click
 in the upper part of the page and choose Security > SecMaster.
 - In the navigation pane on the left, choose Workspaces > Management. In the workspace list, click the name of the target workspace.
Figure 1 Workspace management page

- In the navigation pane on the left, choose Security Orchestration > Playbooks. On the displayed page, select the Workflows tab.
Figure 2 Workflows tab

- In the Operation column of the target workflow, click More and select Version Management.
Figure 3 Version Management page

- On the Version Management slide-out panel, in the version information area, locate the row containing the desired workflow version, and click Copy in the Operation column.
- In the dialog box displayed, click OK.
Editing a Workflow Version

You can only edit a workflow version whose version status is To be submitted or Rejected.
- Log in to the management console.
- Click in the upper part of the page and choose Security > SecMaster.
- In the navigation pane on the left, choose Workspaces > Management. In the workspace list, click the name of the target workspace.
Figure 4 Workspace management page
- In the navigation pane on the left, choose Security Orchestration > Playbooks. On the displayed page, select the Workflows tab.
Figure 5 Workflows tab
- In the Operation column of the target workflow, click More and select Version Management.
Figure 6 Version Management page
- On the Version Management slide-out panel, in the version information area, locate the row containing the desired workflow version, and click Edit in the Operation column.
- On the workflow canvas, drag basic, workflow, and plug-in nodes from Resource Libraries on the left to the canvas on the right.
Table 1 Resource Libraries parameters Parameter
Description
Basic
Basic Node
StartEvent
The start of the workflow. Each workflow can have only one start node. The entire workflow starts from the start node.
EndEvent
The end of the workflow. Each workflow can have multiple end nodes, but the workflow must end with an end node.
UserTask
When the workflow execution reaches this node, the workflow is suspended and a to-do task is generated on the Task Center page.
The subsequent nodes in the workflow continue to be executed only after the user task is completed.
Table 2 describes the manual review parameters.
Step
Another workflow added in the workflow. It is equivalent to the loop body in the workflow.
System Gateway
ExclusiveGateway
For diverged line flows, the workflow chooses only the first line flow that matches the conditional expression to proceed.
During line flow converging, the workflow chooses the line flow first arrives to proceed.
ParallelGateway
During line diverging, all lines are executed.
During line converging, the subsequent node can be executed only when all lines arrive. (If one line fails, the entire workflow fails.)
InclusiveGateway
During line diverging, all lines that match conditional expressions are executed.
The subsequent node can be executed only when all executed diverged lines arrive the inclusive gateway. (If one line fails, the entire workflow fails.)
Workflows
You can select all released workflows in the current workspace.
Plug-ins
You can select all plug-ins in the current workspace.
Table 2 UserTask parameters Parameter
Description
Primary key ID
A primary key ID is generated by the system. You can change it if needed.
Name
Name of the manual review node.
Valid Till
Time the manual review node expires.
Description
Description of the manual review node.
View Parameters
Click
 . On the Select Context pane displayed, select a parameter. To add a parameter, click Add Parameter.
Manual Processing Parameters
Input Parameter Key. To add a parameter, click Add Parameter.
- After the design is complete, click Save and Submit in the upper right corner. In the automatic workflow verification dialog box displayed, click OK.
If the workflow verification fails, check the workflow based on the failure message.
Submitting a Workflow Version
- Log in to the management console.
- Click in the upper part of the page and choose Security > SecMaster.
- In the navigation pane on the left, choose Workspaces > Management. In the workspace list, click the name of the target workspace.
Figure 7 Workspace management page
- In the navigation pane on the left, choose Security Orchestration > Playbooks. On the displayed page, select the Workflows tab.
Figure 8 Workflows tab
- In the Operation column of the target workflow, click More and select Version Management.
Figure 9 Version Management page
- On the Version Management slide-out panel, in the version information area, locate the row containing the desired workflow version, and click Submit in the Operation column.
Figure 10 Submitting a workflow version
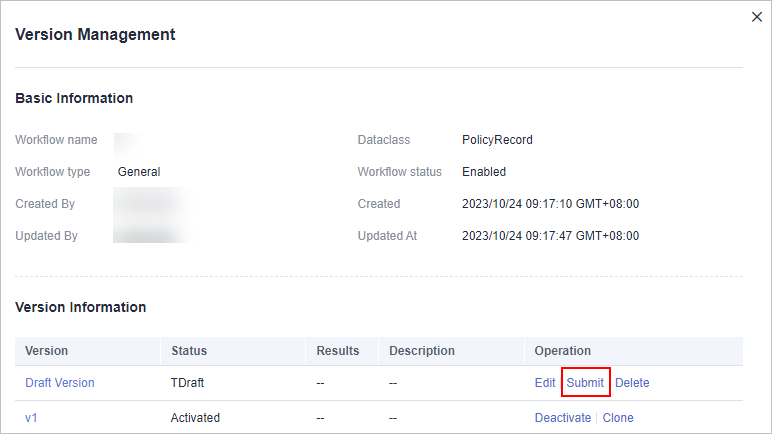
- In the confirmation dialog box, click OK to submit the workflow version.
- After the workflow version is submitted, the Version Status changes to Pending Review.
- After a workflow version is submitted, it cannot be edited. If you need to edit it, you can create a version or reject it during review.
Activating/Deactivating a Workflow Version
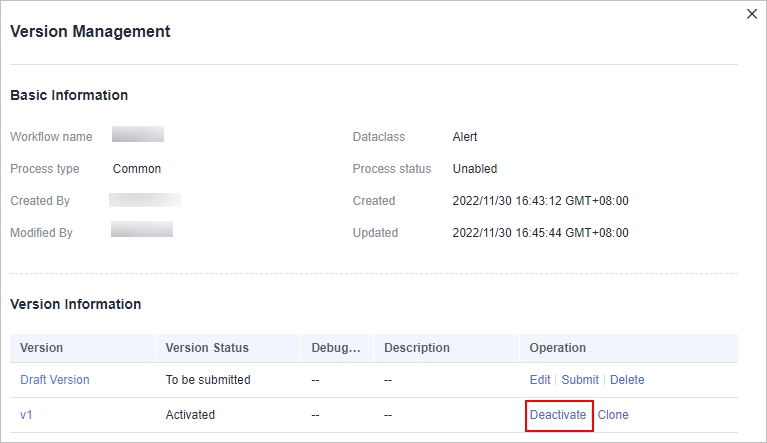
- Only workflow versions in the Inactive state can be activated.
- Each workflow can have only one activated version.
- After the current version is activated, the previously activated version is deactivated. For example, if the V2 version is activated this time, the V1 version in the activated state is deactivated and changes to the deactivated state.
- Log in to the management console.
- Click in the upper part of the page and choose Security > SecMaster.
- In the navigation pane on the left, choose Workspaces > Management. In the workspace list, click the name of the target workspace.
Figure 11 Workspace management page
- In the navigation pane on the left, choose Security Orchestration > Playbooks. On the displayed page, select the Workflows tab.
Figure 12 Workflows tab
- In the Operation column of the target workflow, click More and select Version Management.
Figure 13 Version Management page
- On the Version Management slide-out panel, in the version information area, locate the row containing the desired workflow version, and click Activate or Deactivate in the Operation column.
Figure 14 Example deactivating a workflow version
- In the dialog box that is displayed, click OK.
Deleting a Workflow Version
- Log in to the management console.
- Click in the upper part of the page and choose Security > SecMaster.
- In the navigation pane on the left, choose Workspaces > Management. In the workspace list, click the name of the target workspace.
Figure 15 Workspace management page
- In the navigation pane on the left, choose Security Orchestration > Playbooks. On the displayed page, select the Workflows tab.
Figure 16 Workflows tab
- In the Operation column of the target workflow, click More and select Version Management.
Figure 17 Version Management page
- On the Version Management slide-out panel, in the version information area, locate the row of the target workflow version, and click Delete in the Operation column.
- In the displayed dialog box, click OK.
Deleted workflow versions cannot be retrieved. Exercise caution when performing this operation.
Feedback
Was this page helpful?
Provide feedbackThank you very much for your feedback. We will continue working to improve the documentation.See the reply and handling status in My Cloud VOC.
For any further questions, feel free to contact us through the chatbot.
Chatbot


