
Binding a Subnet and Security Group to a Namespace or Workload Using a Container Network Configuration
Scenario
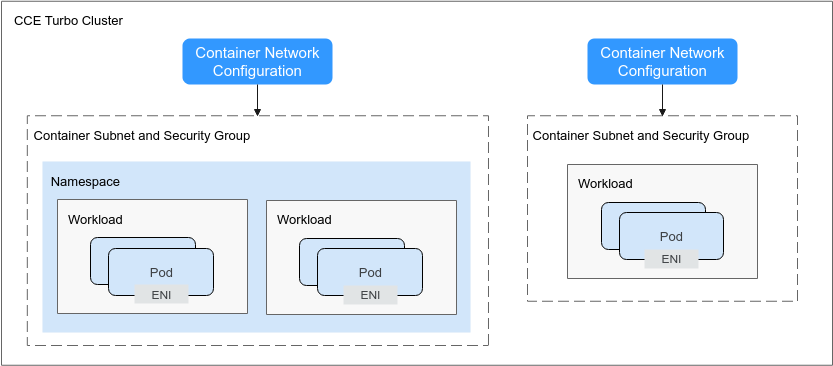
In a CCE Turbo cluster, you can configure subnets and security groups for containers by namespace or workload using NetworkAttachmentDefinition CRDs. To configure a particular container subnet and security group for a specified namespace or workload, create a container network configuration (NetworkAttachmentDefinition) and associate it with the target namespace or workload. In this way, service subnets can be planned or services can be securely isolated.
|
Category |
Resources a Container Network Configuration Can Associate with |
|
|---|---|---|
|
Namespace |
Workload |
|
|
Subnet and security group configurations |
All workloads created in the namespace associated with a container network configuration will use the same subnet and security group configurations. |
The workloads using the same container network configuration will use the same subnet and security group configurations. |
|
Supported cluster versions |
Available only in CCE Turbo clusters of 1.23.8-r0, 1.25.3-r0, or later. |
Available only in CCE Turbo clusters of 1.23.11-r0, 1.25.6-r0, 1.27.3-r0, 1.28.1-r0, or later. |
|
Notes and Constraints |
A namespace can be associated with only one container network configuration. |
Only the custom container network configurations that are not associated with any namespace can be specified. |

- The priorities (in descending order) of the container network configurations used by a pod are as follows: Container network configuration directly associated with the pod > Container network configuration associated with the pod namespace > Default container network configuration of the cluster (default-network)
- If default-network is available in a cluster, it takes effect on all pods where no custom container network configuration has been configured. The default container subnet in the network settings on the Overview page is the container subnet in default-network. default-network cannot be deleted.
- If there is only one container network configuration in a cluster, it is the default container network configuration. If there are multiple container network configurations in a cluster, the one with annotation yangtse.io/default-network: true is the default container network configuration. If there is no default container network configuration in a cluster, the pod that is not associated with any container network configuration fails to be start after being created because no NIC can be allocated for the pod.
Notes and Constraints
- Only the default container network configuration supports dynamic pre-binding of container NICs. When the quota of node NICs is used up, the pod that uses the custom container network configuration attempts to unbind the pre-bound NIC of the default container network configuration, leading to slower pod startup. Therefore, if you need to frequently use the custom container network configuration, disable dynamic pre-binding of global container NICs in the target cluster. If you require high-speed pod elasticity using the default container network configuration, properly plan dynamic pre-binding of container NICs in the target node pool based on scheduling.
- If a workload with a fixed IP address needs to be associated with a new container network configuration, the fixed IP address will be invalid when pods are rebuilt. In this case, delete the workload, release the fixed IP address, and create a workload again.
- Before deleting a custom container network configuration, delete the pods (with the cni.yangtse.io/network-status annotation) created using the configuration in the target namespace. For details, see Deleting a Container Network Configuration.
Operations on the Console for the Namespace Type
- Log in to the CCE console.
- Click the cluster name to access the cluster console. Choose Settings in the navigation pane. In the right pane, click the Network tab.
- Locate the Container Network area and click Add. In the Create Network Configurations dialog box, configure parameters such as the pod subnet and security group.
- Name: Enter a name that contains a maximum of 63 characters. Do not use default-network, default, mgnt0, or mgnt1.
- Associated Resource Type: resource type associated with the custom container network configuration. For details, see Table 1. To create a container network configuration of the namespace type, select Namespace.
- Namespace: Select the namespace to be associated. The namespaces associated with different container network configurations must be unique. If no namespace is available, click Create Namespace to create one.
- Pod Subnet: Select a subnet. If no subnet is available, click Create Subnet to create one. After the subnet is created, click the refresh button.
- Associate Security Group: The default value is the container ENI security group. You can also click Create Security Group to create one. After the security group is created, click the refresh button. A maximum of five security groups can be selected.
- Click OK. After the creation, you will be redirected to the custom container network configuration list, where the new container network configuration is included.
Operations Using kubectl for the Namespace Type
This section describes how to use kubectl to create a container network configuration of the namespace type.
- Use kubectl to access the cluster. For details, see Accessing a Cluster Using kubectl.
- Modify the networkattachment-test.yaml file.
vi networkattachment-test.yaml
Example file content:
apiVersion: k8s.cni.cncf.io/v1
kind: NetworkAttachmentDefinition
metadata:
  annotations:
    yangtse.io/project-id: 05e38**
  name: example
  namespace: kube-system
spec:
  config: |
   {
    "type":"eni-neutron",
    "args":{
      "securityGroups":"41891**",
      "subnets":[
        {
          "subnetID":"27d95**"
        }
      ]
    },
    "selector":{
      "namespaceSelector":{
        "matchLabels":{
          "kubernetes.io/metadata.name":"default"
        }
      }
    }
   }
Table 2 Key parameters Parameter
Mandatory
Type
Description
apiVersion
Yes
String
API version. The value is fixed at k8s.cni.cncf.io/v1.
kind
Yes
String
Type of the object to be created. The value is fixed at NetworkAttachmentDefinition.
yangtse.io/project-id
Yes
String
Project ID in the current region. For details, see .
name
Yes
String
Configuration item name.
namespace
Yes
String
Namespace of the configuration resource. The value is fixed to kube-system.
config
Yes
Table 3 object
Configuration content, which is a string in JSON format.
Table 3 config parameters Parameter
Mandatory
Type
Description
type
Yes
String
The value is fixed at eni-neutron.
args
No
object
Configuration parameters.
selector
No
Table 5 object
Namespace in which the configuration takes effect.
Table 4 args parameters Parameter
Mandatory
Type
Description
securityGroups
No
String
Security group ID. If no security group is planned, ensure that the security group is the same as that in default-network.
How to obtain:
Log in to the VPC console. In the navigation pane, choose Access Control > Security Groups. Click the target security group name and copy the ID on the Summary tab page.
subnets
Yes
Array of subnetID Objects
List of container subnet IDs. At least one subnet ID must be entered. The format is as follows:
[{"subnetID":"27d95**"},{"subnetID":"827bb**"},{"subnetID":"bdd6b**"}]Subnet ID not used by the cluster in the same VPC.
How to obtain:
Log in to the VPC console. In the navigation pane, choose Virtual Private Cloud > Subnets. Click the target subnet name and copy the Subnet ID on the Summary tab page.
Table 5 selector parameters Parameter
Mandatory
Type
Description
namespaceSelector
No
matchLabels object
A Kubernetes standard selector. Enter the namespace label in the following format:
"matchLabels":{
          "kubernetes.io/metadata.name":"default"
        }
The namespaces of different configurations cannot overlap.
- Create the container network configuration.
kubectl create -f networkattachment-test.yaml
If information similar to the following is displayed, the configuration has been created:
networkattachmentdefinition.k8s.cni.cncf.io/example created
Operations on the Console for the Workload Type
- Log in to the CCE console.
- Click the cluster name to access the cluster console. Choose Settings in the navigation pane. In the right pane, click the Network tab.
- Locate the Container Network area and click Add. In the Create Network Configurations dialog box, configure parameters such as the pod subnet and security group.
- Name: Enter a name that contains a maximum of 63 characters. Do not use default-network, default, mgnt0, or mgnt1.
- Associated Resource Type: resource type associated with the custom container network configuration. For details, see Table 1. To create a container network configuration of the workload type, select Workload.
- Pod Subnet: Select a subnet. If no subnet is available, click Create Subnet to create one. After the subnet is created, click the refresh button.
- Associate Security Group: The default value is the container ENI security group. You can also click Create Security Group to create one. After the security group is created, click the refresh button. A maximum of five security groups can be selected.
- Click OK. After the creation, you will be redirected to the custom container network configuration list, where the new container network configuration is included.
- When creating a workload, you can select a custom container network configuration.
- Choose Workloads in the navigation pane. In the right pane, click the Deployments tab.
- Click Create Workload in the upper right corner of the page. In the Advanced Settings area, choose Network Configuration and determine whether to enable a specified container network configuration.
- Select an existing container network configuration. If no configuration is available, click Add to create one.
- After the configuration, click Create Workload.
Return to the Settings page. In the container network configuration list, the name of the resource associated with the created container network configuration is displayed.
Operations Using kubectl for the Workload Type
This section describes how to use kubectl to create a container network configuration of the workload type.
- Use kubectl to access the cluster. For details, see Accessing a Cluster Using kubectl.
- Modify the networkattachment-test.yaml file.
vi networkattachment-test.yaml
Example file content:
apiVersion: k8s.cni.cncf.io/v1
kind: NetworkAttachmentDefinition
metadata:
  annotations:
    yangtse.io/project-id: 80d5a**
  name: example
  namespace: kube-system
spec:
  config: |
   {
    "type":"eni-neutron",
    "args":{
      "securityGroups":"f4983**",
      "subnets":[
        {
          "subnetID":"5594b**"
        }
      ]
    }
   }
Table 6 Key parameters Parameter
Mandatory
Type
Description
apiVersion
Yes
String
API version. The value is fixed at k8s.cni.cncf.io/v1.
kind
Yes
String
Type of the object to be created. The value is fixed at NetworkAttachmentDefinition.
yangtse.io/project-id
Yes
String
Project ID in the current region.
name
Yes
String
Configuration item name.
namespace
Yes
String
Namespace of the configuration resource. The value is fixed to kube-system.
config
Yes
Table 7 object
Configuration content, which is a string in JSON format.
Table 7 config parameters Parameter
Mandatory
Type
Description
type
Yes
String
The value is fixed at eni-neutron.
args
No
object
Configuration parameters.
Table 8 args parameters Parameter
Mandatory
Type
Description
securityGroups
No
String
Security group ID. If no security group is planned, ensure that the security group is the same as that in default-network.
How to obtain:
Log in to the VPC console. In the navigation pane, choose Access Control > Security Groups. Click the target security group name and copy the ID on the Summary tab page.
subnets
Yes
Array of subnetID Objects
List of container subnet IDs. At least one subnet ID must be entered. The format is as follows:
[{"subnetID":"27d95**"},{"subnetID":"827bb**"},{"subnetID":"bdd6b**"}]Subnet ID not used by the cluster in the same VPC.
How to obtain:
Log in to the VPC console. In the navigation pane, choose Virtual Private Cloud > Subnets. Click the target subnet name and copy the Subnet ID on the Summary tab page.
- Create a NetworkAttachmentDefinition.
kubectl create -f networkattachment-test.yaml
If information similar to the following is displayed, the configuration has been created.
networkattachmentdefinition.k8s.cni.cncf.io/example created
- Create a Deployment workload and associate it with the newly created container network configuration.
apiVersion: apps/v1 kind: Deployment metadata: name: nginx spec: replicas: 3 selector: matchLabels: app: nginx template: metadata: labels: app: nginx yangtse.io/network: "example" # Name of the custom container network configuration, which can be used to obtain all pods associated with the container network configuration by label annotations: yangtse.io/network: "example" # Name of the custom container network configuration spec: containers: - name: container-0 image: nginx:alpine resources: limits: cpu: 100m memory: 200Mi requests: cpu: 100m memory: 200Mi imagePullSecrets: - name: default-secret- yangtse.io/network: name of the specified custom container network configuration. Only a container network configuration that is not associated with any namespace can be specified. Add this parameter to the label so that you can use the label to obtain all pods associated with this container network configuration.
Deleting a Container Network Configuration
You can delete the new container network configuration or view its YAML file.
Before deleting a container network configuration, delete all pods using the configuration. Otherwise, the deletion will fail.
- Run the following command to filter the pods that uses the configuration in the cluster (example is used as an example):
kubectl get pod -A -o=jsonpath="{range .items[?(@.metadata.annotations.cni\\.yangtse\\.io/network-status=='[{\"name\":\"example\"}]')]}{.metadata.namespace}{'\t'}{.metadata.name}{'\n'}{end}"The command output contains the pod name and namespace associated with the configuration.
- Delete the owner of the pod. The owner may be a Deployment, StatefulSet, DaemonSet, or Job.
Feedback
Was this page helpful?
Provide feedbackThank you very much for your feedback. We will continue working to improve the documentation.See the reply and handling status in My Cloud VOC.
For any further questions, feel free to contact us through the chatbot.
Chatbot


