Registering an Edge Node
Registering an edge node is the process of creating an edge node on IEF and obtaining the node configuration file and EdgeCore installer.
Constraints
- NPUs on the same node support only the same partition specification.
- You cannot perform virtualization partition on the NPU of an IEF-managed edge node by simply upgrading the NPU plug-in to v2.1.0. Uninstall and reinstall the node, manually partition the NPU, and then manage the node on IEF again.
- The NPU driver version must be later than 22.0. You can go to the driver path (for example, /usr/local/Ascend/driver) and run the cat version.info command to view your driver version.
- If you enable the NPU sharing mode, you need to set the container sharing mode for all chips on the NPU.
- NPU virtualization partition is not supported if the share mode is used.
- The healthy chips displayed refer to physical chips. If NPU virtualization partition or sharing is used, the number of chips after virtualization partition or sharing is displayed.
Registering an Edge Node
- Log in to the IEF console, and click Switch Instance on the Dashboard page to select a platinum service instance.
- In the navigation pane, choose . Then, click Register Edge Node in the upper right corner.
- Configure basic edge node information.
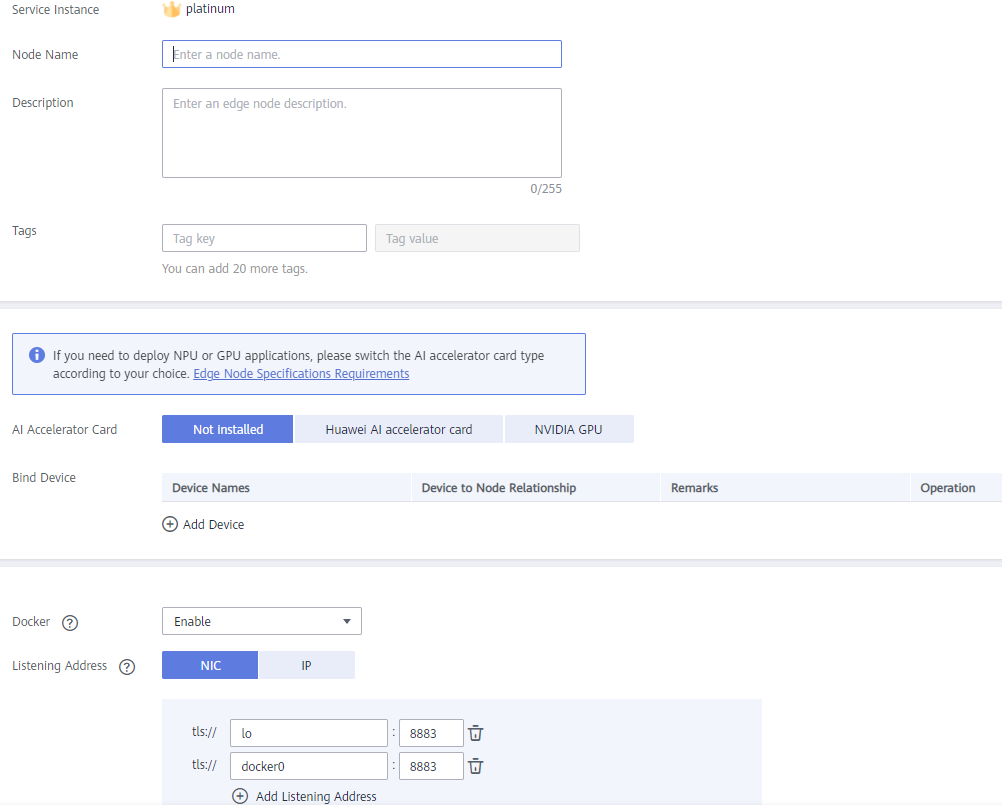
Figure 1 Basic edge node information (1)

- Node Name: name of an edge node. The name can contain 1 to 64 characters, including letters, digits, hyphens (-), and underscores (_).
- Description: Optional. Enter the description of the edge node.
- Tags: Tags can be used to classify resources, facilitating resource management.
- AI Accelerator Card
Ascend AI accelerator card: Select this option if you register an edge node equipped with Ascend Processors (NPUs). After you select Ascend AI accelerator card, select the desired NUP type.
AI accelerator cards support the NPU types listed in the following table:
Table 1 NPU types Type
Description
Ascend 310
Ascend 310 chips
Ascend 310B
Ascend 310B chips
NVIDIA GPU: Select this option if your edge node is equipped with an NVIDIA GPU.
Not installed: Select this option if your edge node does not use any AI accelerator card.

If you select NVIDIA GPU but your edge node is not equipped with any NVIDIA GPU, the edge node cannot be managed by IEF.
If your edge node has been equipped with a GPU, install and configure the GPU driver on the edge node before you can manage it on IEF. For details, see Installing and Configuring a GPU Driver.
- Bind Device: Bind an end device to the edge node. If you have not registered an end device, register one by referring to End Device Management. If you do not bind an end device in this step, you can bind one after the edge node is registered.
- Docker: If you enable Docker, containerized applications can be deployed.
- Listening Address
The address on which the built-in MQTT broker of the edge node listens. It is used for edge-cloud messaging. For details about edge-cloud messaging, see Device Twin Working Principles and Edge-Cloud Message Overview.
By default, local NICs lo (localhost) and docker0 are listened to. You can specify a NIC name or IP address to set the NIC to be listened to. Multiple NICs or IP addresses can be added.
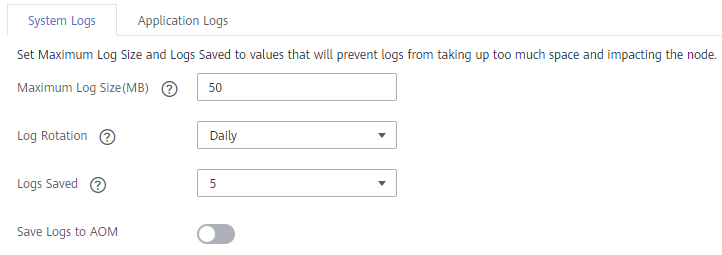
Figure 2 Basic edge node information (2)
Currently, system and application logs can be collected from edge nodes.
- System Logs: logs generated by the IEF software (such as edge-core, edge-logger, and edge-monitor) installed on edge nodes.
- Application Logs: logs generated by applications deployed on edge nodes.
Set the following parameters for both system and application logs:
- Maximum Log Size (MB): maximum size of a log file, in MB. The default value is 50. The value range is 10–1000. If a log file reaches the specified size, the system compresses the log file and dumps it to a specified directory on the host.
- System logs are stored in the /var/IEF/sys/log/ directory on edge nodes and will be dumped to AOM when the maximum log size is reached.
- Application logs include the standard output of containers and the logs mounted to /var/IEF/app/log on the edge node. These logs will be dumped to AOM when the maximum log size is reached.
- Log Rotation: log dump interval. You can select Daily, Weekly, Monthly, or Yearly. Log files will be dumped when either Maximum Log Size (MB) or Log Rotation is reached.
- Logs Saved: maximum number of logs being retained at a specified period. The default value is 5. The value range is 1–10. Once this number is reached, when new log files are dumped in, old log files will be deleted on a first-in first-out (FIFO) basis.
- Save Logs to AOM
You can enable or disable log uploading to AOM. If it is enabled, you can view the logs in AOM. For details, see Viewing Logs on AOM.
- Select I have read and agree to the Huawei Cloud Service Level Agreement. Click Register in the lower right corner.
Registration using a certificate: Download the configuration file and EdgeCore Installer, which will be used in Managing an Edge Node.Figure 3 Downloading the configuration file and EdgeCore Installer

- Click Download Edge node name.tar.gz.
- Select the CPU architecture of your edge node, and click Download EdgeCore Installer.
- In the lower right corner, select I've finished downloading and click Finish.
The edge node is in the Unconnected state because the EdgeCore Installer downloaded in Registering an Edge Node has not been installed. For details, see Managing an Edge Node.
Figure 4 Unconnected edge node
Follow-up Operation
After the registration is complete, you need to manage the edge node. For details, see Managing an Edge Node.
Feedback
Was this page helpful?
Provide feedbackThank you very much for your feedback. We will continue working to improve the documentation.See the reply and handling status in My Cloud VOC.
For any further questions, feel free to contact us through the chatbot.
Chatbot


