
Adding a Custom Rule
Scenario
Custom risk protection rules encompass IP address access exceptions, account access exceptions, and other types of exceptions. When an exception occurs, an alarm is triggered, or access is blocked.
For instance, if you consider accessing the demo application from the same client IP address more than 1000 times within 1 minute to be risky and wish to block access for 5 minutes, you can create a custom rule to do so.
This section describes how to create a customized rule.
Procedure
- Log in to the web console of the API data security protection system as the sysadmin user.
- In the navigation pane on the left, choose . Then click the Custom Rules tab.
- On the Custom Rules page, click Add.
- In the Add Custom Rule dialog box, set rule parameters. Table 1 describes the parameters. Figure 1 Adding a custom rule
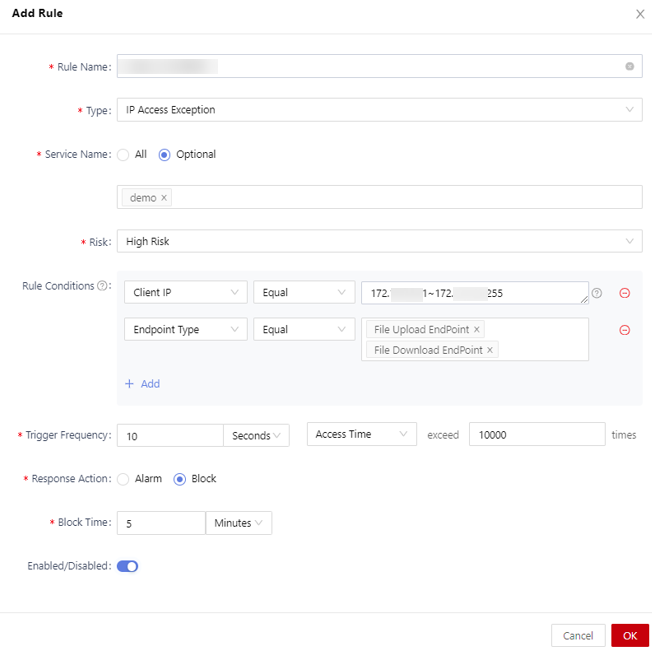
Table 1 Parameters for adding a custom rule Parameter
Description
Rule Name
Enter a rule name.
Type
Select a rule type, which can be IP access exception, account access exception, or other exceptions.
Service Name
Select an application to which the rule applies from the drop-down list.
Risk
Select the risk level of the request that matches the rule.
Rule Conditions
Configure the rule conditions, including the request method, URL, request parameters, request body, data label, and client IP address.
Triggering Frequency
Configure a triggering frequency for the rule. The time unit can be second, minute, or hour.- If Second is selected, the time can be set to any integer ranging from 10 to 86400.
- If Minute is selected, the time can be any integer ranging from 1 to 1440.
- If Hour is selected, the time can be any integer from 1 to 24.
- The number of access times can be an integer ranging from 1 to 100000.
Response Action
Select a response action for the rule.- Alarm: An alarm log is generated when the access matches the rule.
- Block: If the access matches the rule, the access is blocked and an alarm log is generated.
- If you select Block, you need to set the Blocking Duration.
Blocking Duration
Configure the blocking duration. The time unit can be second, minute, or hour. The time threshold ranges from 10 seconds to 10000 hours.
Enabled/Disabled
Enable or disable a rule. : enabled. The rule takes effect immediately after being added.
 : disabled. The rule does not take effect after being configured. You need to manually enable it.
- After the rule is configured, click OK.
Operation Result
After the rule is added and enabled, if the same client IP address frequently accesses the application, the rule is triggered and the access is blocked.
Related Operations
On the Custom Rules page, you can also perform the following operations:
- Allowing a blocked IP address: Click Pass on the right of the target rule to allow the blocked IP address that triggers the risk protection rule.
If the IP address triggers the rule again, the IP address will be blocked again. The Pass button has no effect on the rule whose response action is Alarm.
- Modifying a risk protection rule: Locate the target rule and click Edit on the right.
- Deleting a risk protection rule: Locate the target rule and click Delete on the right.
- Deleting risk protection rules in batches: Select multiple rules and click in the upper right corner.
- Enabling risk protection rules in batches: Select multiple rules and click in the upper right corner.
- Disabling risk protection rules in batches: Select multiple rules and click in the upper right corner.
Feedback
Was this page helpful?
Provide feedbackThank you very much for your feedback. We will continue working to improve the documentation.See the reply and handling status in My Cloud VOC.
For any further questions, feel free to contact us through the chatbot.
Chatbot


