Configuring and Viewing Masking Rules
Masking Algorithms and Application Scenarios
Configuring and Viewing Masking Rules
You can configure masking rules for specified data types to implement static masking of sensitive data. This section describes the data types supported by each masking algorithm and how to add and test masking algorithms.
This method is used to replace a field of the string type with a hash value. In a relational database, if the field length is less than the hash length, the length of the field in the destination database is set to be the same as the hash value length to ensure that the hash value is completely written to the destination database. By default, two hash algorithms, SHA256 and SHA512, are configured for DSC.
Hash algorithms are built-in and do not need to be configured. If you want to test the masking effect, perform the following steps:
- Log in to the DSC console.
- Click
 in the upper left corner and select a region or project.
 - In the navigation pane on the left, choose Data Asset Protection > Static Data Masking. On the displayed page, click the Masking Rule tab.
Figure 1 Hash masking

- In the column of the selected SHA256 or SHA512 algorithm, click Edit and Test.
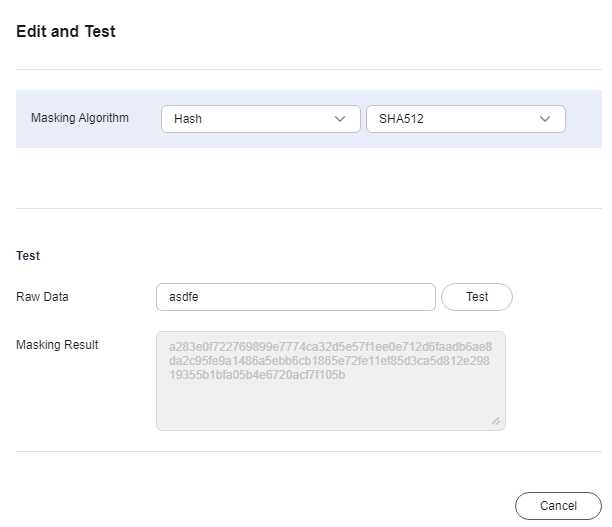
- On the Edit and Test page, set Masking Algorithm to Hash, enter Raw Data, and click Test. The masked data is displayed in the Masking Result text box.
Figure 2 Hash method

This method masks data using encryption algorithms and a master key.
- Log in to the DSC console.
- Click
 in the upper left corner and select a region or project.
 - In the navigation pane on the left, choose Data Asset Protection > Static Data Masking. On the displayed page, click the Masking Rule tab.
Figure 3 Hash masking

- Click the Encryption tab.
- Master Key Algorithm: Select an encryption algorithm from the drop-down list box. Currently, only AES256 is available.
Table 2 Master key algorithms Key Type
Algorithm Type
Key Specifications
Description
Usage
Symmetric key
AES
AES_256
AES symmetric key
Encrypts and decrypts a small amount of data or data keys.
- For KMS encryption, you can select a KMS key from the drop-down list or enter a key ID.
- Select from Keys: Select an existing master key from the drop-down list. If no master key is available, click Create KMS Key to create one. For details about how to create a KMS key, see Creating a Key.

By default, the master key csm/default is used for encryption.
- Enter a KMS key ID: Enter the ID of the KMS key in the current region.
- Select from Keys: Select an existing master key from the drop-down list. If no master key is available, click Create KMS Key to create one. For details about how to create a KMS key, see Creating a Key.
- Select the Data Key Length from the drop-down list box. The options are 128, 192, and 256.
- Master Key Algorithm: Select an encryption algorithm from the drop-down list box. Currently, only AES256 is available.
- After the configuration is complete, click Generate Encryption Configuration.
If you want to delete a configured encryption configuration, click Delete in the Operation column.

Click
 to enable the rotation policy. After rotation, the current encryption configuration is updated to improve security.
This method uses the specified character * or a random character to cover part of the content.
There are six masking methods available, including retaining first N and last M, retaining from X to Y, masking first N and last M, masking from X to Y, masking data ahead of special characters, and masking data followed by special characters.
- Log in to the DSC console.
- Click
 in the upper left corner and select a region or project.
 - In the navigation pane on the left, choose Data Asset Protection > Static Data Masking. On the displayed page, click the Masking Rule tab.
Figure 4 Hash masking

- Click the Character Masking tab.
- Click Add to configure a character masking rule.
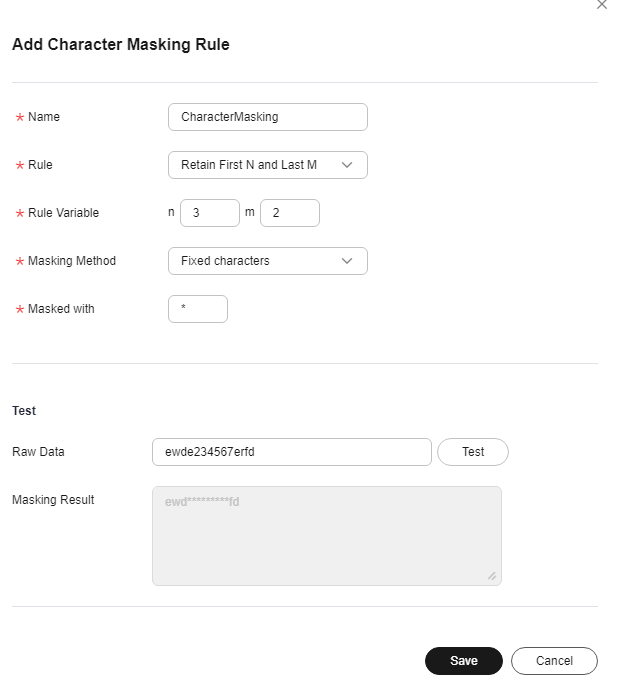
Figure 5 Adding a character masking rule

- Configure the parameters by referring to Table 3. Enter the raw data and click Test. The masking result will be displayed in the Masking Result text box.
Table 3 Character masking parameters Parameter
Description
Name
Enter a character masking rule name. The name can contain only letters, digits, underscores (_), and hyphens (-), and cannot exceed 255 characters.
Rule
The following rules are available:
- Retain first N and last M
- Retain from X to Y
- Mask first N and last M
- Mask from X to Y
- Mask data ahead of special characters
- Mask data followed by special characters
Rule Variable
Enter the value of the corresponding rule. For example, if you select Retain from x to y, set x to 3, and set y to 6, meaning the third to sixth characters are retained.
Masking Method
The optional masking methods are as follows:
- Fixed characters: Replace specified characters with fixed characters.
- Random characters: Replace specified characters with random characters.
Masked with
This parameter is displayed when Masking Method is set to Fixed Characters. You need to enter the specified characters used to mask data.
Random Character Type
This parameter is displayed when Masking Method is set to Random characters. The options are as follows:
- Random letters
- Random digits
- Combination of random digits and letters
- Verify the testing result and click Save.

- Multiple character masking rules have been preset in DSC. Built-in masking rules cannot be deleted. To delete a custom masking rule, click Delete in the Operation column of the target rule.
- All rules can be edited. To edit a rule, locate the row containing the rule and click Edit in the Operation column.
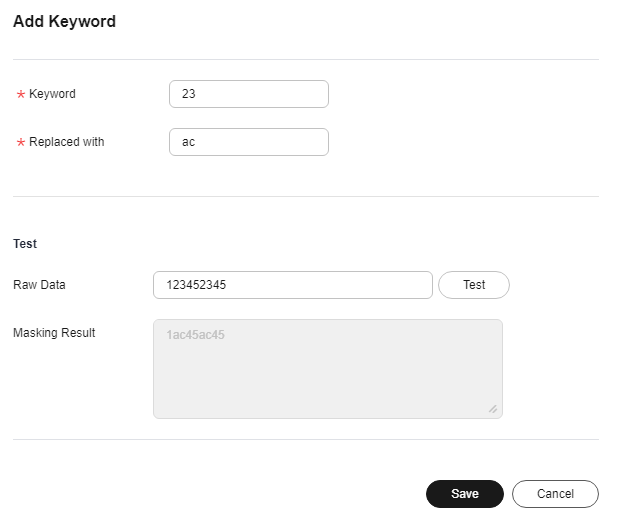
This method masks data by replacing matched keywords with custom strings. For example, if the original characters are abcdefgbcdefgkjkoij, the keyword is bcde, and the replacement string is 12, the masking result is a12fg12fgkjkoij.
- Log in to the DSC console.
- Click
 in the upper left corner and select a region or project.
 - In the navigation pane on the left, choose Data Asset Protection > Static Data Masking. On the displayed page, click the Masking Rule tab.
Figure 6 Hash masking

- Click the Keyword Replacement tab.
- Click Add in the upper left corner. The Add Keyword page is displayed.
- Set the keyword and the replacement string.
Then, the keywords matched in raw characters will be replaced with the replacement string.
Figure 7 Adding a keyword
- Enter the raw data and click Test. The masking result will be displayed in the Masking Result text box.
- Verify the testing result and click Save.
- In the Operation column of the keyword replacement rule list, click Edit and Test to modify a masking rule.
- In the Operation column of the keyword replacement rule list, click Delete to delete a masking rule.
- Masking Using the Null Value: Set fields of any type to NULL. For a field whose attribute is set to NOT NULL, the algorithm changes the attribute to NULL during copy.
- Masking Using the Empty Value: Set the specified field to an empty value. Specifically, a character field is left blank, a numeric field is set to 0, a date field is set to 1970, and time field is set to 00:00.
It is a built-in masking rule of DSC and does not need to be configured. To view the masking rule, perform the following steps:
- Log in to the DSC console.
- Click
 in the upper left corner and select a region or project.
 - In the navigation pane on the left, choose Data Asset Protection > Static Data Masking. On the displayed page, click the Masking Rule tab.
Figure 8 Hash masking

- Click the Value Change tab.
- Log in to the DSC console.
- Click
 in the upper left corner and select a region or project.
 - In the navigation pane on the left, choose Data Asset Protection > Static Data Masking. On the displayed page, click the Masking Rule tab.
Figure 9 Hash

- Click Round.
There are two built-in data masking algorithms available:
- Date Roundup: Used for time-related fields such as timestamp, time, data, and datetime in RDS.
- Number Roundup: Used for value types fields such as double, float, int, and long. After data masking, the original field type does not change.
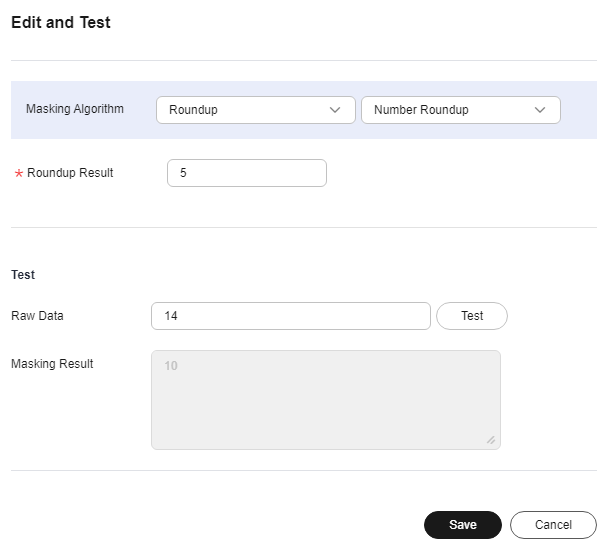
- Click Edit and Test. On the Edit and Test page, select Roundup for Masking Algorithm and set the Roundup result.
Masking Result: Rounds a given value downwards to a multiple value closest to the raw data. For example, if the given value is 5 and the raw data is 14, the multiple of 5 that is closest to 14 is 10. That is, the masking result is 10.
Figure 10 Number roundup
- Enter the raw data and click Test. The masking result will be displayed in the Masking Result text box.
- Verify the testing result and click Save.
Once sensitive data is identified, it is replaced with simulated data. At present, this function applies to only OBS masking tasks and database masking tasks.
|
No. |
Sensitive Data Rule |
Simulation Masking Type |
|---|---|---|
|
1 |
ID card No. (Chinese mainland) |
ID card number |
|
2 |
Birthday |
Random date (specified range) |
|
3 |
Date |
Random date (specified range) |
|
4 |
Mobile number (Chinese mainland) |
Mobile number |
|
5 |
Email address |
Email address |
|
6 |
Postal code (Chinese mainland) |
Postal code |
|
7 |
Address (Chinese mainland) |
Address |
|
8 |
Exact address (China) |
Address |
|
9 |
International mobile equipment identity (IMEI) |
IMEI |
|
10 |
IPv4 address |
IPv4 address |
|
11 |
IPv6 address |
IPv6 address |
|
12 |
Bank account number |
Bank account number |
|
13 |
Person name (Simplified Chinese) |
Person name |
|
14 |
Car license plate number (Chinese mainland) |
Car license plate number |
|
15 |
Passport No. (Chinese mainland) |
Passport No. |
Feedback
Was this page helpful?
Provide feedbackThank you very much for your feedback. We will continue working to improve the documentation.See the reply and handling status in My Cloud VOC.
For any further questions, feel free to contact us through the chatbot.
Chatbot


