Auto Renewal
Auto-renewal makes renewal easier and prevents RabbitMQ instances from being automatically deleted if you forget to manually renew them. The auto-renewal rules are as follows:
- The first auto-renewal date and billing cycle are calculated based on the expiration date of the RabbitMQ instance.
- The auto-renewal period of a RabbitMQ instance varies depending on how you enable auto-renewal.
- Auto-renewal can be enabled any time before a RabbitMQ instance expires. The system attempts to automatically renew the instance at 03:00 seven days before the instance expires. If the fee deduction fails, there is one attempt at 03:00 every day until the instance expires or the renewal is successful.
- After auto-renewal is enabled, you can still manually renew your RabbitMQ instance. After a manual renewal is complete, auto-renewal still takes effect, and fees start to be deducted seven days before the new subscription expires.
- Fees are deducted seven days before your subscription expires. You can change this deduction date as required.
Learn about Auto-Renewal Rules before enabling auto-renewal.
Prerequisites
Your yearly/monthly RabbitMQ instance has not expired.
Enabling Auto-Renewal When Buying a RabbitMQ Instance
You can enable auto-renewal when buying a RabbitMQ instance, as shown in Figure 1. For more information about buying a RabbitMQ instance, see Buying an Instance.
If you enable auto-renewal when buying a RabbitMQ instance, the auto-renewal periods are as follows:
- Monthly billing: Your subscription will be renewed each month.
- Yearly billing: Your subscription will be renewed each year.
Enabling Auto-Renewal on the Renewals Page
- Go to the Billing > Renewal page.
- Customize search criteria.
- On the Auto Renewals page, you can view the resources for which auto-renewal has been enabled.
- You can enable auto-renewal for resources on the Manual Renewals, Pay-per-Use After Expiration, and Renewals Canceled pages.
- Enable auto-renewal for yearly/monthly resources.
- Separate auto-renewal: Choose More > Enable Auto-Renewal in the Operation column for the desired RabbitMQ instance.
- Batch auto-renewal: Select the desired RabbitMQ instances and click Enable Auto-Renewal above the list.
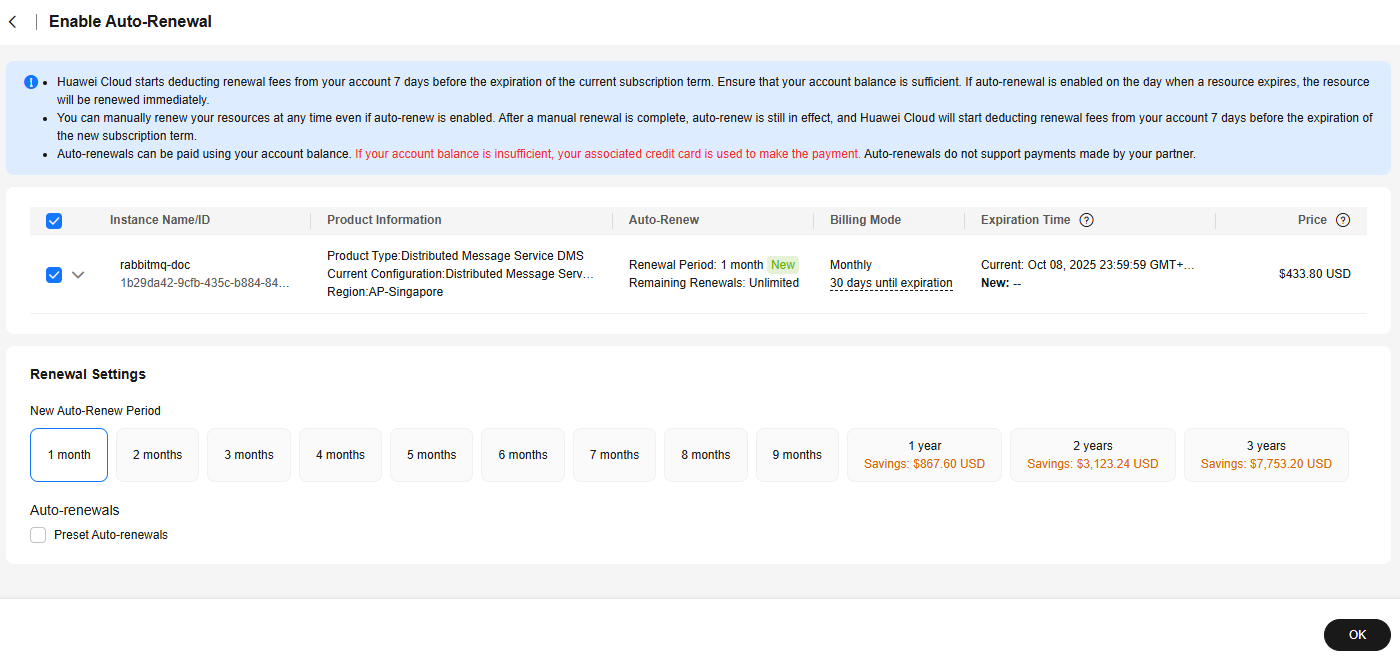
- Select a renewal period, specify the desired auto-renewal times, and click Pay.
If auto-renewal is enabled on the Renewals page, the auto-renewal period is subject to the selected renewal period and number of auto-renewals. For example, if you select three months renewal duration and do not select Preset auto-renewals, your subscription is automatically renewed for three months before each expiration.Figure 2 Enabling auto-renewal

Feedback
Was this page helpful?
Provide feedbackThank you very much for your feedback. We will continue working to improve the documentation.See the reply and handling status in My Cloud VOC.
For any further questions, feel free to contact us through the chatbot.
Chatbot


