このページは、お客様の言語ではご利用いただけません。Huawei Cloudは、より多くの言語バージョンを追加するために懸命に取り組んでいます。ご協力ありがとうございました。
- What's New
- Function Overview
- Service Overview
-
Billing
- Billing Overview
- Billing Modes
- Billing Items
- Billing Examples
- Changing the Billing Mode
- Renewing Your Subscription
- Bills
- About Arrears
- Billing Termination
- Cost Management
-
Billing FAQs
- How Is SecMaster Billed?
- Can I Use SecMaster for Free?
- How Do I Change or Disable Auto Renewal for SecMaster?
- Will SecMaster Be Billed After It Expires?
- How Do I Renew SecMaster?
- Where Can I Unsubscribe from SecMaster?
- Where Can I View the Remaining Quotas of Security Data Collection and Security Data Packages?
- Can I Change the Billing Mode for SecMaster?
- Getting Started
-
User Guide
- Buying SecMaster
- Authorizing SecMaster
- Checking Security Overview
- Workspaces
- Viewing Purchased Resources
-
Security Governance
- Security Governance Overview
- Security Compliance Pack Description
- Authorizing SecMaster to Access Cloud Service Resources
- Subscribing to or Unsubscribing from a Compliance Pack
- Starting a Self-Assessment
- Viewing Security Compliance Overview
- Viewing Evaluation Results
- Viewing Policy Scanning Results
- Downloading a Compliance Report
- Security Situation
- Resource Manager
- Risk Prevention
- Threats
- Security Orchestration
-
Playbook Overview
- Ransomware Incident Response Solution
- Attack Link Analysis Alert Notification
- HSS Isolation and Killing of Malware
- Automatic Renaming of Alert Names
- Auto High-Risk Vulnerability Notification
- Automatic Notification of High-Risk Alerts
- Auto Blocking for High-risk Alerts
- Real-time Notification of Critical Organization and Management Operations
-
Settings
- Data Integration
-
Log Data Collection
- Data Collection Overview
- Data Collection Process
- Adding a Node
- Configuring a Component
- Adding a Connection
- Creating and Editing a Parser
- Adding and Editing a Collection Channel
- Verifying Log Collection
- Managing Connections
- Managing Parsers
- Managing Collection Channels
- Viewing Collection Nodes
- Managing Nodes and Components
- Partitioning a Disk
- Logstash Configuration Description
- Connector Rules
- Parser Rules
- Upgrading the Component Controller
- Customizing Directories
- Permissions Management
- Key Operations Recorded by CTS
-
Best Practices
-
Log Access and Transfer Operation Guide
- Solution Overview
- Resource Planning
- Process Flow
-
Procedure
- (Optional) Step 1: Buy an ECS
- (Optional) Step 2: Buy a Data Disk
- (Optional) Step 3: Attach a Data Disk
- Step 4: Create a Non-administrator IAM User
- Step 5: Configure Network Connection
- Step 6: Install the Component Controller (isap-agent)
- Step 7: Install the Log Collection Component (Logstash)
- (Optional) Step 8: Creating a Log Storage Pipeline
- Step 9: Configure a Connector
- (Optional) Step 10: Configure a Log Parser
- Step 11: Configure a Log Collection Channel
- Step 12: Verify Log Access and Transfer
- Credential Leakage Response Solution
-
Log Access and Transfer Operation Guide
-
API Reference
- Before You Start
- API Overview
- Calling APIs
-
API
- Alert Management
- Incident Management
- Indicator Management
- Playbook Management
- Alert Rule Management
- Playbook Version Management
- Playbook Rule Management
- Playbook Instance Management
- Playbook Approval Management
- Playbook Action Management
- Incident Relationship Management
- Data Class Management
- Workflow Management
- Data Space Management
- Pipelines
- Workspace Management
- Metering and Billing
- Metric Query
- Baseline Inspection
- Appendix
- FAQs
-
More Documents
-
User Guide (ME-Abu Dhabi Region)
- Service Overview
- Buying SecMaster
- Authorizing SecMaster
- Viewing Security Overview
- Workspaces
- Viewing Purchased Resources
-
Security Governance
- Security Governance Overview
- Security Compliance Pack Description
- Authorizing SecMaster to Access Cloud Service Resources
- Subscribing to or Unsubscribing from a Compliance Pack
- Starting a Self-Assessment
- Viewing Security Compliance Overview
- Viewing Evaluation Results
- Viewing Policy Scanning Results
- Downloading a Compliance Report
- Security Situation
- Resource Manager
- Risk Prevention
- Threat Operations
- Security Orchestration
-
Settings
- Data Integration
-
Log Data Collection
- Data Collection Overview
- Adding a Node
- Configuring a Component
- Adding a Connection
- Creating and Editing a Parser
- Adding and Editing a Collection Channel
- Managing Connections
- Managing Parsers
- Managing Collection Channels
- Viewing Collection Nodes
- Managing Nodes and Components
- Partitioning a Disk
- Logstash Configuration Description
- Connector Rules
- Parser Rules
- Upgrading the Component Controller
- Customizing Directories
- Permissions Management
- FAQs
- Change History
-
User Guide (Kuala Lumpur Region)
- Service Overview
- Authorizing SecMaster
- Security Overview
- Workspaces
- Viewing Purchased Resources
- Security Situation
- Resource Manager
-
Risk Prevention
-
Baseline Inspection
- Baseline Inspection Overview
- Creating a Custom Check Plan
- Starting an Immediate Baseline Check
- Viewing Check Results
- Handling Check Results
- Viewing Compliance Packs
- Creating a Custom Compliance Pack
- Importing and Exporting a Compliance Pack
- Viewing Check Items
- Creating a Custom Check Item
- Importing and Exporting Check Items
- Vulnerability Management
- Policy Management
-
Baseline Inspection
-
Threat Operations
- Incident Management
- Alert Management
- Indicator Management
- Intelligent Modeling
- Security Analysis
- Data Delivery
-
Security Orchestration
- Security Orchestration Overview
- Built-in Playbooks
- Security Orchestration Process
- (Optional) Configuring and Enabling a Workflow
- Configuring and Enabling a Playbook
- Operation Object Management
- Playbook Orchestration Management
- Layout Management
- Plug-in Management
- Settings
-
FAQs
-
Product Consulting
- Why Is There No Attack Data or Only A Small Amount of Attack Data?
- Where Does SecMaster Obtain Its Data From?
- What Are the Dependencies and Differences Between SecMaster and Other Security Services?
- What Are the Differences Between SecMaster and HSS?
- How Do I Update My Security Score?
- How Do I Handle a Brute-force Attack?
- Issues About Data Synchronization and Data Consistency
- About Data Collection Faults
-
Product Consulting
- Change History
-
User Guide (ME-Abu Dhabi Region)
- General Reference
Copied.
Managing Models
Scenario
This topic walks you through how to manage models, such as enabling, disabling, and deleting a model.
Limitations and Constraints
Only custom models can be enabled, disabled, and deleted.
Procedure
- Log in to the management console.
- Click
in the upper part of the page and choose Security > SecMaster.
- In the navigation pane on the left, choose Workspaces > Management. In the workspace list, click the name of the target workspace.
- In the navigation pane on the left, choose Threat Operations > Intelligent Modeling.
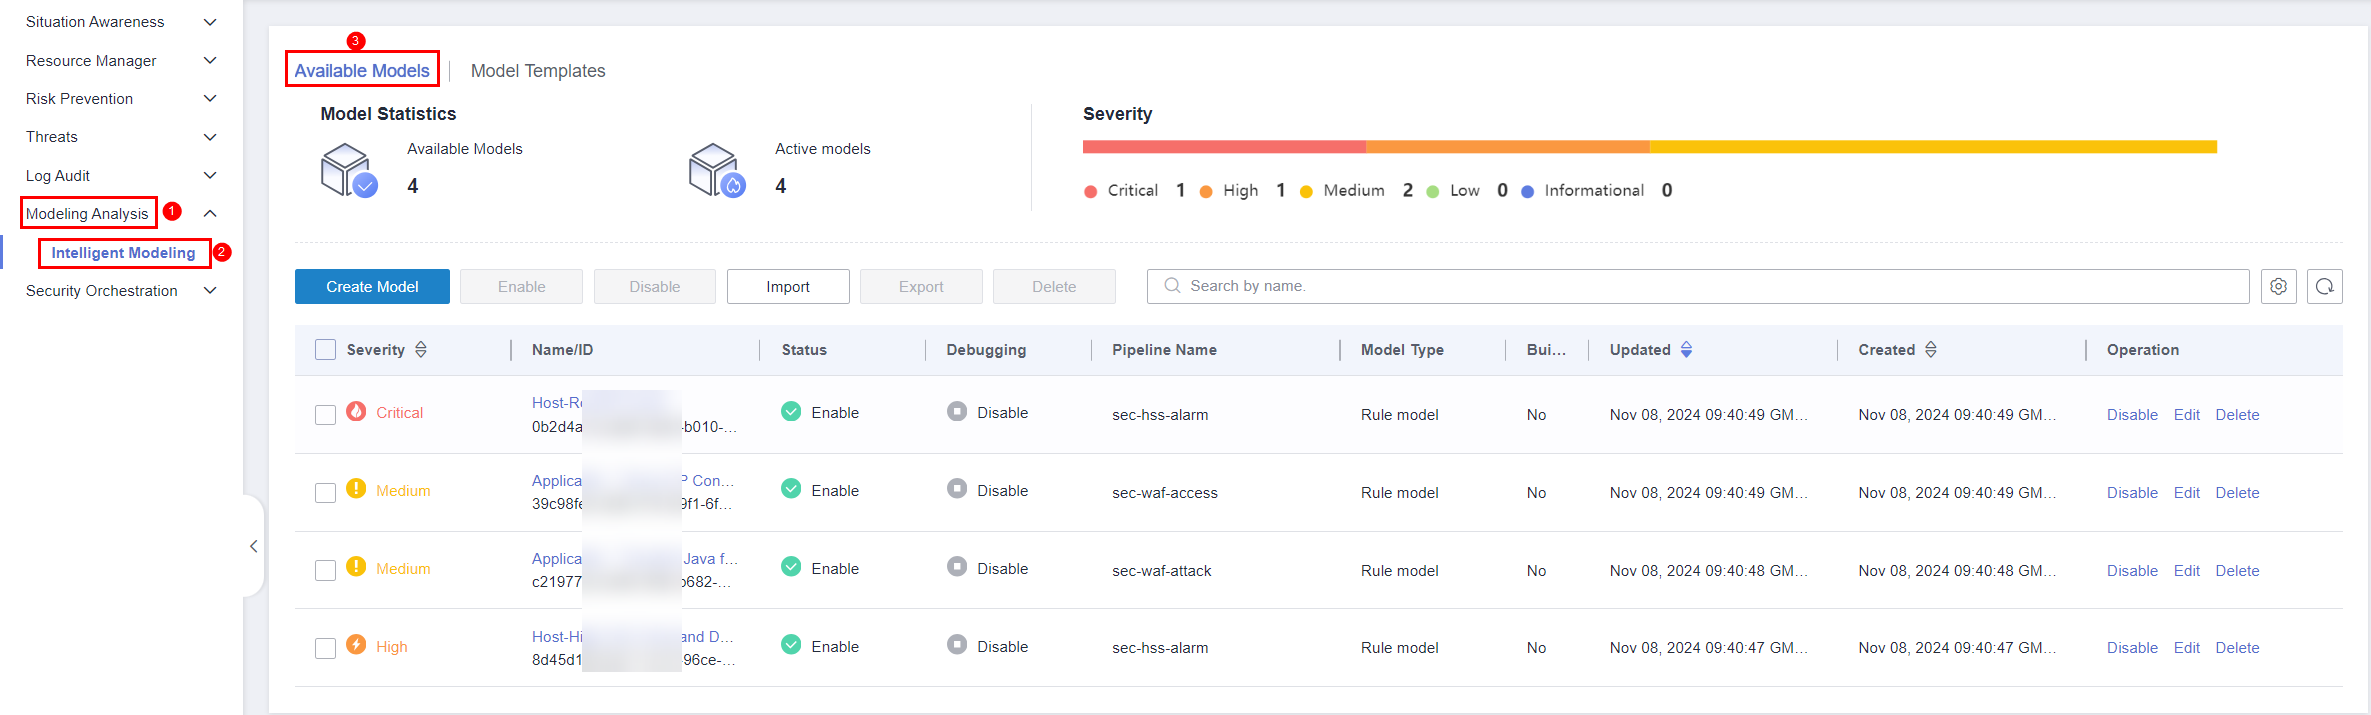
- On the Available Models tab, manage models.
Table 1 Managing models Operation
Description
Enable
In the model list, click Enable in the Operation column of the target model.NOTE:
To enable models in batches, select all models you want to start and click Enable in the upper left corner of the list.
If the model status changes to Enable, the model is successfully started.
Disable
In the model list, locate the row that contains the target model and click Disable in the Operation column.
NOTE:
To disable models in batches, select all models and click Disable in the upper left corner of the list.
When the alert model status changes to Disable, the model is disabled.
Delete
- In the model list, locate the row that contains the target model and click Delete in the Operation column.
NOTE:
To delete models in batches, select all models to be deleted and click Delete in the upper left corner of the list.
- In the displayed dialog box, click OK.
- In the model list, locate the row that contains the target model and click Delete in the Operation column.
Feedback
Was this page helpful?
Provide feedbackThank you very much for your feedback. We will continue working to improve the documentation.See the reply and handling status in My Cloud VOC.
For any further questions, feel free to contact us through the chatbot.
Chatbot