
Creating and Editing a Model
Scenarios
SecMaster can use models to monitor log data in pipelines. If SecMaster detects the data that hits trigger conditions in a model, SecMaster generates an alert.
You can use a preconfigured model template to create a model. You can also create an alert model from scratch.
Creating an Alert Model Using a Preconfigured Model Template
- Log in to the management console.
- Click
 in the upper part of the page and choose Security > SecMaster.
 - In the navigation pane on the left, choose Workspaces > Management. In the workspace list, click the name of the target workspace.
- In the navigation pane on the left, choose and select the Model Templates tab.
Figure 1 Model Templates tab
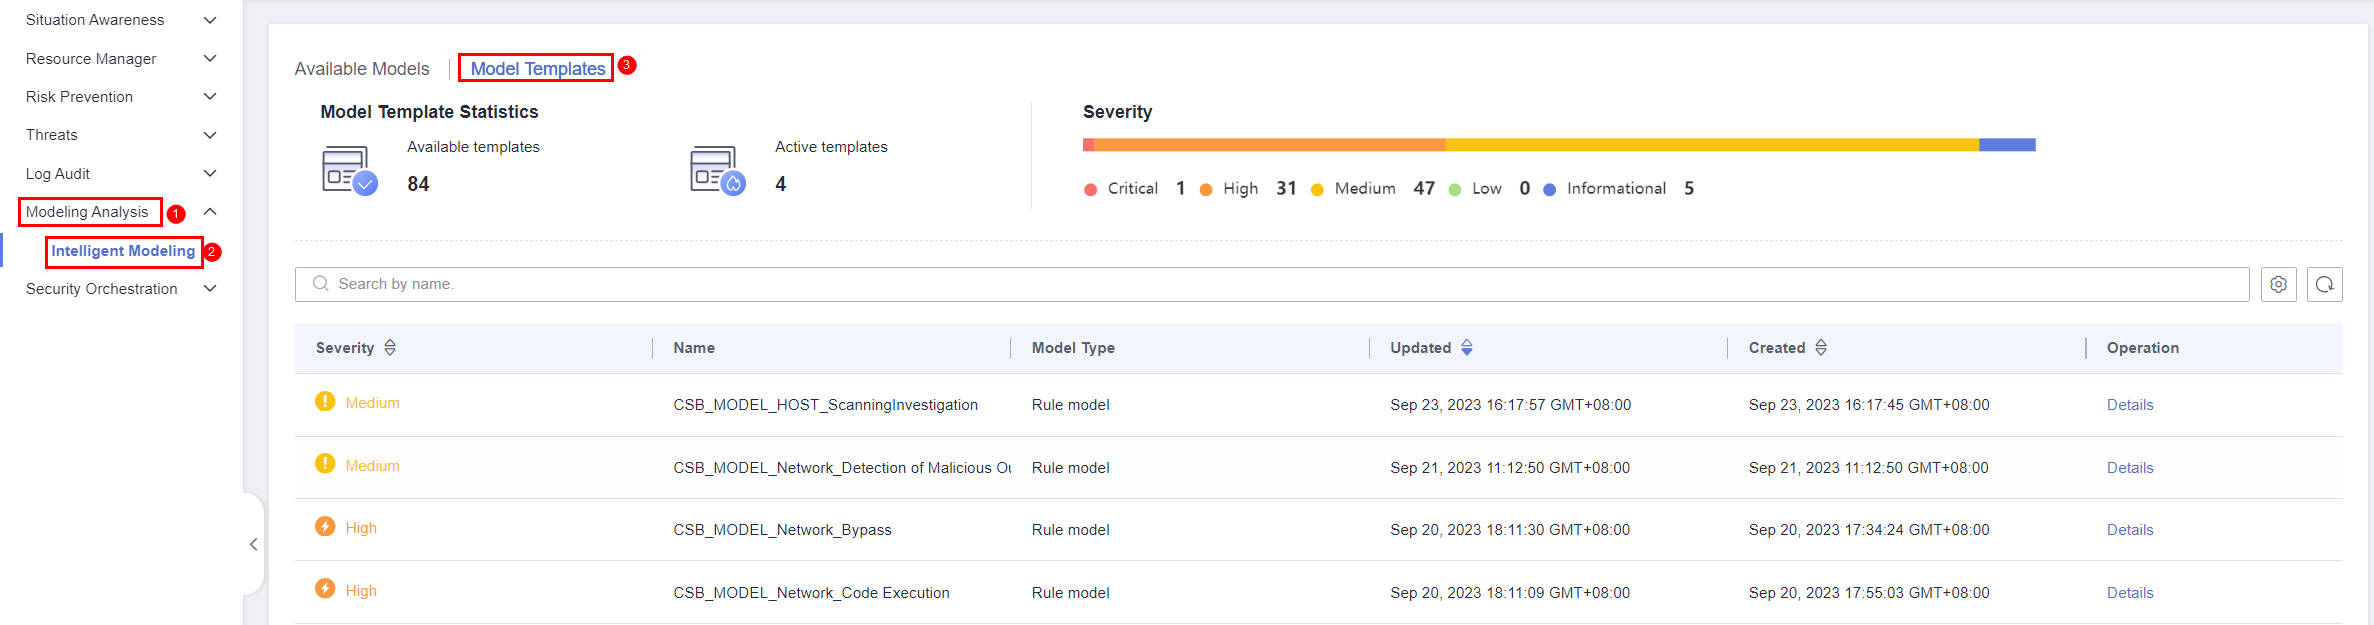
- In the model template list, click Details in the Operation column of the target model template. The template details page is displayed on the right.
- On the model template details page, click Create Model in the lower right corner. The page for creating an alert model is displayed.
- On the Create Threat Model page, configure basic information about the model by referring to Table 1.
Table 1 Basic alert model parameters Parameter
Description
Pipeline Name
Select the execution pipeline for the alert model based on the pipeline described in Restrictions area in the Description text box.
Model Name
Name of the alert model.
Severity
Severity of the alert model.
You can set the severity to Critical, High, Medium, Low, or Informational.
- Critical: A critical alert indicates that the system is severely attacked, which may cause data loss, system breakdown, or long service interruption. For example, such alerts are generated if ransomware encryption behaviors or malware is detected. You need to handle them immediately to avoid severe system damage.
- High: A high-risk alert indicates that the system may be under an attack that has not caused serious damage. For example, such alerts are generated if unauthorized login attempts are detected or unsafe commands (for deleting critical system files or modifying system settings) are executed. You need to investigate and take measures in a timely manner to prevent attacks from spreading.
- Medium: A medium-risk alert indicates that the system has potential security threats, but there are no obvious signs of being attacked. For example, if abnormal modifications of a file or directory are detected, there may be potential attack paths or configuration errors in the system. You need to further analyze and take proper preventive measures to enhance system security.
- Low: A low-risk alert indicates that a minor security threat exists in the system but does not have significant impact on your system. For example, such alerts are generated if port scans are detected, indicating that there may be attackers trying to find system vulnerabilities. These alerts do not require immediate emergency measures. If you have high requirements for asset security, you should also pay attention to alerts at this level.
- Informational: A potential error exists and may affect services. If you have high requirements for asset security, you should also pay attention to alerts at this level.
Alarm Type
Alarm type displayed after the alert model is triggered.
Model Type
The default value is Rule model.
Description
Description of the alert model
Status
Indicates whether to enable the alert model.
The status set here can be changed after the entire alert model is set successfully.
- After the setting is complete, click Next in the lower right corner of the page. The page for setting the model logic is displayed.
- Set the model logic. For details about the parameters, see Table 2.
Table 2 Configure Model Logic Parameter
Description
Query Rule
Set alert query rules. After the setting is complete, click Run and view the running result.
A query analysis statement consists of a query statement and an analysis statement. The format is Query Statement|Analysis Statement. For details about the syntax of query analysis statements, see Overview.NOTE:If the reserved field is of the text type, MATCH_QUERY is used for word segmentation queries by default.
Query Plan
Set an alert query plan.
- Running query interval: xx minutes/hour/day.
If the running query interval is minute, set this parameter to a value ranging from 5 to 59 minutes. If the running query interval is hour, set this parameter to a value ranging from 1 to 23 hours. If the running query interval is day, set this parameter to a value ranging from 1 to 14 days.
- Time window: xx minutes/hour/day.
If the time window is minute, the value ranges from 5 minutes to 59 minutes. If the time window is hour, the value ranges from 1 hour to 23 hours. If the time window is day, the value ranges from 1 day to 14 days.
- Execution Delay: xx minutes. The value ranges from 0 to 5 minutes.
Advanced Alarm Settings
- Custom Information: Customize extended alert information.
Click Add, and set the key and value information.
- Alarm Details: Enter the alarm name, description, and handling suggestions.
Trigger Condition
Sets alert triggering conditions. The value can be greater than, equal to, not equal to, or less than xx.
If there are multiple trigger conditions, click Add and add them. A maximum of five trigger conditions can be added.
If there are multiple trigger conditions, SecMaster scans log data to hit each trigger condition from top to bottom and generates all types of alerts for hit trigger conditions.
Alarm Trigger
The way to trigger alerts for queried results. The options are as follows:
- One alert for all query results
- One alert for each query result
Debugging
Sets whether to generate debugging alarms.
Suppression
Specifies whether to stop the query after an alert is generated.
- If Suppression is enabled, the query stops after an alert is generated.
- If Suppression is disabled, the query is not stopped after an alert is generated.
- Running query interval: xx minutes/hour/day.
- After the setting is complete, click Next in the lower right corner of the page. The model details preview page is displayed.
- After confirming that the preview is correct, click OK in the lower right corner of the page.
Creating a Custom Alert Model
- Log in to the management console.
- Click in the upper part of the page and choose Security > SecMaster.
- In the navigation pane on the left, choose Workspaces > Management. In the workspace list, click the name of the target workspace.
- In the navigation pane on the left, choose .
Figure 2 Available Models
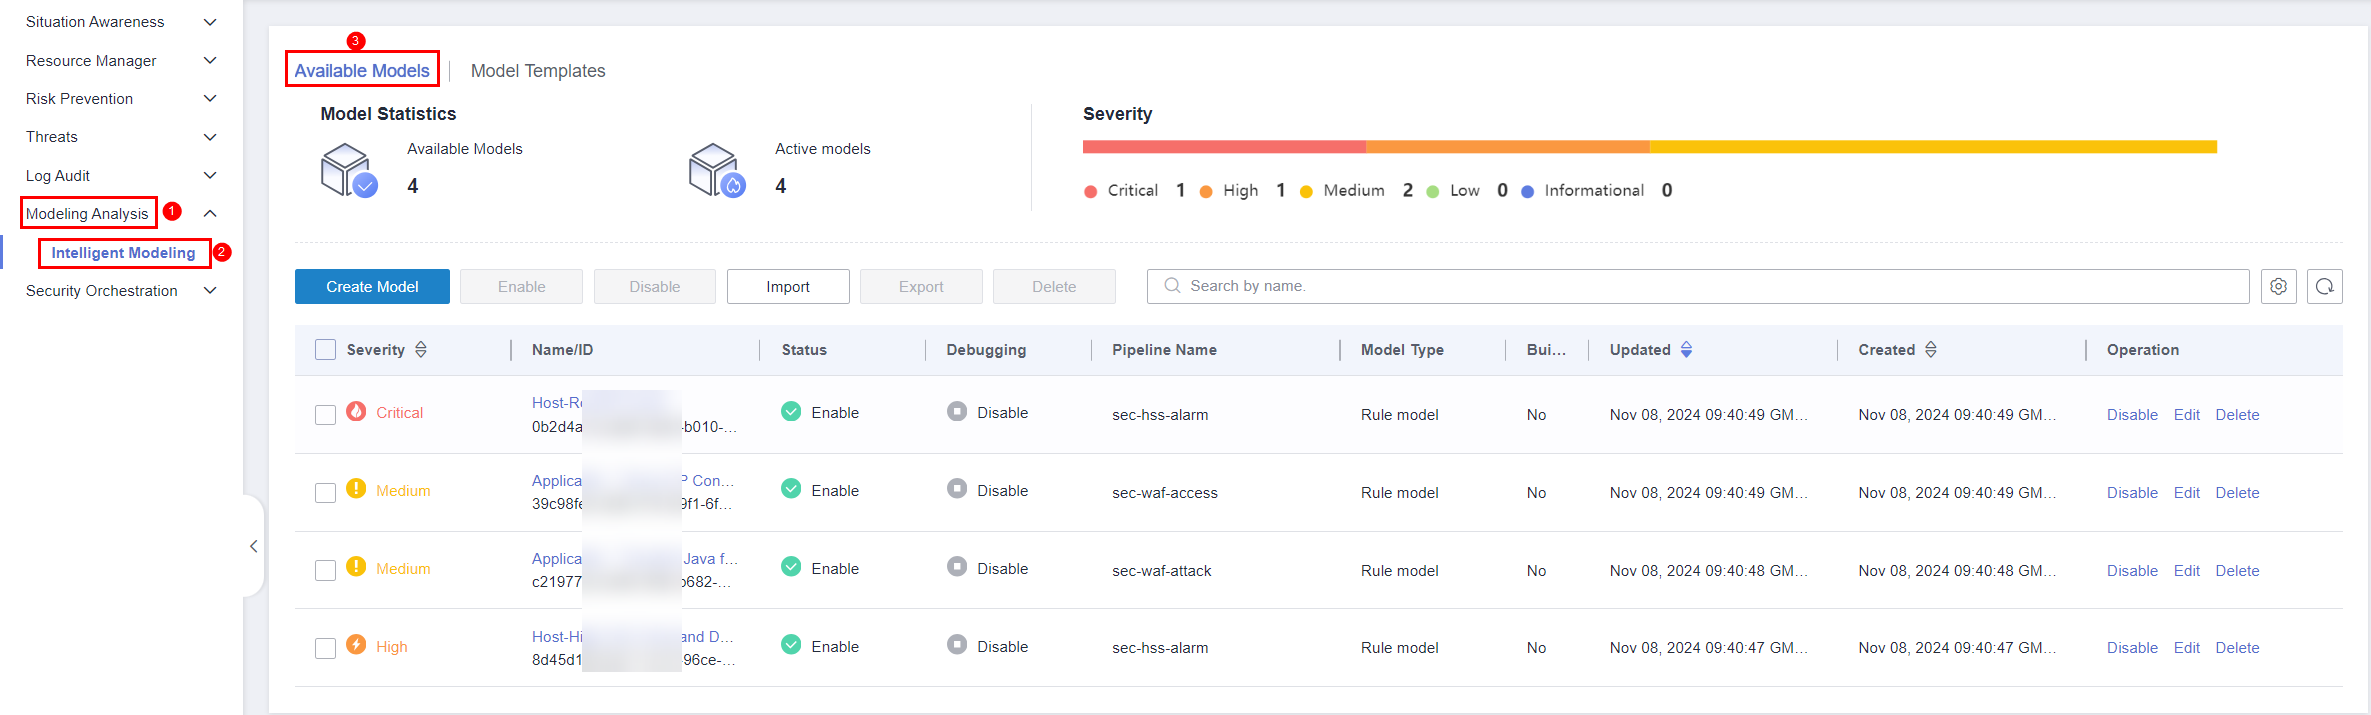
- Click Create Model in the upper left corner of the Available Models tab.
- On the Create Model slide-out panel displayed, configure basic information about the alert model. For details about the parameters, see Table 3.
Table 3 Basic alert model parameters Parameter
Description
Pipeline Name
Select the execution pipeline of the alert model.
Model Name
Name of the alert model.
Severity
Severity of the alert model. You can set the severity to Critical, High Risk, Medium Risk, Low Risk, or Warning.
- Critical: A critical alert indicates that the system is severely attacked, which may cause data loss, system breakdown, or long service interruption. For example, such alerts are generated if ransomware encryption behaviors or malware is detected. You need to handle them immediately to avoid severe system damage.
- High: A high-risk alert indicates that the system may be under an attack that has not caused serious damage. For example, such alerts are generated if unauthorized login attempts are detected or unsafe commands (for deleting critical system files or modifying system settings) are executed. You need to investigate and take measures in a timely manner to prevent attacks from spreading.
- Medium: A medium-risk alert indicates that the system has potential security threats, but there are no obvious signs of being attacked. For example, if abnormal modifications of a file or directory are detected, there may be potential attack paths or configuration errors in the system. You need to further analyze and take proper preventive measures to enhance system security.
- Low: A low-risk alert indicates that a minor security threat exists in the system but does not have significant impact on your system. For example, such alerts are generated if port scans are detected, indicating that there may be attackers trying to find system vulnerabilities. These alerts do not require immediate emergency measures. If you have high requirements for asset security, you should also pay attention to alerts at this level.
- Informational: A potential error exists and may affect services. If you have high requirements for asset security, you should also pay attention to alerts at this level.
Alarm Type
Alarm type displayed after the alert model is triggered.
Model Type
The default value is Rule model.
Description
Description of the alert model
Status
Indicates whether to enable the alert model.
The status set here can be changed after the entire alert model is set successfully.
- After the setting is complete, click Next in the lower right corner of the page. The page for setting the model logic is displayed.
- Set the model logic. For details about the parameters, see Table 4.
Table 4 Configure Model Logic Parameter
Description
Query Rule
Set alert query rules. After the setting is complete, click Run and view the running result.
For details about the syntax, see Overview.
Query Plan
Set an alert query plan.
- Running query interval: xx minutes/hour/day.
If the running query interval is minute, set this parameter to a value ranging from 5 to 59 minutes. If the running query interval is hour, set this parameter to a value ranging from 1 to 23 hours. If the running query interval is day, set this parameter to a value ranging from 1 to 14 days.
- Time window: xx minutes/hour/day.
If the time window is minute, the value ranges from 5 minutes to 59 minutes. If the time window is hour, the value ranges from 1 hour to 23 hours. If the time window is day, the value ranges from 1 day to 14 days.
- Execution Delay: xx minutes. The value ranges from 0 to 5 minutes.
Advanced Alarm Settings
Trigger Condition
Setting alert triggering conditions. The value can be greater than, equal to, not equal to, or less than xx.
To configure multiple trigger conditions, click Add and add them one by one. A maximum of five trigger conditions can be added.
If there are multiple trigger conditions, SecMaster scans log data to hit each trigger condition and generates all types of alerts for hit trigger conditions.
Alarm Trigger
The way to trigger alerts for queried result. The options are as follows:
- One alert for all query results
- One alert for each query result
Debugging
Sets whether to generate debugging alarms.
Suppression
Specifies whether to stop the query after an alert is generated.
- If Suppression is enabled, the query stops after an alert is generated.
- If Suppression is disabled, the query is not stopped after an alert is generated.
- Running query interval: xx minutes/hour/day.
- After the setting is complete, click Next in the lower right corner of the page. The model details preview page is displayed.
- After confirming that the preview is correct, click OK in the lower right corner of the page.
Editing a Model
Only custom models can be edited.
- Log in to the management console.
- Click in the upper part of the page and choose Security > SecMaster.
- In the navigation pane on the left, choose Workspaces > Management. In the workspace list, click the name of the target workspace.
- In the navigation pane on the left, choose .
Figure 3 Available Models
- In the available model list, click Edit in the Operation column of the target model.
- On the Edit Model slide-out panel, configure basic information about the alert model. For details about the parameters, see Table 5.
Table 5 Basic alert model parameters Parameter
Description
Pipeline Name
Select the execution pipeline of the alert model. Editing the pipeline name is not supported currently.
Model Name
Name of the alert model.
Severity
Severity of the alert model. You can set the severity to Critical, High, Medium Low, or Informational.
Alarm Type
Alarm type displayed after the alert model is triggered.
Model Type
The default value is Rule model.
Description
Description of the alert model
- After the setting is complete, click Next in the lower right corner of the page. The page for setting the model logic is displayed.
- Set the model logic. For details about the parameters, see Table 6.
Table 6 Configure Model Logic Parameter
Description
Query Rule
Set alert query rules. After the setting is complete, click Run and view the running result.
A query analysis statement consists of a query statement and an analysis statement. The format is Query Statement|Analysis Statement. For details about the syntax of query analysis statements, see Overview.NOTE:If the reserved field is of the text type, MATCH_QUERY is used for word segmentation queries by default.
Query Plan
Set an alert query plan.
- Running query interval: xx minutes/hour/day.
If the running query interval is minute, set this parameter to a value ranging from 5 to 59 minutes. If the running query interval is hour, set this parameter to a value ranging from 1 to 23 hours. If the running query interval is day, set this parameter to a value ranging from 1 to 14 days.
- Time window: xx minutes/hour/day.
If the time window is minute, the value ranges from 5 minutes to 59 minutes. If the time window is hour, the value ranges from 1 hour to 23 hours. If the time window is day, the value ranges from 1 day to 14 days.
- Execution Delay: xx minutes. The value ranges from 0 to 5 minutes.
Advanced Alarm Settings
- Custom Information: Customize extended alert information.
Click Add, and set the key and value information.
- Alarm Details: Enter the alarm name, description, and handling suggestions.
Trigger Condition
Sets alert triggering conditions. The value can be greater than, equal to, not equal to, or less than xx.
If there are multiple trigger conditions, click Add and add them. A maximum of five trigger conditions can be added.
If there are multiple trigger conditions, SecMaster scans log data to hit each trigger condition from top to bottom and generates all types of alerts for hit trigger conditions.
Alarm Trigger
The way to trigger alerts for queried results. The options are as follows:
- One alert for all query results
- One alert for each query result
Debugging
Sets whether to generate debugging alarms.
Suppression
Specifies whether to stop the query after an alert is generated.
- If Suppression is enabled, the query stops after an alert is generated.
- If Suppression is disabled, the query is not stopped after an alert is generated.
- Running query interval: xx minutes/hour/day.
- After the setting is complete, click Next in the lower right corner of the page. The model details preview page is displayed.
- After confirming that the preview is correct, click OK in the lower right corner of the page.
Feedback
Was this page helpful?
Provide feedbackThank you very much for your feedback. We will continue working to improve the documentation.See the reply and handling status in My Cloud VOC.
For any further questions, feel free to contact us through the chatbot.
Chatbot


