Help Center/
GeminiDB/
GeminiDB HBase API/
Working with GeminiDB HBase API/
Instance Modifications/
Adding and Deleting Instance Nodes/
Manually Adding Instance Nodes
Updated on 2025-10-29 GMT+08:00
Manually Adding Instance Nodes
This section describes how to add nodes to an instance to suit your service requirements.
Usage Notes
- Adding nodes may lead to the decrease of operations per second (OPS). Perform this operation during off-peak hours.
- You can only add nodes when the instance status is Available or Checking restoration.
- Instances that one or more nodes are added to cannot be deleted.
- After the nodes are added, you can delete them by following Manually Deleting Instance Nodes.
- Currently, a maximum of 60 nodes are supported. To add more, choose Service Tickets > Create Service Ticket in the upper right corner of the console and contact the customer service.
Method 1
- Log in to the Huawei Cloud console.
- On the Instances page, locate the instance that you want to add nodes to and click its name.
- In the Node Information area on the Basic Information page, click Add Node.
Figure 1 Node information

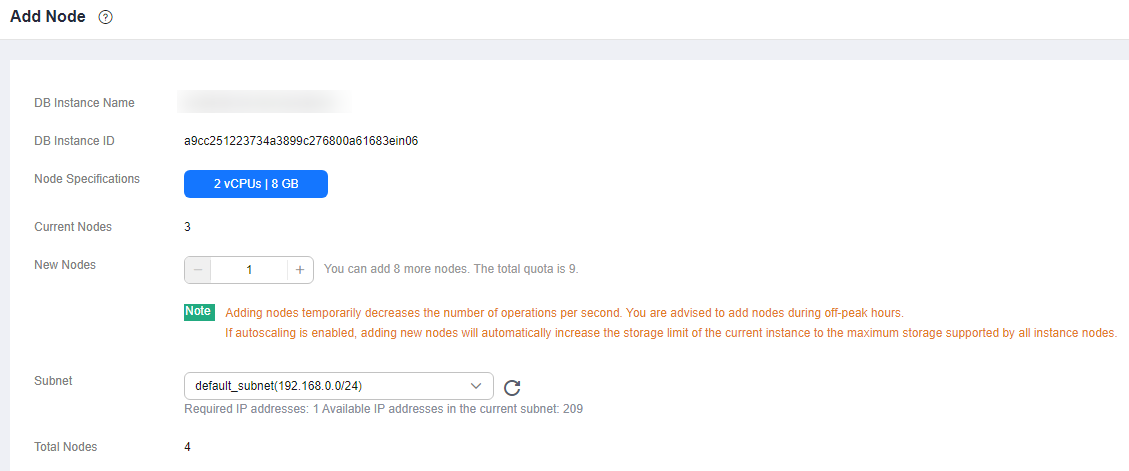
- Specify Add Nodes and click Next.
Figure 2 Adding nodes


- New nodes are of the same specifications as existing nodes. Once a new node is added, its specifications cannot be changed.
- New nodes and the instance can be in different subnets of the same VPC.
- On the displayed page, confirm the node configurations.
- Yearly/Monthly
- If you need to modify your settings, click Previous.
- If you do not need to modify your settings, click Next and complete the payment.
- Pay-per-use
- If you need to modify your settings, click Previous.
- If you do not need to modify your settings, click Submit.
- Yearly/Monthly
- View the results.
- When new nodes are being added, the instance status is Adding node.
- After the nodes are added, the instance status becomes Available.
- Click the instance name. In the Node Information area on the Basic Information page, view information about the new nodes.
Method 2
- Log in to the Huawei Cloud console.
- On the Instances page, locate the target instance and choose in the Operation column.
Figure 3 Adding nodes

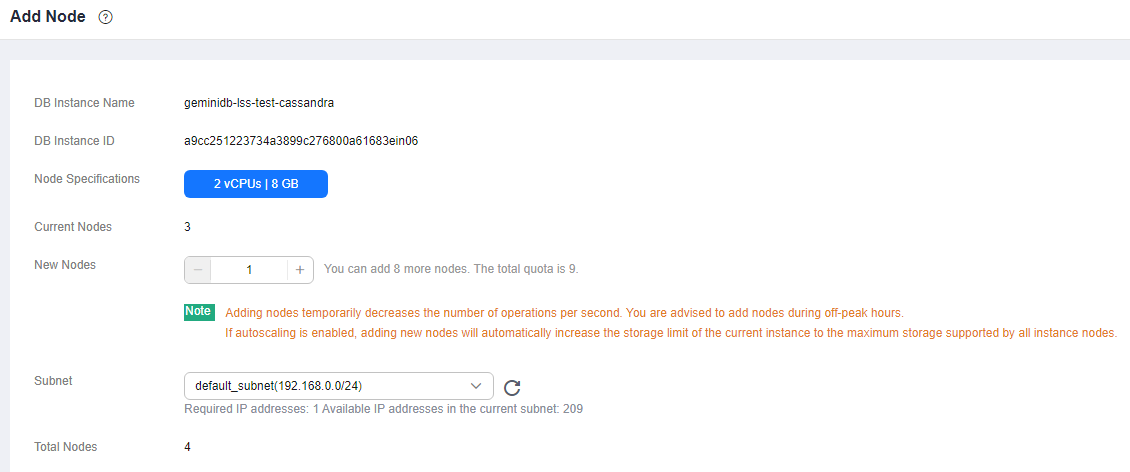
- Specify Add Nodes and click Next.
Figure 4 Adding nodes


- New nodes are of the same specifications as existing nodes. Once a new node is added, its specifications cannot be changed.
- New nodes and the instance can be in different subnets of the same VPC.
- On the displayed page, confirm the node configurations.
- Yearly/Monthly
- If you need to modify your settings, click Previous.
- If you do not need to modify your settings, click Next and complete the payment.
- Pay-per-use
- If you need to modify your settings, click Previous.
- If you do not need to modify your settings, click Submit.
- Yearly/Monthly
- View the results.
- When new nodes are being added, the instance status is Adding node.
- After the nodes are added, the instance status becomes Available.
- Click the instance name. In the Node Information area on the Basic Information page, view information about the new nodes.
Feedback
Was this page helpful?
Provide feedbackThank you very much for your feedback. We will continue working to improve the documentation.See the reply and handling status in My Cloud VOC.
The system is busy. Please try again later.
For any further questions, feel free to contact us through the chatbot.
Chatbot


