Granting UCS Permissions to IAM Users
Application Scenarios
UCS permissions management offers fine-grained control over permissions using IAM and Kubernetes RBAC. It also supports IAM-based fine-grained permissions control and IAM token-based authentication. With cluster-, fleet-, cluster namespace-, and fleet namespace-level permissions control, users' access to specific resources can be effectively restricted, and permissions of different departments or projects of an enterprise can be isolated, ensuring resource isolation and security.
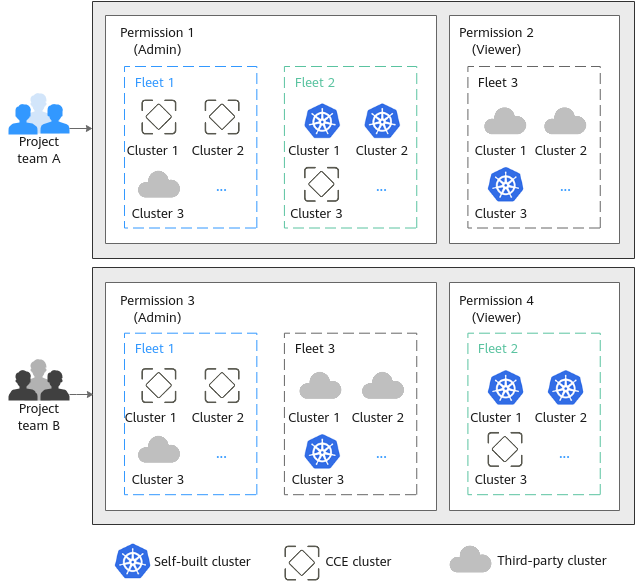
Assume that you have two project teams, each involving multiple members. Figure 1 shows how their permissions are granted.
- During the development, project team A needs the Admin permission on fleets 1 and 2 and the Viewer permission on fleet 3.
- During the development, project team B needs the Admin permission on fleets 1 and 3 and the Viewer permission on fleet 2.
|
Authorization Model |
Description |
Permissions Management Object |
|---|---|---|
|
IAM authorization |
IAM authorization for user groups is primarily concerned with managing access to cloud platform resources. Policies are used to control the permissions of each user group on specific resources. IAM emphasizes precise control over cloud resources. |
Clusters, Fleets, Add-ons, Policy Center, Configuration Management, Traffic Distribution, Service Meshes, and Container Intelligent Analysis |
|
RBAC authorization |
RBAC authorization for user groups is role-based. Permissions are associated with roles, which are then assigned to user groups. RBAC authorization is typically employed for internal access control within applications. RBAC places greater emphasis on aligning roles with tasks. |
Resource objects such as Deployment and Service in a cluster |
Authorization Scheme
For permission isolation, use both IAM system-defined policies and UCS permissions management. IAM system-defined policies control users' access to UCS console functions. UCS permissions management controls users' access to fleet and cluster resources.
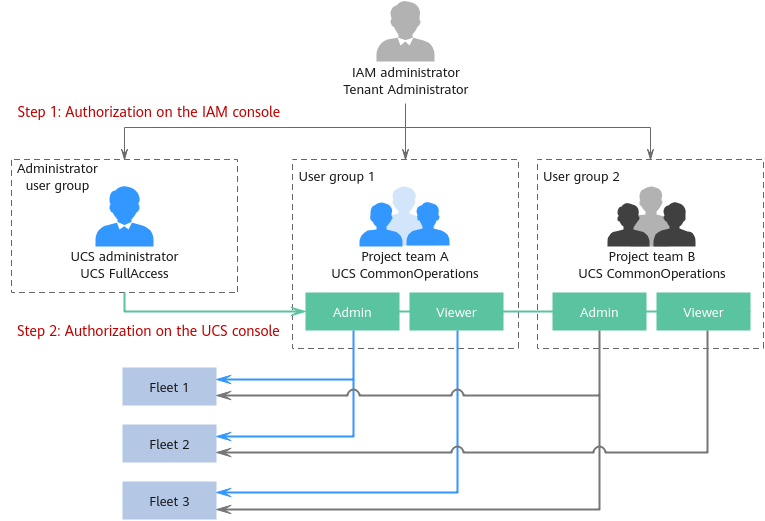
As shown in Figure 2, authorization consists of the following steps:
- Step 1: Authorization on the IAM console. The IAM administrator with the Tenant Administrator permissions needs to create three user groups. One is the administrator user group, and the other two are user groups (group 1 and group 2) of two project teams (team A and team B). The UCS FullAccess and UCS CommonOperations permissions are granted to the user groups, respectively.
- Step 2: Authorization on the UCS console. The UCS administrator with the UCS FullAccess permissions adds the administrator and viewer permissions for user groups 1 and 2.
The administrator permissions of user group 1 are added to fleet 1 and fleet 2, and the viewer permissions of user group 1 are added to fleet 3. The administrator permissions of user group 2 are added to fleet 1 and fleet 3, and the viewer permissions of user group 2 are added to fleet 2.
Prerequisites
- The account has subscribed to UCS and fleet and cluster resources have been available according to Figure 1.
- The permission data has been prepared according to Figure 2.
Table 2 Data preparation on the IAM console User Group
User
Permissions
Administrator user group: UCS_Group_admin
UCS_Group_admin_User1
UCS FullAccess
User group 1: UCS_Group_1
UCS_Group_1_User1, UCS_Group_1_User2, ...
UCS CommonOperations
User group 2: UCS_Group_2
UCS_Group_2_User1, UCS_Group_2_User2, ...
UCS CommonOperations
Table 3 Data preparation on the UCS console User Group
User
Permission Type
Permission Name
User group 1
UCS_Group_1_User1, UCS_Group_1_User2, ...
Administrator
ucs-group-1-admin
Viewer
ucs-group-1-readonly
User group 2
UCS_Group_2_User1, UCS_Group_2_User2, ...
Administrator
ucs-group-2-admin
Viewer
ucs-group-2-readonly
Step 1: Create a User Group and Grant Permissions to the IAM Administrator
- Log in to the IAM console as the IAM administrator.
- In the navigation pane, choose User Groups. In the upper right corner, click Create User Group.
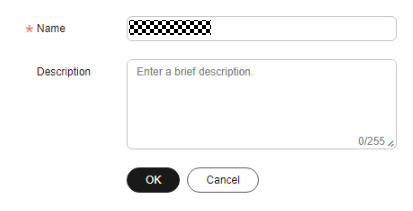
- In the displayed dialog box, enter the administrator user group name and description, and click OK.
Figure 3 Creating a user group

- In the user group list, click Authorize in the row that contains the target user group.
Figure 4 Granting permissions to the user group

- Search for and select the permission policy UCS FullAccess.
Figure 5 Selecting the permission policy

- Click Next and select the authorization scope.
The default option All resources is selected, indicating that the IAM user will be able to use all resources, including those in enterprise projects, region-specific projects, and global services under your account based on granted permissions.
Table 4 Authorization scopes Authorization Scope
Description
All resources
IAM users will be able to use all resources, including those in enterprise projects, region-specific projects, and global services under your account based on granted permissions.
Enterprise projects
IAM users will be able to use resources in the selected enterprise projects based on granted permissions.
For example, an enterprise project may contain resources that are deployed in different regions. After you associate the enterprise project with the IAM users, they can access the resources in this enterprise project based on granted permissions.
Region-specific projects
IAM users will be able to use resources in the selected region-specific projects based on granted permissions.
- Click OK.
- In the navigation pane, choose Users. In the upper right corner, click Create User.
Enter the username and initial password. For details about other parameters, see Creating an IAM User.
- Click Next and select the user group authorized in 4.
Figure 6 Adding the user to the user group

- Click Create.
- Repeat the preceding steps to create and authorize other user groups and users in Table 2.
Step 2: Perform RBAC Authorization for the User Groups
- Log in to the UCS console as the UCS administrator. In the navigation pane, choose Permissions.
- Select a cluster or fleet for which you want to add permissions from the drop-down list on the right.
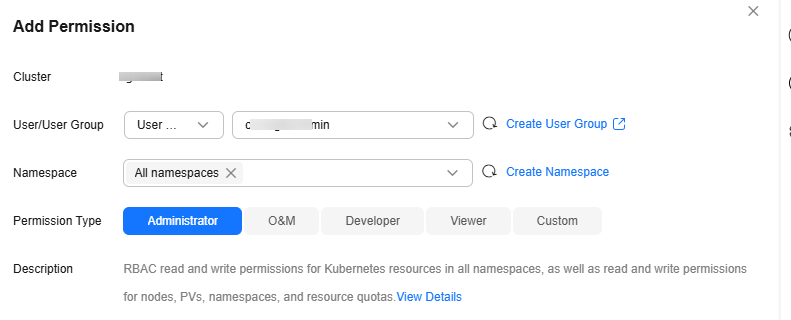
- Click Add Permission in the upper right corner.
- In the window that slides from the right, confirm the cluster or fleet name, set Namespace (for example, select All namespaces), select the target user or user group, and set Permission Type.

If you do not have IAM permissions, you cannot select users or user groups when configuring permissions for other users or user groups. In this case, you can enter a user ID or user group ID.
- Click OK.

- Repeat the preceding steps to add different types of permissions for other users or user groups in Table 3.
Feedback
Was this page helpful?
Provide feedbackThank you very much for your feedback. We will continue working to improve the documentation.See the reply and handling status in My Cloud VOC.
For any further questions, feel free to contact us through the chatbot.
Chatbot


