Using ELB to Build a Unified Public Network Access Entry for CAE Applications
Context
During enterprises' digital transformation, containerized applications deployed by CAE usually run in Virtual Private Cloud (VPC). Due to the network isolation mechanism, private IP addresses cannot be directly accessed by public network users.
Elastic Load Balance (ELB) distributes public network traffic to multiple CAE components based on rules. It is the core solution for public network access of services in a VPC.
Solution
This solution uses ELB as the core and performs multi-step collaborative configuration to build a unified public network access entry for CAE applications.
This section describes this solution.
- Step 1: Use CAE to Create an Environment and Application and View Network Information
In CAE, create an environment and application and record network information.
- Step 2: Use CAE to Create a Nginx Component
In CAE, create a Nginx component by deploying an image.
- Step 3: Use ELB to Create a Dedicated Load Balancer
In ELB, create a dedicated load balancer and bind an EIP to it. The load balancer must be in the same VPC and subnet as the CAE environment.
- Step 4: Use CAE to Configure a Component Access Mode
In CAE, configure a load balancer access mode for the component and associate the load balancer with the CAE component. Then, access the CAE application through the public IP address.
Prerequisites
You have registered a Huawei account, enabled Huawei Cloud services, and logged in.
Step 1: Use CAE to Create an Environment and Application and View Network Information
Creating an Environment
- Log in to CAE.
- Click
 next to Environment in the upper part of the page.

- On the Create Environment page, set parameters by referring to Table 1. For details, see Creating an Environment.
Table 1 Parameters for creating an environment Parameter
Example Value
Environment
Enter env-test.
Enterprise Project
default is selected by default.
Virtual Private Cloud
Select vpc-cae (xxx.xxx.x.x/xx).
Subnet
Select subnet-2 (1xxx.xxx.x.x/xx).
Security Group
Select Use existing and then default from the drop-down list.
Organization
Select Create Organization from the drop-down list and enter a name, for example, group-test.
- Click OK.
Creating an Application
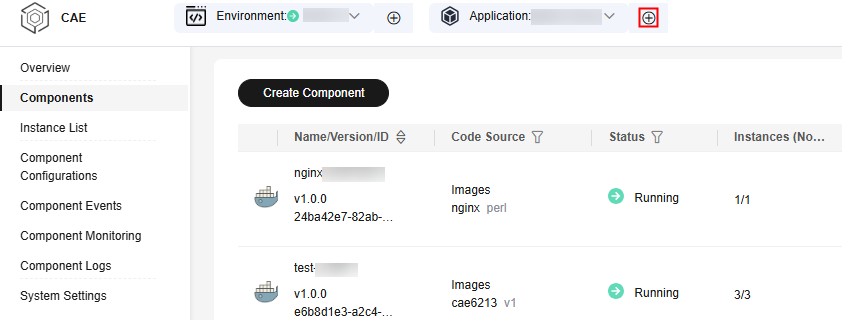
- Choose Components and click
 on the right of the Application module in the upper part of the page.

- Enter the application name app-test and click OK.
Viewing Network Information
- Choose Overview.
- In the lower part of the page, view the network information of the current environment and record the VPC and subnet information.
When creating a dedicated load balancer, you need to set the VPC and subnet of the load balancer. The VPC and subnet must be the same as those of the CAE environment.

Step 2: Use CAE to Create a Nginx Component
- On the CAE console, choose Components in the navigation pane.
- In the upper part of the page, select the created environment (env-test) and application (app-test).
- Click Create Component. On the displayed page, set parameters by referring to Table 2. For details, see Creating a Component.
Table 2 Parameters for creating a component Parameter
Example Value
Component
Enter nginx-test.
Version
Enter 1.0.0.
Specifications
Select 0.5Core and 1GiB.
Instances
Set it to 1.
Code Source
- Select Images.
- Select Open Source Images.
- Locate the Nginx image and select a Nginx image version, for example, mainline.
- Click Create and Deploy Component.
- In the displayed dialog box, confirm the component information and click Deploy Now.
Step 3: Use ELB to Create a Dedicated Load Balancer
- Log in to ELB.
- Click Buy Elastic Load Balancer and set parameters by referring to Table 3. For details, see Creating a Dedicated Load Balancer.
Table 3 Parameters for creating a dedicated load balancer Parameter
Example Value
Type
Select Dedicated load balancer.
Billing Mode
Select Pay-per-use.
Region
Select the region where the CAE environment is located.
AZ
Retain the default value.
Name
Enter elb-test.
Enterprise Project
Select default.
Specifications
- Specification Type: Select Fixed.
- Select Network load balancing (TCP/UDP).
- Retain the default value.
Network Type
Select Private IPv4 network.
VPC
Select vpc-cae(xxx.xxx.x.x/xx) where the CAE environment is located.
Frontend Subnet
Select subnet-2 (xx.xx.xx.xx/xx) where the CAE environment is located.
IPv4 Address
Select Automatically assign IP address.
Backend Subnet
Select Subnet of the load balancer.
IP as a Backend
Retain the default value
 .
.EIP
Select Auto assign. A new EIP will be assigned to the load balancer. For details about the parameters, see EIP.
EIP Type
Select Dynamic BGP.
Billed By
Select Traffic.
Bandwidth (Mbit/s)
Retain the default value.
- Click Buy Now.
- View the ELB and EIP information on the Elastic Load Balance page.

Step 4: Use CAE to Configure a Component Access Mode
- Log in to CAE.
- Choose Component Configurations.
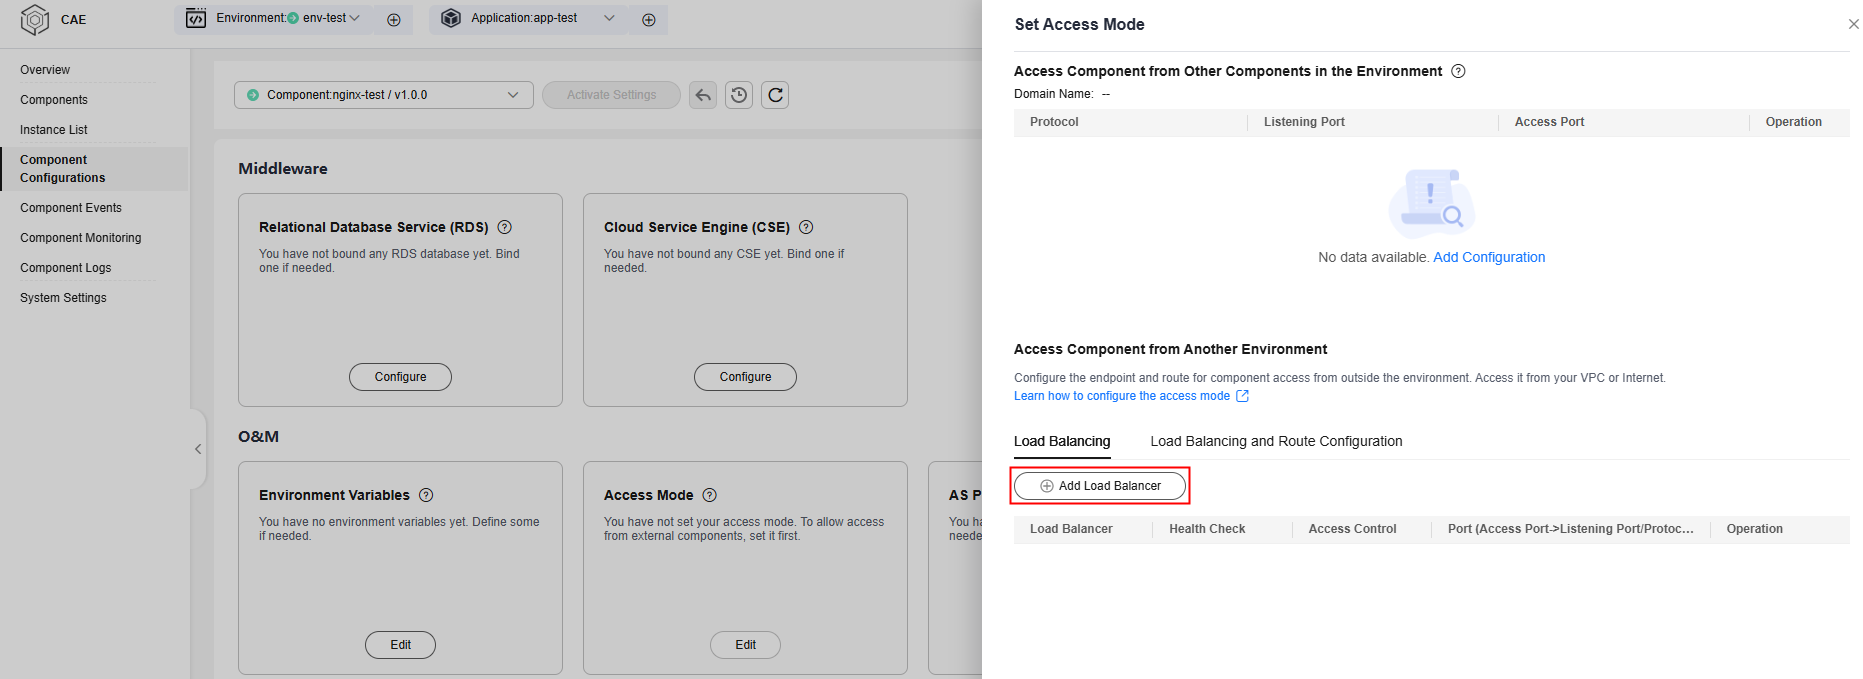
- Click Edit on the Access Mode card.
- In the Access Component from Another Environment area, click Load Balancing > Add Load Balancer.

- On the Create Load Balancer page, set parameters by referring to Table 4.
Table 4 Parameters for configuring a load balancer Parameter
Example Value
Load Balancer
- Select Dedicated.
- Select elb-test created in the previous step from the drop-down list.
Health Check
Select Enable.
Access Control
Select Allow all IP addresses.
Port Settings
- Protocol: Select TCP.
- Listening Port: Enter 80.
- Access Port: Enter 80.
- Click OK.
- On the component configuration page, click Activate Settings > OK.
- The public IP address is displayed on the Access Mode card. It is the EIP that you purchased and bound to the dedicated load balancer in the previous step.
- Access the public IP address using a browser to view the Nginx static web page.

Feedback
Was this page helpful?
Provide feedbackThank you very much for your feedback. We will continue working to improve the documentation.See the reply and handling status in My Cloud VOC.
For any further questions, feel free to contact us through the chatbot.
Chatbot


