Huawei Cloud AAD, DDoS Scheduling Center, and CDN Interworking
Scenarios
Huawei Cloud AAD and CDN are scheduled based on custom rules set by the DDoS scheduling center. Under normal conditions, traffic is directed to the closest CDN node for enhanced performance. In the event of an attack, the traffic is rerouted to AAD for scrubbing.
Constraints and Limitations
You need to submit a work order to contact the Anti-DDoS Service team to obtain the CDN scheduling permission.
Procedure
- Log in to the management console.
- Select a region in the upper part of the page, click
 in the upper left corner of the page, and choose . The Anti-DDoS page is displayed.
 - In the navigation tree on the left, choose . The CDN Scheduling page is displayed.
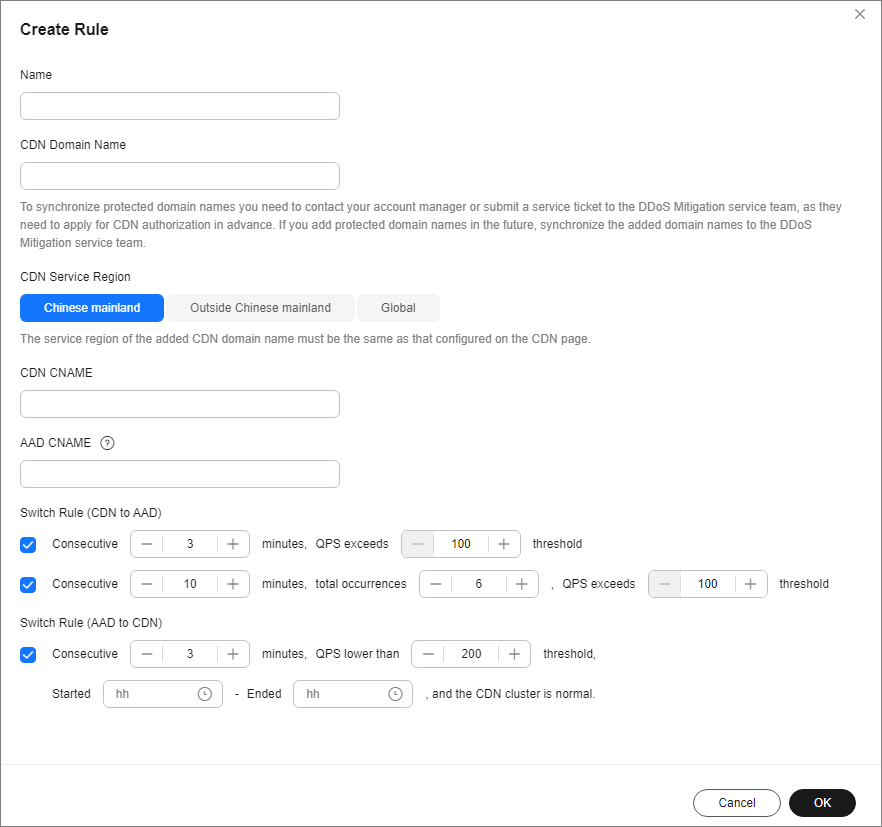
- Click Create Rule.
Figure 1 Rule details

Table 1 Rule details Parameter
Description
Name
Enter the name of a user-defined CDN scheduling rule.
CDN Domain Name
Enter a CDN domain name. The domain name can contain only letters, digits, hyphens (-), and periods (.), and cannot exceed 64 characters.
CDN Service Scope
The region of the CDN domain name to be added must be the same as that configured on the CDN page. The supported service regions are Chinese mainland, Outside Chinese mainland, and Global.
CDN CNAME
Enter a CDN CNAME. The CDN CNAME can contain a maximum of 128 characters, including lowercase letters, digits, and periods (.).
AAD CNAME
Enter an AAD CNAME. The AAD CNAME can contain a maximum of 128 characters, including lowercase letters, digits, and periods (.).
Switch Rule (CND to AAD)
Set the rule for switching CDN to AAD based on the site requirements.
Switch Rule (AAD to CND)
Set the rule for switching back to the CDN based on the site requirements.
- After confirming that the configuration is correct, click OK and record the value of Scheduling CNAME.
Figure 2 Creating a rule

- Click
 in the upper left corner of the page and choose Networking > Domain Name Service.
 - Click Public Zones.
- Locate the row that contains the target domain name, and choose Manage Record Set.
- Click Add Record Set to add a CNAME record set.
Figure 3 Adding a record set

Table 2 Parameter descriptions Parameter
Description
Name
Enter the CDN domain name.
Record Type
Select CNAME – Map one domain to another.
Line
Select Default.
TTL (s)
TTL is short for time-to-live, which specifies the cache period of resource records on a local DNS server. If your service address is frequently changed, set TTL to a smaller value.
Value
Set this parameter to the Scheduling CNAME in the 5.
- Confirm the configuration and click OK.
Feedback
Was this page helpful?
Provide feedbackThank you very much for your feedback. We will continue working to improve the documentation.See the reply and handling status in My Cloud VOC.
For any further questions, feel free to contact us through the chatbot.
Chatbot


