How Do I Upload an Authentication Document to the Root Directory of a Website?
During domain name authentication, you need to upload the downloaded authentication file to the root directory of the website (that is, the directory at the same level as the index file on the homepage). The file upload location varies according to the server used by the user. To upload the authentication file, perform the following steps.
Tomcat, Apache, and IIS Servers
Perform the following steps:
- Log in to your web server.
If you are not the root user, run the su -root command to switch to the root user.
- Locate the root directory of the server, that is, the directory at the same level as the index file. Table 1 lists the root directories of common servers.
Table 1 Root directories of common servers Server Used by a Website
Root Directory
Tomcat
Tomcat deployment address/webapps/ROOT/
Apache
The default value is /var/www/html. Set the directory based on the site requirements.
IIS
The default value is C:\inetpub\wwwroot. Set the directory based on the site requirements.
- Save the authentication document to the directory found in Step 2.
 NOTE:
NOTE:
The directory must be in the same level as the index file.
Example:
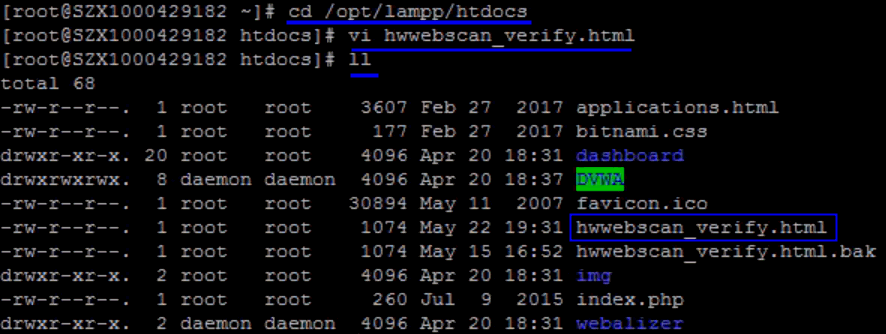
- Run the cd root directory command to go to the root directory of the server.
- Run the vi hwwebscan_verify.html command to create a file with the same name as the authentication file.
- Run i to enter the edit mode.
Paste the content of the authentication file here.
- Press Esc to exit the editing mode, and then run the :wq command to save the settings and exit.
- Run ll to check whether the authentication file is successfully uploaded.
Figure 1 Example

- Enter domain name/hwwebscan_verify.html in the address box of the browser to check whether the authentication file is uploaded. If the file can be accessed, the upload is successful.
Nginx Servers
Perform the following steps to redirect the access to hwwebscan_verify.html to a local file:
- Log in to the Nginx server.
If you are not the root user, run the su -root command to switch to the root user.
- Upload the authentication document to any directory (the Nginx process only has the read permission on this directory). The following uses the /opt/mock directory as an example.
Example:
- Run the cd /opt/mock command to open the /opt/mock directory.
- Run the vi hwwebscan_verify.html command to create a file with the same name as the authentication file.
- Run i to enter the edit mode.
Paste the content of the authentication file here.
- Press Esc to exit the editing mode, and then run the :wq command to save the settings and exit.
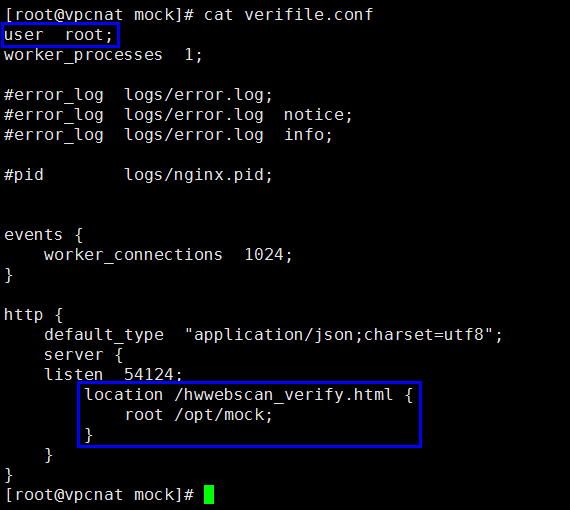
- Open the nginx.conf file and configure the location information of the HTTP module of Nginx. After the configuration is successful, you can read the authentication file from the /opt/mock directory.
- Run the vi nginx.conf command to open the nginx.con file.
- Modify the following content based on the site requirements and overwrite the original HTTP module. See Figure 2.
http {
default_type "application/json;charset=utf-8";
server {
Replace listen ${your website port};# with the actual value.
location /hwwebscan_verify.html {
${user}  /opt/mock;
}
}
}
- Run the nginx -s reload command to update the configuration.
- Enter domain name/hwwebscan_verify.html in the address box of the browser to check whether the authentication file is uploaded. If the file can be accessed, the upload is successful.
Feedback
Was this page helpful?
Provide feedbackThank you very much for your feedback. We will continue working to improve the documentation.See the reply and handling status in My Cloud VOC.
For any further questions, feel free to contact us through the chatbot.
Chatbot


