

Configuring Request and Response Header Forwarding
In the cloud CNAME access or dedicated mode scenario, WAF functions as a reverse proxy between the client and origin server and can forward requests and responses. If you configure request and response header field forwarding, WAF can inject custom identifier information into the request and response headers during forwarding.
Principles
- Request header field forwarding
When a client sends a request, WAF receives the request, adds key-value information to the request based on the configured request header field rules, and then forwards the request carrying the new field to the origin server. The injection process does not modify other content of the original request.
This feature transfers key WAF context (such as the request source IP address and session ID) to the origin server. In doing this, your origin server can obtain the real client information and WAF forwarding traces.
- Response header field forwarding
When your origin server sends back a response, WAF adds a custom response header field before passing the response to the client. This makes it easy to tell where requests are coming from and gives you better visibility into how your website is performing.
Forwarding responses with custom identifiers (such as service nodes and protection identifiers) to the client also makes it easy for frontend engineers to troubleshoot issues and collect statistics across different channels.
Typical Application Scenarios
- If you need to collect statistics on the number of visits to your e-commerce platform protected by WAF, you can add X-WAF-Access: yes to the request header so that your origin server can filter traffic from WAF and independently collect statistics on the conversion effect.
- If you need to record the real client IP address of an API request (the origin server obtains the IP address of the WAF node by default after WAF forwards the request), you can configure X-Real-IP: $remote_addr in the request header ($remote_addr is the variable of the real client IP address). The origin server can directly read this field to obtain the real IP address.
- If you are a SaaS service provider and need to distinguish requests from different tenants, you can add X-Tenant-ID: $tenant_id (where $tenant_id is the variable for the Huawei Cloud tenant ID) to the request header. Your origin server then uses this field to isolate tenant data.
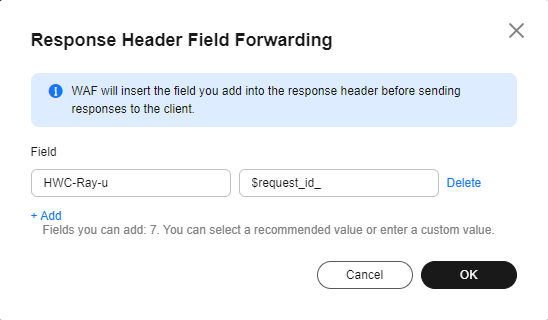
- If you are a frontend engineer and need to check for access latency issues, you can add X-WAF-Request-ID: $request_id to the response header. The request ID is used to associate WAF logs with origin server logs, helping quickly locate the node where the latency occurs.
Constraints
| Function | Constraint |
|---|---|
| Access mode restrictions |
|
| Region constraints | You can check the console to see whether this function is supported in a specific region. |
| Key restriction | The key value will be added to the original header field and will not overwrite the native Nginx field. You can set it to any value other than keys in native Nginx fields. |
| Value restriction | The value can be set to a custom string or a variable starting with $. Variables starting with $ are real-time data (such as request time and session information) dynamically obtained by WAF during request processing. After being configured, the variables are automatically replaced with the actual values. Variables starting with $ support only the following fields: $time_local, $request_id, $connection_requests, $tenant_id, $project_id, $remote_addr, $remote_port, $scheme, $request_method, $http_host, $origin_uri, $request_length, $ssl_server_name, $ssl_protocol, $ssl_curves, $ssl_session_reused |
| Other | Dots (.) cannot be specified in the request header or response header for forwarding. |
Prerequisites
You have added the website you want to protect to WAF in Cloud Mode - CNAME or Dedicated Mode.
Configuring Request and Response Header Forwarding
Configure request and response header forwarding by referring to Procedure, Recommended Value Settings, and Verification Methods.
Procedure
- Log in to the WAF console.
- Click
 in the upper left corner and select a region or project.
- (Optional) If you have enabled the enterprise project function, in the upper part of the navigation pane on the left, select your enterprise project from the Filter by enterprise project drop-down list. Then, WAF will display the related security data in the enterprise project on the page.
- In the navigation pane on the left, choose .
- On the Protected Objects page, click the target domain name.
- In the Advanced Settings area, click Modify next to Request Header Field Forwarding or Response Header Field Forwarding.
- In the displayed dialog box, enter a key/value pair and click Add to add multiple fields. Figure 1 Request Header Field Forwarding
 Figure 2 Response Header Field Forwarding
- After fields are added, click OK.
Recommended Value Settings
| Value | Description | Application Scenario |
|---|---|---|
| $time_local | Local access time of the server. | The access log records the request time, which is used to filter and collect statistics on requests by time. |
| $request_id | Unique ID of a request. | Check the access latency problem at the front end. |
| $connection_requests | Number of requests per connection. | Monitor connection reuse. |
| $tenant_id | Huawei Cloud user ID. | Service providers can distinguish requests from different users based on this value. |
| $project_id | Service project ID. | Multiple projects share the same gateway. Exceptions are collected by project to accurately locate affected services. |
| $remote_addr | Layer-4 network address of the client. | IP address-based traffic limiting, access control (blacklist and whitelist), and region statistics. |
| $remote_port | Layer-4 network port of the client. | Assistance to source tracing: If a large number of requests are initiated from different ports of the same IP address, they are regarded as a batch scan. |
| $scheme | Request protocol (HTTP or HTTPS). | Distinguish plaintext and encrypted access. |
| $request_method | Request method. | Method-level access control, RESTful route distribution, and traffic limiting policies. |
| $http_host | Request host header. | Distinguish sites with multiple domain names. |
| $origin_uri | Original request URL. | Record the original path before rewriting, which is used to debug the rewriting rules and collect access statistics. |
| $request_length | Total length of a request. | Limit the request body size and detect oversized request attacks. |
| $ssl_server_name | Server name requested by the client in TLS Server Name Indication (SNI). | Encrypted malicious connections without a Host header. |
| $ssl_protocol | SSL/TLS version. | Security compliance audit, which forcibly checks the minimum protocol version. |
| $ssl_curves | Elliptic curve algorithm used in the TLS handshake. | Check for security risks and identify malicious connections with weak encryption curves. |
| $ssl_session_reused | SSL session reuse identifier. | Evaluate the TLS session reuse rate to optimize handshake performance. |
Verification Methods
- On the origin server, verify the request header forwarding fields:
For example, if the origin server is a Linux server, run the curl -I -H "Host: Target domain name" Origin-server-IP address command to check whether the returned request headers contain the configured fields.
- On the client, verify the response header forwarding fields:
Open the browser developer tool (F12). On the Network tab, access the target domain name, send a request, and check whether the Response Headers area contains the configured fields on the Headers tab.
What is your overall rating for this page?
Thank you very much for your feedback. We will continue working to improve the documentation.See the reply and handling status in My Cloud VOC.
For any further questions, feel free to contact us through the chatbot.
Chatbot


