ALM-12007 Process Fault
Alarm Description
The process health check module checks the process status every 5 seconds. This alarm is generated when the process health check module detects that the process connection is faulty for three consecutive times.
This alarm is cleared when the process can be connected.
Alarm Attributes
|
Alarm ID |
Alarm Severity |
Auto Cleared |
|---|---|---|
|
12007 |
Major |
Yes |
Alarm Parameters
|
Parameter |
Description |
|---|---|
|
Source |
Specifies the cluster or system for which the alarm is generated. |
|
ServiceName |
Specifies the service for which the alarm is generated. |
|
RoleName |
Specifies the role for which the alarm is generated. |
|
HostName |
Specifies the host for which the alarm is generated. |
Impact on the System
The impact varies depending on the instance that is faulty.
For example, if an HDFS instance is faulty, the impacts are as follows:
- If a DataNode instance is faulty, read and write operations cannot be performed on data blocks stored on the DataNode, which may cause data loss or unavailability. However, data in HDFS is redundant. Therefore, the client can access data from other DataNodes.
- If an HttpFS instance is faulty, the client cannot access files in HDFS over HTTP. However, the client can use other methods (such as shell commands) to access files in HDFS.
- If a JournalNode instance is faulty, namespaces and data logs cannot be stored to disks, which may cause data loss or unavailability. However, HDFS stores backups on other JournalNodes. Therefore, the faulty JournalNode can be recovered and data can be rebalanced.
- If a NameNode deployed in active/standby mode is faulty, an active/standby switchover occurs. If only one NameNode is deployed, the client cannot read or write any HDFS data. On MRS, NameNodes must be deployed in two-node mode.
- If a Router instance is faulty, the client cannot access data on the router. However, the client can use other Routers or directly access data on the backend NameNode.
- If a ZKFC instance is faulty, the NameNode does not continuously and automatically fail over. As a result, data cannot be read from or write to HDFS by the client. In this case, you need to enable automatic failover on other available ZKFC instances to restore the HDFS cluster.
Possible Causes
- The instance process is abnormal.
- The disk space is insufficient.

If a large number of process fault alarms exist in a time segment, files in the installation directory may be deleted mistakenly or permission on the directory may be modified.
Handling Procedure
Check whether the instance process is abnormal.
- On FusionInsight Manager, choose O&M > Alarm > Alarms, click
 in the row where the alarm is located, and click the host name to view the service IP address and service name of the host for which the alarm is generated.
 - On the Alarms page, check whether the ALM-12006 Node Fault is generated.
- Handle the alarm according to ALM-12006 Node Fault.
- Log in to the host for which the alarm is generated as user root. Check whether the installation directory user, user group, and permission of the alarm role are correct. The user, user group, and the permission must be omm:ficommon 750.
For example, the NameNode installation directory is ${BIGDATA_HOME}/FusionInsight_Current/1_8_NameNode/etc.
- Run the following command to set the permission to 750 and User:Group to omm:ficommon:
chmod 750 <folder_name>
chown omm:ficommon <folder_name>
- Wait for 5 minutes. In the alarm list, check whether ALM-12007 Process Fault is cleared.
- If yes, no further action is required.
- If no, go to Step 7.
- Log in to the active OMS node as user root and run the following command to view the configurations.xml file. In the preceding command, "Service name" is the service name queried in Step 1.
vi $BIGDATA_HOME/components/current/Service name/configurations.xml
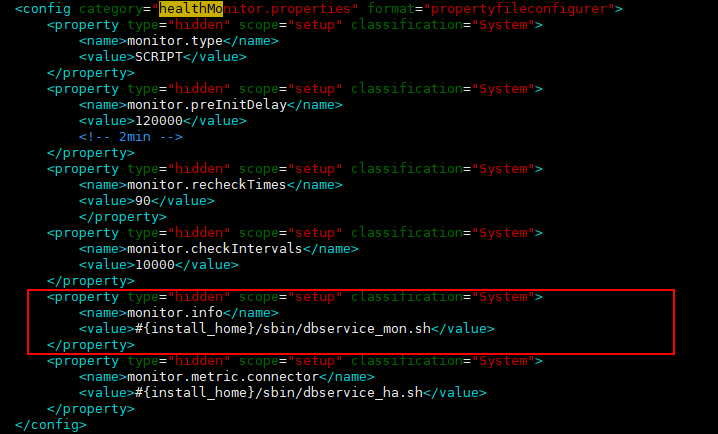
Search for the keyword healthMonitor.properties, find the health check configuration item corresponding to the alarm reporting instance, and record the interface or script path specified by monitor.info, as shown in the following figure.
Check the logs recorded in the interface or script and rectify the fault.

- Wait for 5 minutes. In the alarm list, check whether the alarm is cleared.
- If yes, no further action is required.
- If no, go to Step 9.
- Check whether the required disk is mounted on the faulty node normally.
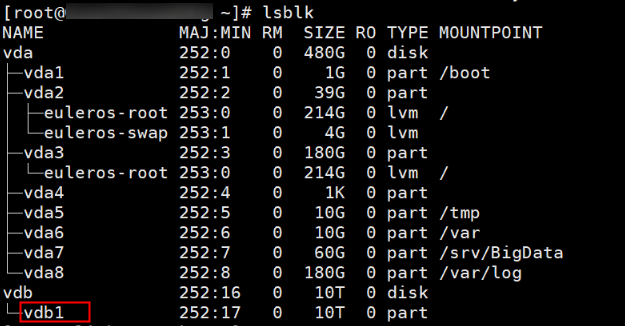
- Log in to the node where the alarm was generated as the root user and run the following command to check whether there is a disk whose TYPE is part and MOUNTPOINT is empty.
lsblk
If information similar to the following is displayed, disk vdb1 is not mounted.

- Initialize the disk that fails to be mounted and mount it again. For details, see Extending Disk Partitions and File Systems.
- Log in to the node for which the alarm was generated as the root user and run the following command to check and record the UUID of the mounted disk:
blkid
- Run the following command to check whether there is the UUID of the mounted disk:
The command output is shown in the following figure.

- Add the mounted disk information to the /etc/fstab file. You can obtain the information in any of the following ways:
- On the node where the alarm was generated, run the following command to view historical snapshot files and check the mounting information of the offline disk:
- Obtain mounting information from the /etc/fstab file on a normal node in the current cluster.
- Contact O&M personnel.
- Restart the faulty instance on the node for which the alarm was generated.
Log in to Manager, choose Hosts, and click the name of the host for which the alarm was generated. On the Dashboard tab page, at the Instances area, click a faulty instance. On the displayed instance page, choose More > Restart Instance. Repeat the preceding operations to restart all faulty instances on the host.
- Log in to the node where the alarm was generated as the root user and run the following command to check whether there is a disk whose TYPE is part and MOUNTPOINT is empty.
- Wait 5 minutes and check whether the alarm is cleared.
- If yes, no further action is required.
- If no, go to Step 11.
Check whether disk space is sufficient.
- On the FusionInsight Manager, check whether the alarm list contains ALM-12017 Insufficient Disk Capacity.
- Rectify the fault by following the steps provided in ALM-12017 Insufficient Disk Capacity.
- Wait for 5 minutes. In the alarm list, check whether ALM-12017 Insufficient Disk Capacity is cleared.
- Wait for 5 minutes. In the alarm list, check whether the alarm is cleared.
- If yes, no further action is required.
- If no, go to Step 15.
Collect fault information.
- On the FusionInsight Manager, choose O&M > Log > Download.
- According to the service name obtained in Step 1, select the component and NodeAgent from the Service and click OK.
- Click
 in the upper right corner, and select a time span starting 10 minutes before and ending 10 minutes after when the alarm was generated. Then, click Download to collect the logs.
 - Contact the O&M personnel and send the collected log information.
Alarm Clearance
After the fault is rectified, the system automatically clears this alarm.
Related Information
None
Feedback
Was this page helpful?
Provide feedbackThank you very much for your feedback. We will continue working to improve the documentation.See the reply and handling status in My Cloud VOC.
For any further questions, feel free to contact us through the chatbot.
Chatbot


