Procedure
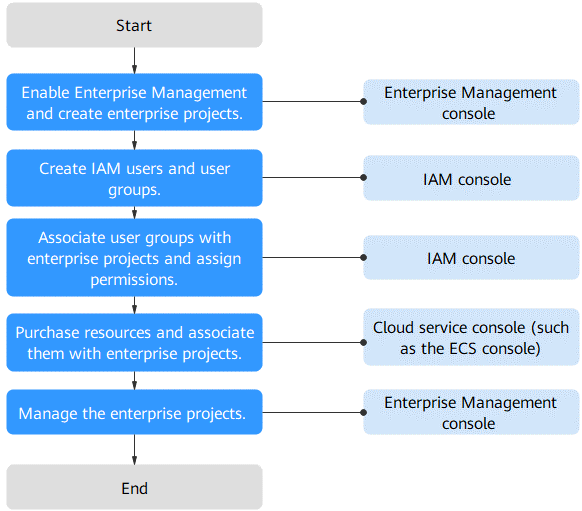
The following process shows how the company can manage resources and personnel with Enterprise Management.

Step 1: Enable Enterprise Project and create enterprise projects on the EPS console.
Step 2: On the IAM console, create users and user groups and add users to user groups.
Step 3: On the IAM console, authorize the user groups to manage related enterprise projects.
Step 4: Purchase resources on related service consoles and add the resources to related enterprise projects.
Follow-Up Operation: Enterprise Project Management: Perform personnel, resource, and accounting management on the Enterprise Management console.
Enabling Enterprise Management and Creating Enterprise Projects
Perform the following procedure to create two enterprise projects, such as Enterprise_Project_A and Enterprise_Project_B, on the Enterprise Management console. If you have enabled Enterprise Project, go to Step 4.

You can only enable Enterprise Project with an enterprise account.
For an enterprise account, the Account Type must be set to Enterprise and the enterprise name cannot be left empty.
- Log in to Huawei Cloud console.
- Method 1: Choose Enterprise > Project Management in the upper right corner of the page.
If the screen resolution is low, choose More > Enterprise > Project Management.
Figure 2 Project Management
Method 2: Click the
 icon in the upper left corner of the page, and then click Management & Governance > Enterprise Project Management Service.
 - On the Apply for Enterprise Project page, click Apply Now.
Figure 3 Applying for enabling the enterprise project function

- On the Enterprise Project Management Service page, click Create Enterprise Project.
Figure 4 Creating an enterprise project

- Enter Enterprise_Project_A for Name and click OK.
- Repeat steps 5 and 6 to create Enterprise_Project_B.
The two enterprise projects are displayed on the Enterprise Project Management Service page.
Creating IAM Users and User Groups
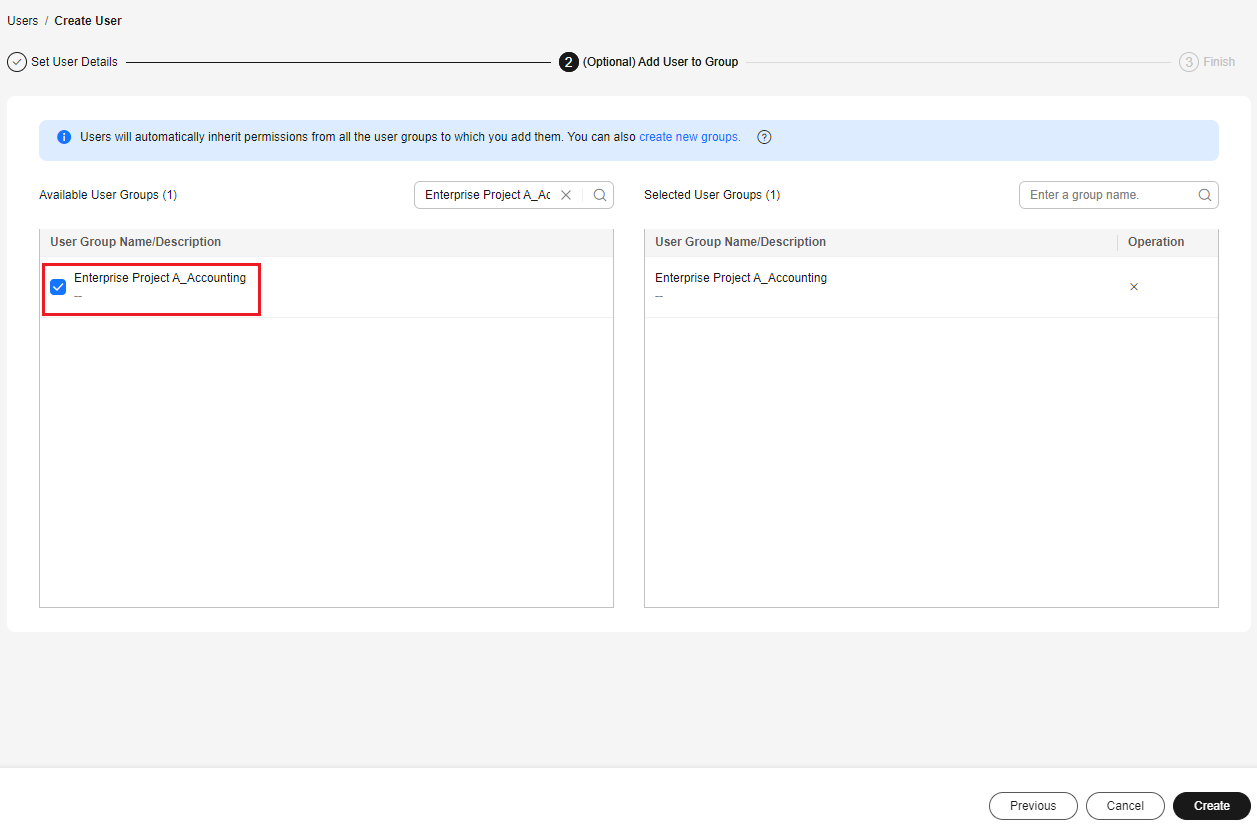
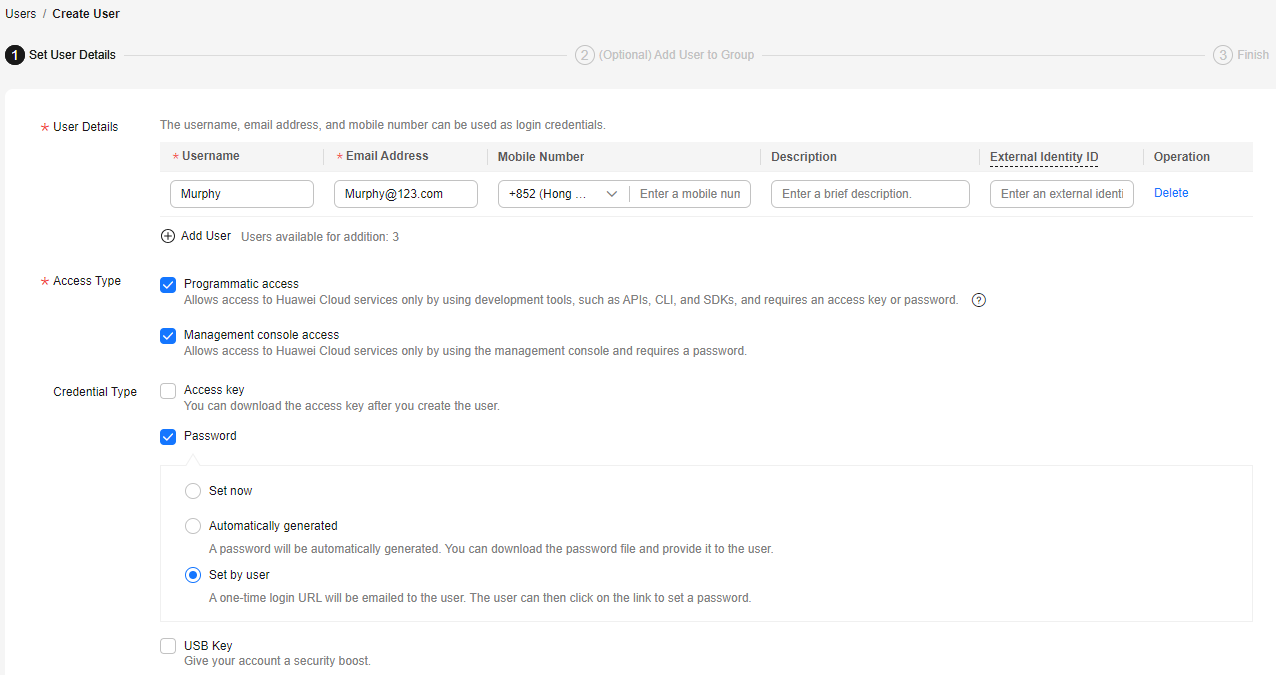
The following is an example procedure for creating a user group (Enterprise Project A_Accounting) and user (Murphy) and adding the user to the user group.
- Create a user group.
- On the Huawei Cloud console, click Management & Governance and choose Identity and Access Management.
- On the IAM console, choose User Groups in the navigation pane. Then click Create User Group.
Figure 5 Creating a user group

- Set the user group name to Enterprise Project A_Accounting and click OK.
- Repeat steps 2 to 3 to create the accounting, development, security maintenance, and operations teams for the two enterprise projects.
The user groups are displayed in the user group list.
- Create an IAM user and add the user to a user group.
- In the navigation pane of the IAM console, choose Users. Then click Create User.
- Specify the user information, select an access type (see Figure 6), and click Next.
- Add user Murphy to the user group Enterprise Project A_Accounting and click Create.
Figure 7 Adding the user to a user group
- Repeat steps 1 to 3 to create users for all employees and add the users to corresponding user groups.
The user is displayed in the user list. You can view the IAM users of each user group on the Users tab.
Associating User Groups with Enterprise Projects
Assign permissions to a user group and apply user group permissions to enterprise projects.
- Log in to the IAM console as the administrator.
- In the user group list, locate the row containing the target user group and click Authorize in the Operation column.
- On the displayed page, search for Enterprise Project BSS FullAccess in the search box, select it, and click Next.

You can create custom policies to supplement system-defined policies for fine-grained permissions management. For details, see Creating a Custom Policy.
Figure 8 Selecting permissions
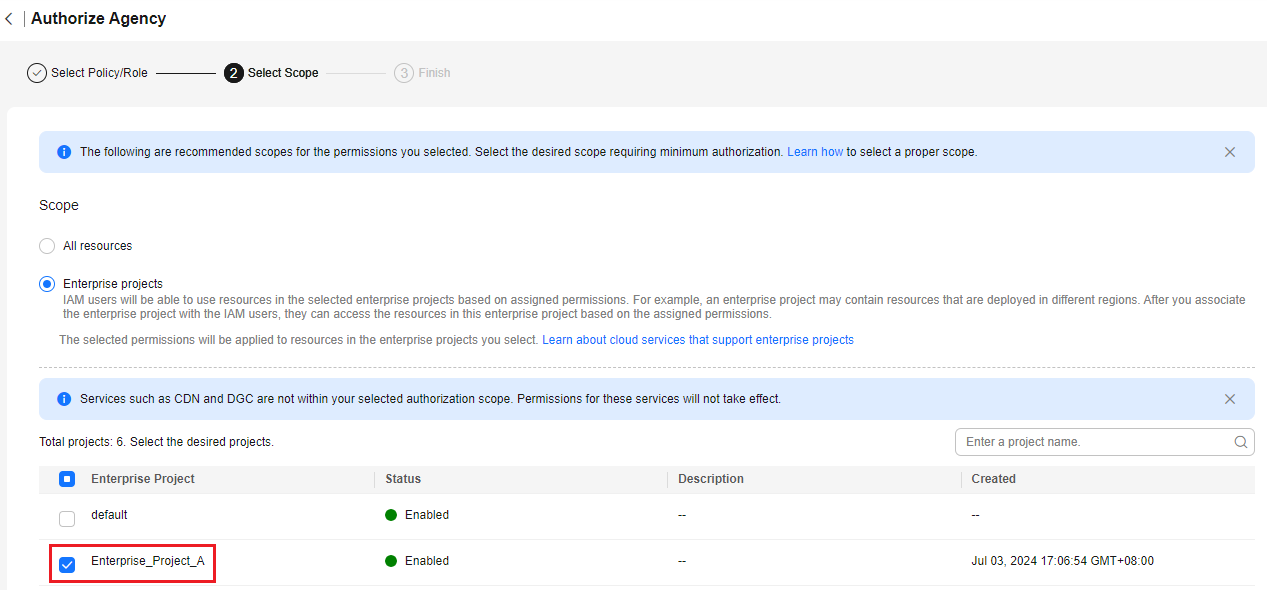
- Select the Enterprise projects authorization scope.
Figure 9 Selecting an enterprise project

- In the enterprise project list, select Enterprise Project A.
- Click OK.
Purchasing Resources and Associating Them with Enterprise Projects
The following is an example procedure for purchasing an ECS and associating it with enterprise project A.
- Log in to the ECS console.
- Click Buy ECS in the upper right corner.
- Specify the ECS information and select Enterprise_Project_A from the Enterprise Project drop-down list.
- Read and select the agreement, and click Create.
- Repeat Step 1 to Step 4 to purchase resources for the two enterprise projects.
To view the purchased resources, go to the Enterprise Management console and click View Resource in the row that contains the target project.

- Currently, Enterprise Management only supports some Huawei Cloud services. For details, see Supported Cloud Services.
- If you have already purchased resources, you can directly associate them with the two enterprise projects. For details, see Adding Resources to an Enterprise Project.
Follow-Up Operation: Enterprise Project Management
After completing the preceding steps, you can manage your enterprise projects on the Enterprise > Project Management > Enterprise Project Management Service page.
- Resource management: Click View Resource to view the existing resources of an enterprise project and add more resources to the enterprise project.
- Personnel management: Choose More > Permissions to go to the IAM console to view the users and user groups associated with an enterprise project, and modify the users, user groups and their permissions for the enterprise project. For details, see Personnel Management.
- Accounting management: Click View Expenditures to view the orders and bills and manage renewals of an enterprise project. For details, see Enterprise Project Accounting Management.
Feedback
Was this page helpful?
Provide feedbackThank you very much for your feedback. We will continue working to improve the documentation.See the reply and handling status in My Cloud VOC.
For any further questions, feel free to contact us through the chatbot.
Chatbot


