

Handling an Instance Stop Event
Scenarios
When the system reports an instance stop event, you need to authorize instance stop.
This section describes how to handle an instance stop event in Pending authorization state and guides you through the required authorization.
- Now: After receiving a request, the system immediately stops the instance.
- Later: After receiving a request, the system stops the instance at the scheduled time.
You can change the scheduled time as needed. For details, see Changing the Reservation Time.

An instance stop event will result in service interruptions and the loss of unsaved data. Confirm the impacts in advance.
Prerequisites
If you need to perform operations as an IAM user, ensure that the IAM user has been granted the required permissions.
Event query and handling require the permissions defined in the following policies:
- Query events: ecs:instanceScheduledEvents:list
- Accept and authorize events: ecs:instanceScheduledEvents:accept
- Change the reservation time: ecs:instanceScheduledEvents:update
For details about how to grant permissions to IAM users, see Using IAM Roles or Policies to Grant Access to ECS.
Authorizing Instance Stop
- Log in to the management console.
- Click
 in the upper left corner and select a region and project.
 - Click
 . Under Compute, click Elastic Cloud Server.
 - In the navigation pane, choose Events. Figure 1 Events

- On the Events page, in the search box of the event list, filter the instance stop events in Pending authorization state.
- Select Event Type and then Instance stop.
- Select Event Status and then Pending authorization.
- Locate the target event and click Authorize Instance Stop in the Operation column. Figure 2 Authorizing instance stop

- Select the checkbox and click Next.
- Specify Stop Option.
- Select Now.
The system stops the instance upon receiving the request.
- Select Later and specify Scheduled Time.
After receiving the request, the system will stop the instance at the scheduled time.
You can change the scheduled time as needed. For details, see Changing the Reservation Time.
- Select Now.
- Enter AGREE in the text box below to confirm the instance stop operation.
- Click OK.
After you submit the authorization request, the event status becomes To be executed. After the system receives the request, it decides when to change the event status to Executing based on the scheduled time you specify.
When the status of the instance stop event becomes Execution succeeded, the instance is stopped. Check the status of services running on the instance.
Changing the Reservation Time
After you submit a scheduled instance stop request, the event status changes to To be executed. You can change the reservation time as needed.

You must change the reservation time at least 30 minutes before the current reservation time.
- Log in to the management console.
- Click in the upper left corner and select a region and project.
- Click
 . Under Compute, click Elastic Cloud Server.
 - In the navigation pane, choose Events.
- On the Events page, in the search box of the event list, filter the instance stop events in To be executed state.
- Select Event Type and then Instance stop.
- Select Event Status and then To be executed.
- In the Operation column of the event to be executed, click Change Reservation Time. Figure 3 Changing the reservation time
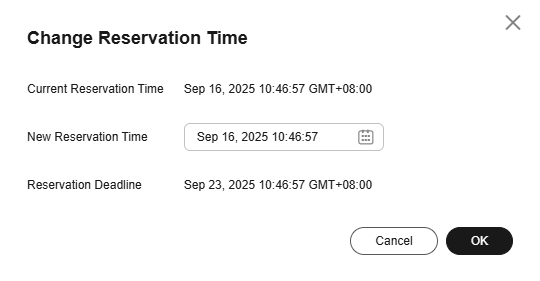
- Specify New Reservation Time and click OK.
After the change is complete, the new reservation time is displayed in the Execution Time column of the event list.
What is your overall rating for this page?
Thank you very much for your feedback. We will continue working to improve the documentation.See the reply and handling status in My Cloud VOC.
For any further questions, feel free to contact us through the chatbot.
Chatbot


