
Creating an Account
The system has created the following default accounts: sysadmin (system administrator), audadmin (audit administrator), and secadmin (security administrator). If multiple employees need to use the system, create separate accounts for each employee for easier management.
Context
An account's permissions are determined by its assigned role. The system has created the following roles by default: system administrator, audit administrator, and security administrator. Table 1 describes the permissions of these roles.
For example, to create a system administrator account for Zhang San, perform the following steps:
Creating a Single Account
- Log in to the web console of the API data security protection system as user sysadmin.
- In the navigation pane on the left, choose System Management > Account Management.
- To create a single account, for example, zhangsan, perform the following operations:
- Click Create Account in the upper right corner.
- Set account parameters. Figure 1 Creating an account
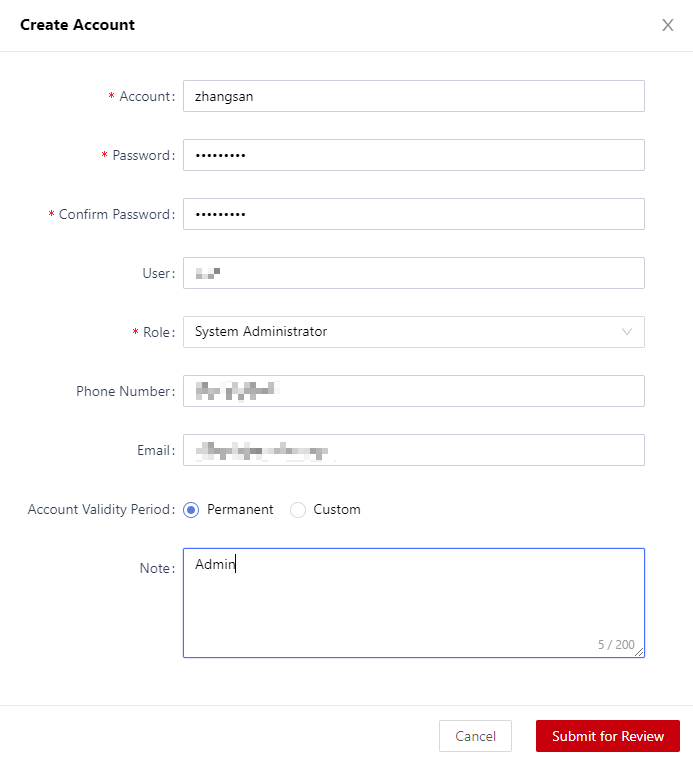
Table 1 Parameter descriptions Parameter
Description
Account
Enter an account name.
Password/Confirm Password
Specify a login password and confirm it.
User
Enter the user of the account.
Role
Select a role from the drop-down list.
Phone Number
Enter the user's mobile number.
Email
Enter the user's email address.
Account Validity Period
Configure the validity period of the account. The options are:- Permanent: The account will never expire.
- Custom: Once selected, you need to set a validity period. The account will be disabled when the validity period expires.
Note
Enter an account description.
- Click Submit for Review.
- To create multiple accounts in batches, perform the following operations:
- Click Import.
- In the Import Account Information dialog box, click Download File Template to download the account import template file. Figure 2 Importing accounts

- On the local PC, complete the template file by entering account information based on the examples provided. Table 1 describes the account parameters.
- Upload the completed template file.
- Click Import Test to check whether the format is correct.
- Click Confirm Import.
- On the account review page, review the account.
Review the created account as the administrator. For how to review an account, see Reviewing an Account.
Operation Results
You can use the new account to log in to the system.
Related Operations
- To modify an account, click Edit.
- To delete a single account, click Delete.
- To delete multiple accounts in batches, select the accounts and click Delete.

For the default system accounts, you can only modify the email address and mobile number.
Feedback
Was this page helpful?
Provide feedbackThank you very much for your feedback. We will continue working to improve the documentation.See the reply and handling status in My Cloud VOC.
For any further questions, feel free to contact us through the chatbot.
Chatbot


