
Adding a Masking Rule
Scenario
The system enables you to configure masking rules based on application, URL, client IP address, account, and account group, allowing for precise authentication and masking protection for access behavior. These rules can be set up in the data masking module.
For instance, if you want to configure a masking rule for the demo application to ensure that sensitive data, such as bank card numbers, is masked when the demo application is accessed, you can do so within this module.
This section describes how to add a masking rule.

The masking rule is effective only to proxy access to the application or service. The masking effect on the log retrieval page and the sensitive data page is built into the system and remains unchanged regardless of the masking rule creation.
Prerequisites
- You have added an application. For details, see Application Services.
- A masking template has been configured. For details, see Configuring a Masking Template.
Procedure
- Log in to the web console of the API data security protection system as user sysadmin.
- In the navigation pane, choose .
- Click the Rules tab.
- Click Add to configure a masking rule. For details about related parameters, see Parameters for adding a masking rule. Figure 1 Adding a masking rule
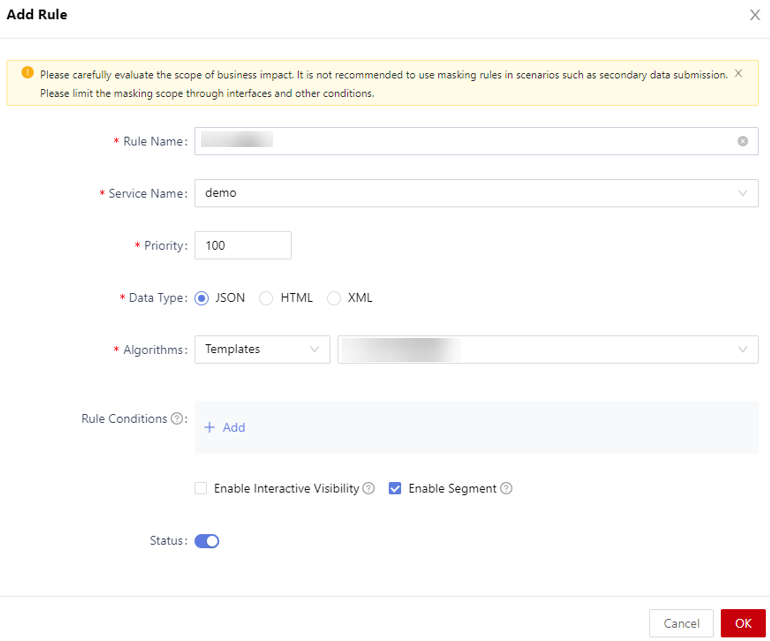
Table 1 Parameters for adding a masking rule Parameter
Description
Rule name
Enter the name of the custom masking rule.
Service name
Select the application or service to which the rule applies.
Priority
When a request matches multiple masking rules, the rule with the highest priority takes effect.
Data type
Select the data type for masking.
Algorithms
Configure the masking algorithm to identify and mask sensitive data according to the masking template, data label, and data field.
Rule conditions
Configure the rule conditions, including the URL, client IP address, account, and account group.
Enable interactive visibility
After the interactive visibility function is enabled, the eye icon is displayed in the masked data. You can click the eye icon to view the original data.
Enable segment
Once this function is enabled, word segmentation is applied to paragraphs.
Status
Enable or disable a masking rule.- Enabled: The masking rule takes effect immediately after being added.
- Disabled status: The rule does not take effect after being added. You need to manually enable it.
- Click OK.
Operation Result
After the masking rule is added, you can view the new masking rule in the rule list. When the application assets are accessed through the configured proxy, data is masked based on the masking rule. For details, see Viewing the Masking Result.
Related Operations
You can also perform the following operations on the Rules page:
- Editing a masking rule: Click Edit on the right of the target rule to modify the rule information.
- Deleting a masking rule: Click Delete on the right of the target rule to delete the masking rule.
- Delete masking rules in batches: Select multiple rules and click Delete in the upper right corner.
Feedback
Was this page helpful?
Provide feedbackThank you very much for your feedback. We will continue working to improve the documentation.See the reply and handling status in My Cloud VOC.
For any further questions, feel free to contact us through the chatbot.
Chatbot


