
Using git-crypt to Transmit Sensitive Data on the Git Client
About git-crypt
git-crypt is a third-party open-source software that can transparently encrypt and decrypt files in the Git repository. It can be used to encrypt and store specified files and file types. Developers can store encrypted files (e.g. confidential information or sensitive data) in the same repository as shareable code, and the repository can be pulled and pushed just like a normal repository, with the contents of the encrypted files visible only to those who have the corresponding file key, but with no restriction on participants' ability to read or write to unencrypted files.
Using Key Pairs for Encryption and Decryption on Windows
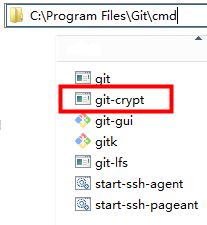
- Download and install the latest Git client for Windows, download the latest git-crypt for Windows, and save the downloaded .exe file to the cmd folder in the Git installation directory.
- Run the following commands to generate a key pair locally:
- Open Git Bash and go to the local repository.
- Run the following command to create the .git-crypt folder in the Git repository. The folder contains the key and configuration file required for encrypting the file.
git-crypt init
- Run the following command to export the key file to the C:/test directory and name the file KeyFile:
git-crypt export-key /c/test/keyfile
- After the preceding steps are performed, go to the path of the exported key file to check whether the key is successfully generated. The computer containing the key file can decrypt the corresponding encrypted file.
- Run the following command to configure the encryption range for the repository:
- Create a file named .gitattributes in the root directory of the repository.

- If the system prompts you to enter the file name when you create the .gitattributes file, you can enter .gitattributes. to create the file. If you run the Linux command to create the file, this problem does not occur.
- Do not save the .gitattributes file as a .txt file. Otherwise, the configuration does not take effect.
- Open the .gitattributes file and run the following command to set the encryption range.
<file_name_or_file_range>: filter=git-crypt diff=git-crypt
Four examples are as follows:FT/file01.txt filter=git-crypt diff=git-crypt # Encrypt a specified file. In this example, the file01.txt file in the FT folder is encrypted. *.java filter=git-crypt diff=git-crypt # The .java file is encrypted. G* filter=git-crypt diff=git-crypt # Files whose names start with G are encrypted. ForTest/** filter=git-crypt diff=git-crypt # Files in the ForTest folder are encrypted.

- Create a file named .gitattributes in the root directory of the repository.
- Encrypt the file.
git-crypt status encrypts only the files to be committed this time. It does not encrypt the historical files that are not modified this time. Git displays a message for the unencrypted files involved in this setting (see Warning in the following figure). If you want to encrypt all files of a specified type in the repository, run the git-crypt status -f command. The -f (force execution) option is risky. Exercise caution when using this option.
Open Git Bash in the root directory of the repository and run the following command to encrypt the file. The encryption status of the file is displayed.
git-crypt status

After the encryption, you can still open and edit the encrypted files in plaintext in your local repository because your local repository has a key.
You can run the add, commit, and push commands to push the repository to CodeArts Repo. In this case, the encrypted files are pushed together.
Encrypted files are stored in CodeArts Repo as encrypted binary files and cannot be viewed directly. If you do not have a key, you cannot decrypt these files even if you download them to the local computer.
- Decrypt the file.
- Ensure that the git-crypt file exists in the Git installation path on the local computer.
- Clone the repository from CodeArts Repo to the local host.
- Obtain the key file for encrypting the repository and store it on the local computer.
- Go to the repository directory and right-click Git Bash.
- Run the decryption command. If no command output is displayed, the command is successfully executed.
git-crypt unlock /C/test/KeyFile # Replace /C/test/KeyFile with the actual key storage path.
- Ensure that the git-crypt file exists in the Git installation path on the local computer.

Encrypting and Decrypting a File in GPG Mode on Windows
- Install and initialize Git.
- Download the latest Windows-based git-crypt and save the downloaded .exe file to the cmd folder in the Git installation directory. The following figure uses the default Git Bash installation path of Windows Server 2012 R2 Standard (64-bit) as an example.

- Download the GPG of the latest version. When you are prompted to donate for the open-source software, select 0 to skip the donation process.

Double-click to start the installation. Click Next to complete the installation.
- Generate a key pair in GPG mode.
- Open Git Bash and run the following command:
GPG --gen-key
- Enter the name and email address as prompted.
- Enter o as prompted and press Enter. The dialog boxes for entering and confirming the password are displayed.

The password can be empty. For information security, you are advised to set a new password.
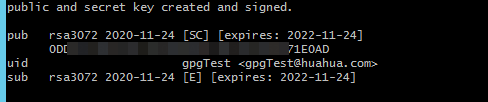
- If the following information is displayed, the GPG key pair is generated successfully.
- Open Git Bash and run the following command:
- Initialize the repository encryption.
- Open Git bash in the root directory of the repository and run the following command to initialize the repository:
git-crypt init

- Run the following command to add a copy of the key to your repository. The copy has been encrypted using your public GPG key.
git-crypt add-GPG-user USER_ID
USER_ID can be the name, email address, or fingerprint that uniquely identifies the key, as shown in 1, 2, and 3 in the following figure in sequence.

After the command is executed, a message is displayed, indicating that the .git-crypt folder and two files in it are created.

- Open Git bash in the root directory of the repository and run the following command to initialize the repository:
- Configure the encryption scope for the repository.
- Go to the .git-crypt folder in the repository.
- Open the .gitattributes file and run the following command to set the encryption range.
<file_name_or_file_range>: filter=git-crypt diff=git-crypt
Four examples are as follows:FT/file01.txt filter=git-crypt diff=git-crypt # Encrypt a specified file. In this example, the file01.txt file in the FT folder is encrypted. *.java filter=git-crypt diff=git-crypt # The .java file is encrypted. G* filter=git-crypt diff=git-crypt # Files whose names start with G are encrypted. ForTest/** filter=git-crypt diff=git-crypt # Files in the ForTest folder are encrypted.

- Copy the .gitattributes file to the root directory of the repository.
- Encrypt the file.
git-crypt status encrypts only the files to be committed this time. It does not encrypt the historical files that are not modified this time. Git displays a message for the unencrypted files involved in this setting (see Warning in the following figure). If you want to encrypt all files of a specified type in the repository, run the git-crypt status -f command. The -f (force execution) option is risky and may cause inconvenience. Exercise caution when using this option.
Open Git Bash in the root directory of the repository and run the following command to encrypt the file. The encryption status of the file is displayed.
git-crypt status

After the encryption, you can still open and edit the encrypted files in plaintext in your local repository because your local repository has a key.
You can run the add, commit, and push commands to push the repository to CodeArts Repo. In this case, the encrypted files are pushed together.
Encrypted files are stored in CodeArts Repo as encrypted binary files and cannot be viewed directly. If you do not have a key, you cannot decrypt it even if you download it to the local computer.
- Export the key.
- Lists the currently visible keys. You can view the name, email address, and fingerprint of each key.
GPG --list-keys

- Run the GPG --export-secret-key command to export the keys. In this example, the GPGTest key is exported to drive C and named Key.
GPG --export-secret-key -a GPGTest > /c/key
During the execution, the system prompts you to enter the key password. Enter the correct password.
No command output is displayed. You can view the key file in the corresponding directory (drive C in this example).
- Send the generated key to the team members to share the encrypted file.
- Lists the currently visible keys. You can view the name, email address, and fingerprint of each key.
- Import the key and decrypt the file.
- To decrypt files on another machine, download and install git-crypt and GPG based on Git.
- Clone the corresponding repository to the local host.
- Obtain the key of the corresponding encrypted file. For details about how to export the key, see step 8. In this example, the obtained key is stored in drive C.
- Go to the repository, open Git Bash, and run the import command to import the key. You will be prompted to enter the key password during the import.
GPG --import /c/key
- Run the unlock command to decrypt the file.
git-crypt unlock
During the decryption, a dialog box is displayed, prompting you to enter the password of the key. If no command output is displayed after you enter the correct password, the decryption is successful.

- View the file before and after decryption.

Application of git-crypt Encryption in Teamwork
When a team needs to store files that have restricted disclosure in the code repository, the combination of CodeArts Repo, Git, and git-crypt can be used to encrypt some files in the distributed open-source repository.
Generally, Key pair encryption can meet the requirements of restricting the access to some files.
When your team needs to set different confidential levels for encrypted files, the GPG encryption can be used. This encryption mode allows users to use different keys to encrypt different files in the same repository and share the keys of different confidential levels with team members, restricting file access by level.
Installing git-crypt and GPG on Linux and MacOS
Install git-crypt and GPG on Linux.
- Linux installation environment
Software
Debian/Ubuntu Package
RHEL/CentOS Package
Make
make
make
A C++11 compiler (e.g. gcc 4.9+)
g++
gcc-c++
OpenSSL development files
libssl-dev
openssl-devel
- In Linux, install git-crypt by compiling the source code.
make
make install
Install git-crypt to a specified directory
make install PREFIX=/usr/local
- In Linux, install GPG by compiling the source code.
./configure
make
make install
- Install git-crypt using the Debian package.
The Debian package can be found in the debian branch of the project's Git repository.
The software package is built using git-buildpackage, as shown in the following figure.
git checkout debian
git-buildpackage -uc -us
- Install GPG using the build package in Debian.
sudo apt-get install gnupg
Install git-crypt and GPG on macOS.
Feedback
Was this page helpful?
Provide feedbackThank you very much for your feedback. We will continue working to improve the documentation.See the reply and handling status in My Cloud VOC.
For any further questions, feel free to contact us through the chatbot.
Chatbot


