
How Do I Migrate Common Java Projects Created with Eclipse to the Cloud?
Symptoms
Java web projects developed using Eclipse cannot generate build packages in CodeArts Build.
Cause Analysis
Java web projects developed with Eclipse cannot generate a build package in CodeArts Build. You need to convert these projects in advance.
Solution
This guide walks you through converting your Java web project into an Ant project and then using the Ant tool in CodeArts Build to build a package.
- Create a build.xml file in the project.
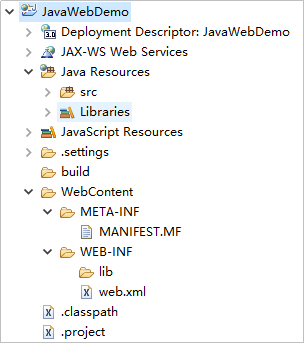
The following figure shows the directory structure of a web project demo created using Eclipse.
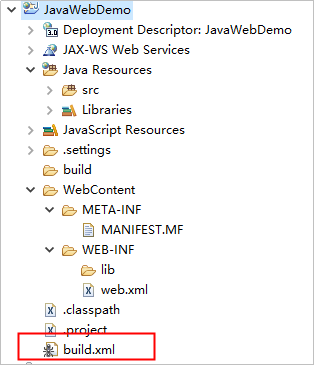
In the root directory, create a build.xml file. The updated directory structure is shown in the following figure.
The following provides a detailed description of the build.xml file, followed by a complete example of a build.xml file. You only need to change the attributes in the example to the actual value of the project.
- Defining attributes
- Project name
1<property name="project.name" value="JavaWebTest" />
- Package name: Name of the WAR file generated during packaging. The project.name is used for the name of the project. So the name of the generated WAR package is project.name.war.
1<property name="package.name" value="${project.name}.war" />
- WAR package output path: When uploading a software package, use this path and package name as the build package path. The value is the path, which can be customized.
1<property name="dist.war.dir" value="./targets" />
Note: If the ./targets directory does not exist, create one in the init step.
- Source code (*.java) path. The value indicates the path where the Java code of a project is stored.
1<property name="src.dir" value="src" />
- WebContent directory in the source code. The value indicates the path for storing the WebContent code of a project.
1<property name="webcontent.dir" value="./WebContent" />
- WEB-INF directory in the source code. The value indicates the path for storing the WEB-INF code of a project. Generally, the WEB-INF code is stored in the WebContent directory. Therefore, the WebContent directory is referenced.
1<property name="webcontent.webinf.dir" value="${webcontent.dir}/WEB-INF" />
- CLASS file output directory: Generally, the compiled CLASS files are stored in the WEB-INF directory.
1<property name="webcontent.webinf.classes.dir" value="${webcontent.webinf.dir}/classes" />
Note: If the classes directory does not exist, create one in the init step.
- lib path, which is the path for storing the referenced dependency package. Generally, the path is in the WEB-INF directory.
1<property name="webcontent.webinf.lib.dir" value="${webcontent.webinf.dir}/lib" />
Note: If the lib directory does not exist, create one in the init step.
- Java version
1
2
<property name="source.version" value="1.8" />
<property name="target.version" value="1.8" />
- Path of the web.xml file, which does not need to be defined in non-web projects.
1<property name="webxml.path" value="${webcontent.webinf.dir}/web.xml" />
- Project name
- Defining paths
- Define the classpath path. For example, if A references B, the compilation of A.java searches for the B.class file in this path.
 1
 2
 3
 4
 5
 6
 7
 8
 9
10
11
12
13
14
15
<path id="classpath">
	<!-- JAR package of the project -->
	<fileset dir="${webcontent.webinf.lib.dir}">
		<include name="**/*.jar" />
	</fileset>

	<!-- classes file of the project -->
	<pathelement location="${webcontent.webinf.classes.dir} " />

	<!-- The web server package to be used, which can be downloaded and added. -->
	<!-- JAR package of the web server -->
	<!-- <fileset dir="${localWebServer.home}/lib">
		<include name="**/*.jar" />
	</fileset>     -->
</path>
- Define the classpath path. For example, if A references B, the compilation of A.java searches for the B.class file in this path.
- Defining the build process
- Initialization (init), including clearing the output directory of the WAR package and creating the classes directory.
Attribute
Description
<delete> tag
Deletion action. The dir attribute indicates the directory to be deleted.
<mkdir> tag
Directory creation action. The dir attribute indicates the directory to be created.
<echo> tag
Printing action. The message attribute indicates the content to be printed.
In this step, create the following directories which are not included in the original project: WAR package directory (dist.war.dir), CLASS file directory (webcontent.webinf.classes.dir) for compilation, and lib directory (webcontent.webinf.lib.dir) for storing dependency packages.1 2 3 4 5 6 7 8 9
<target name="init"> <echo message="Delete the targets directory (output directory of the WAR package)" /> <delete dir="${dist.war.dir}" /> <echo message="Create the targets directory (output directory of the WAR package)." /> <mkdir dir="${dist.war.dir}" /> <echo message="Create the classes directory." /> <!-- classes directory under the WebContent directory --> <mkdir dir="${webcontent.webinf.classes.dir}" /> </target>
- Initialization (init), including clearing the output directory of the WAR package and creating the classes directory.
- Compile the JAVA file. Use the <javac> tag to compile the JAVA file to dist.classes. The compilation procedure depends on the classes directory created in the init step.
Attribute
Description
depends
depends="init" indicates that the current step must be used after the init step.
srcdir
Specifies the path attribute src.dir of the defined Java code.
destdir
Specifies the classes directory that is defined to store the compiled CLASS file.
source, target
Specifies the JDK version used during compilation.
1
2
3
4
5
6
7
8
9
<target name="compile" depends="init"> <echo message="Use the specified classpath to compile the source code and output the code to the classes directory." /> <!-- The JDK version is 1.8. --> <javac encoding="utf-8" listfiles="true" srcdir="${src.dir}" destdir="${webcontent.webinf.classes.dir}" debug="on" deprecation="false" optimize="true" failonerror="true" source="${source.version}" target="${target.version}"> <classpath refid="classpath" /> </javac> </target>
- Compress the compiled project into a WAR package. Use the <delete> tag to delete the original WAR package, and then use the <war> tag to package the project.
Attribute
Description
warfile
Name of the WAR package, including the package path.
webxml
Specifies the path of the web.xml file.
<fileset> subtag
Specifies the WebContent path.
1 2 3 4 5 6 7 8
<target name="war" depends="compile" description="Package a project into a WAR package"> <echo message="Generate a WAR package" /> <delete file="${dist.war.dir}/${package.name}" /> <war warfile="${dist.war.dir}/${package.name}" webxml="${webxml.path}"> <fileset dir="${webcontent.dir}"> </fileset> </war> </target>

If you want to pack a JAR package, use the <jar> tag instead of the <war> tag. The following is an example:
- The jarfile attribute is similar to the WAR package attribute. It is the path for storing the packaged JAR package and needs to be defined in the attribute definition phase. The basedir attribute is the directory of the compiled .class directory, that is, the webcontent.webinf.classes.dir attribute defined in the WAR package.
- The JAR package does not require the webxml attribute.
- When packaging a JAR intended to be run through java -jar, you must define the manifest. For functional (non-executable) or dependency JAR packages, a manifest is not required. Main-Class specifies the class to which the main function belongs.
1 2 3 4 5 6 7 8 9 10
<target name="jar" depends="compile" description="make jar file"> <!--JAR operation. jarfile specifies the path for storing the JAR package. basedir is the directory of the compiled CLASS file. --> <jar jarfile="${jarfilename}" basedir="${classes}"> <!--Specify the manifest file for the JAR package. If the JAR package does not need to be packed in runnable format, the manifest file is optional.--> <manifest> <!--Specify main-class--> <attribute name="Main-Class" value="demo.SayHello" /> </manifest> </jar> </target>
The following is a complete example build.xml for your reference. Generally, you only need to fill in the paths in the attribute definition phase based on the actual project paths.
1 2 3 4 5 6 7 8 9 10 11 12 13 14 15 16 17 18 19 20 21 22 23 24 25 26 27 28 29 30 31 32 33 34 35 36 37 38 39 40 41 42 43 44 45 46 47 48 49 50
<?xml version="1.0"?>
<project default="war" basedir=".">
        <echo message="pulling in property files" /> <property file="build.properties" />
        <property name="project.name" value="JavaWebDemo" />
        <property name="package.name" value="${project.name}.war" />
        <property name="dist.war.dir" value="./targets" />
        <property name="src.dir" value="src" />
        <property name="webcontent.dir" value="./WebContent" />
        <property name="webcontent.webinf.dir" value="${webcontent.dir}/WEB-INF" />
        <property name="webcontent.webinf.classes.dir" value="${webcontent.webinf.dir}/classes" />
        <property name="webcontent.webinf.lib.dir" value="${webcontent.webinf.dir}/lib" />
        <property name="source.version" value="1.8" />
        <property name="target.version" value="1.8" />
        <property name="webxml.path" value="${webcontent.webinf.dir}/web.xml" />

        <path id="classpath">
		<fileset dir="${webcontent.webinf.lib.dir}">
			<include name="**/*.jar" />
		</fileset>
		<pathelement location="${webcontent.webinf.classes.dir} " />
	</path>

       <target name="init">
            <echo message="Delete the targets directory (output directory of the WAR package)." />
            <delete dir="${dist.war.dir}" />
            <echo message="Create the targets directory (output directory of the WAR package)." />
            <mkdir dir="${dist.war.dir}" />
            <echo message="Create the classes directory." />
            <mkdir dir="${webcontent.webinf.classes.dir}" />
       </target>


	<target name="compile" depends="init">
		<echo message="Use the specified classpath to compile the source code and output the code to the classes directory." />
		<javac encoding="utf-8" listfiles="true" srcdir="${src.dir}"
			destdir="${webcontent.webinf.classes.dir}" debug="on" deprecation="false"
			optimize="true" failonerror="true" source="${source.version}" target="${target.version}">
			<classpath refid="classpath" />
		</javac>
	</target>

       <target name="war" depends="compile" description="Package a project into a WAR package">
            <echo message="Generate a WAR package" />
            <delete file="${dist.war.dir}/${package.name}" />
            <war warfile="${dist.war.dir}/${package.name}" webxml="${webxml.path}">
                  <fileset dir="${webcontent.dir}">
                  </fileset>
            </war>
       </target>
</project>
- Defining attributes
- Submit the modified build.xml file to the code repository and create an Ant build task.
Upload the software package to the build package path in the software release repos. Enter the WAR package output path and package name in the format described in the build.xml file.
- Save and run the build task. After the build is successful, you can view the resulting WAR package in the release repo.
Feedback
Was this page helpful?
Provide feedbackThank you very much for your feedback. We will continue working to improve the documentation.See the reply and handling status in My Cloud VOC.
For any further questions, feel free to contact us through the chatbot.
Chatbot


