Migrating External ClickHouse Data to an MRS Cluster Using the remote Function
Scenario
The remote function is an efficient and convenient method for migrating ClickHouse data. It is applicable to multiple migration scenarios and can migrate up to 1 billion records per hour, depending on the network bandwidth. The remote function can migrate ClickHouse data from different sources to MRS ClickHouse, including self-built open-source ClickHouse, CDH ClickHouse, and cloud database ClickHouse.
The remote function supports the following data migration modes.
|
Data Migration |
Migration Process |
Applicable Scenario |
|---|---|---|
|
Export all metadata from the source cluster, batch adjust the exported metadata, and create table structures in the target cluster. |
This mode applies to initial migration or large-scale metadata migration scenarios. |
|
|
Query the source data remotely using the remote function on the target cluster client and write the query result to the target cluster. |
This mode applies to large-scale data migration, featuring fast migration and simple operations. |
Impact on the System
The migration increases the load on the source cluster, which may affect services on the source cluster.
Notes and Constraints
- MergeTree tables are migrated directly. As for distributed tables, only their metadata is migrated, as they do not store data and depend on local tables.
- The migration must be performed during off-peak hours of the source ClickHouse cluster to avoid affecting services.
- The remote migration of large tables needs to be performed by group to prevent OOM from affecting services on the source cluster.
- During the migration, the remote rate needs to be limited. The migration rate displayed on the client is that when data is not compressed.
- During the migration, you must monitor the metrics of the source ClickHouse cluster, such as the CPU and memory. This ensures that services of the source ClickHouse cluster are running properly.
Prerequisites
- The source cluster can communicate with the target cluster.
- The source and target clusters must be both in normal mode (with Kerberos authentication disabled) or security mode (with Kerberos authentication enabled). If the source and target clusters are both in security mode, ensure that mutual trust has been configured between the two clusters. For how to configure mutual trust between clusters, see Configuring Mutual Trust Between MRS Clusters.
- Ensure that the parameter CLICKHOUSE_OPENSOURCE_COMMUNITY of the target MRS ClickHouse cluster is set to true. Changing the parameter value requires restarting the ClickHouse service and re-downloading the ClickHouse client.
- Log in to Manager, choose Cluster > Services > ClickHouse, click Configurations and then All Configurations. On the displayed page, search for the parameter CLICKHOUSE_OPENSOURCE_COMMUNITY, change its value to true, save the configuration, and restart the ClickHouse.
- Download and install the target ClickHouse cluster client again. For details, see Installing a Client.
- For an MRS cluster with Kerberos authentication enabled, create a user with ClickHouse permissions on Manager before the migration. For how to create a user with ClickHouse operation permissions, see Creating a User with ClickHouse Permissions.
Existing Metadata Migration
- Install the source ClickHouse client. For details, see Installing a Client.
- View the source ClickHouse database list on the ClickHouse client.
clickhouse client --host IP address of the ClickHouse node in the source cluster --port Port of the ClickHouse node in the source cluster --user Username for logging in to the ClickHouse node in the source cluster --password Password for logging in to the ClickHouse node in the source cluster --query="show databases"

- The system, information_schema, and INFORMATION_SCHEMA databases in the source cluster are system databases and do not need to be migrated.
- Change the client commands based on the actual environment if the source cluster is not an MRS ClickHouse cluster.
Table 1 Parameter description Parameter
Description
IP address of the ClickHouse node
IP address of the ClickHouseServer instance.
To obtain the IP address of the ClickHouseServer instance, log in to FusionInsight Manager of the cluster and choose Cluster > Services > ClickHouse > Instances.
Port of the ClickHouse node
Connection port.
- By default, clusters with Kerberos authentication enabled use SSL connections and the default port is 9440.
You can also obtain the port number from the tcp_port_secure parameter of the ClickHouseServer instance.
If a non-SSL connection is required in this scenario, log in to FusionInsight Manager, choose Cluster > Services > ClickHouse > Configurations, search for SSL_NONESSL_BOTH_ENABLE, change the value to true, and restart all ClickHouse instances.
- By default, clusters with Kerberos authentication disabled use non-SSL connections. The default port is 9000.
You can also obtain the port number from the tcp_port parameter of the ClickHouseServer instance.
If an SSL connection is required in this scenario, log in to FusionInsight Manager, choose Cluster > Services > ClickHouse > Configurations, search for SSL_NONESSL_BOTH_ENABLE, change the value to true, and restart all ClickHouse instances.
Username for logging in to the ClickHouse node
- If Kerberos authentication is enabled for the cluster, that is, the cluster is in security mode, you must create a username on Manager.
- If Kerberos authentication is not enabled for the cluster, that is, the cluster is in normal mode, you can log in to the cluster as the default user default (the default password of the default user is empty) or a user with ClickHouse permissions.
Password used for logging in to the ClickHouse node
Password of the ClickHouse login user.
- Run the following command to view the table list of a database in the source ClickHouse:
clickhouse client --host IP address of the ClickHouse node in the source cluster --port Port of the ClickHouse node in the source cluster --user Username for logging in to the ClickHouse node in the source cluster --password Password for logging in to the ClickHouse node in the source cluster --query="show tables from db_name"
- Export the table creation statement of the db_name database in the source ClickHouse.
clickhouse client --host IP address of the ClickHouse node in the source cluster --port Port of the ClickHouse node in the source cluster --user Username for logging in to the ClickHouse node in the source cluster --password Password for logging in to the ClickHouse node in the source cluster --query="select create_table_query from system.tables where database='db_name' FORMAT TSVRaw" > db_table.sql
- Open the db_table.sql file in 4 and add ON CLUSTER Name of the ClickHouse cluster in the destination cluster to the end of each CREATE TABLE statement.
- Log in to the ClickHouse client node in the destination cluster.
Connect to the ClickHouse server using the cluster client. For details, see ClickHouse Client Practices.
- Create a database and table using the DDL statement of the source cluster.
clickhouse client --host IP address of the ClickHouse node in the target cluster --port Port of the ClickHouse node in the target cluster --multiquery --user Username for logging in to the ClickHouse node in the target cluster --password Password for logging in to the ClickHouse node in the target cluster < db_table.sql
Full Data Migration
- View the ClickHouse data in the source cluster.
- Log in to the client node of the source cluster.
Connect to the ClickHouse server using the cluster client. For details, see ClickHouse Client Practices.
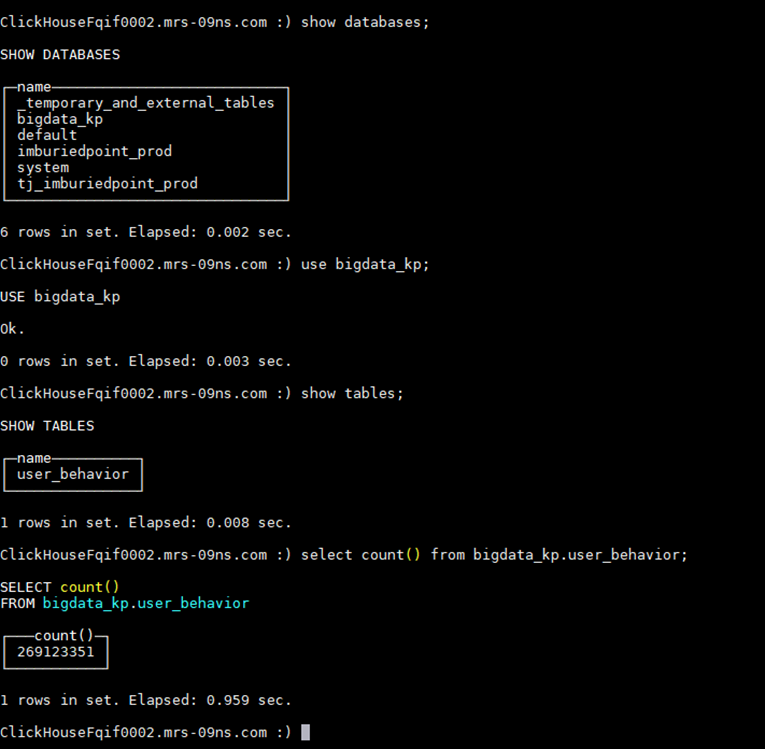
- Run the following command to view the database tables and data in the source cluster:
show databases;
Use the queried database, for example, bigdata_kp.
use bigdata_kp;
Query tables in the database.
show tables;
Query table data. The user_behavior table is used as an example.select count() from bigdata_kp.user_behavior;
The query result is as follows:

- Log in to the client node of the source cluster.
- Log in to the client node of the target cluster.
Connect to the ClickHouse server using the cluster client. For details, see ClickHouse Client Practices.
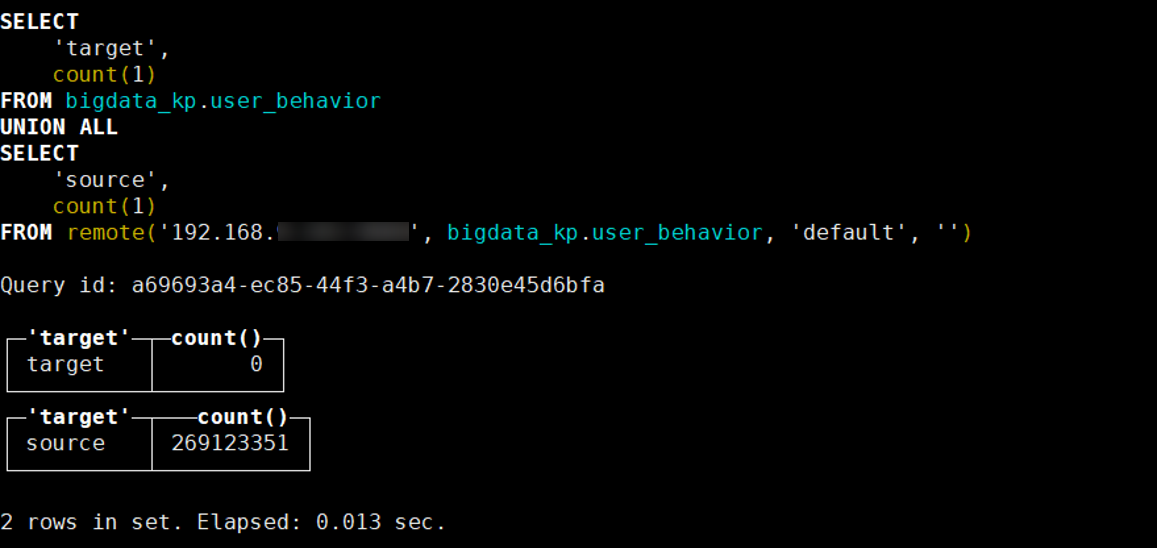
- Check the tables and data on the target and source databases before the migration.
SELECT
    'target',
    count(1)
FROM Target database name.Target table name
UNION ALL
SELECT
    'source',
    count(1)
FROM remote('IP address of the source ClickHouse node', Source database name.Source table name, 'Username for logging in to source ClickHouse cluster', 'Password for logging in to source ClickHouse cluster')
The result is as follows:
target indicates the target table data, and source indicates the source table data.

- Use the following SQL syntax to migrate data:
insert into db_name.table_name select * from remote('IP address of the ClickHouse node in the source cluster:ClickHouse port', db_name.table_name, 'Username of the ClickHouse node in the source cluster', 'Password of the ClickHouse user in the source cluster') SETTINGS max_network_bandwidth = 'Threshold';Table 2 Parameter description 2 Parameter
Description
max_network_bandwidth
The maximum bandwidth for data transmission, in byte/s. It is used to control the rate at which data is transmitted over the network during the query process to prevent network congestion or other services from being affected due to excessive data transmission.
- If this parameter is set to 0, the bandwidth is adjusted by the system.
- If this parameter is set to a value greater than 0, the bandwidth is restricted. For example, 100 x 1024 x 1024 indicates the maximum bandwidth is 100 MB/s.
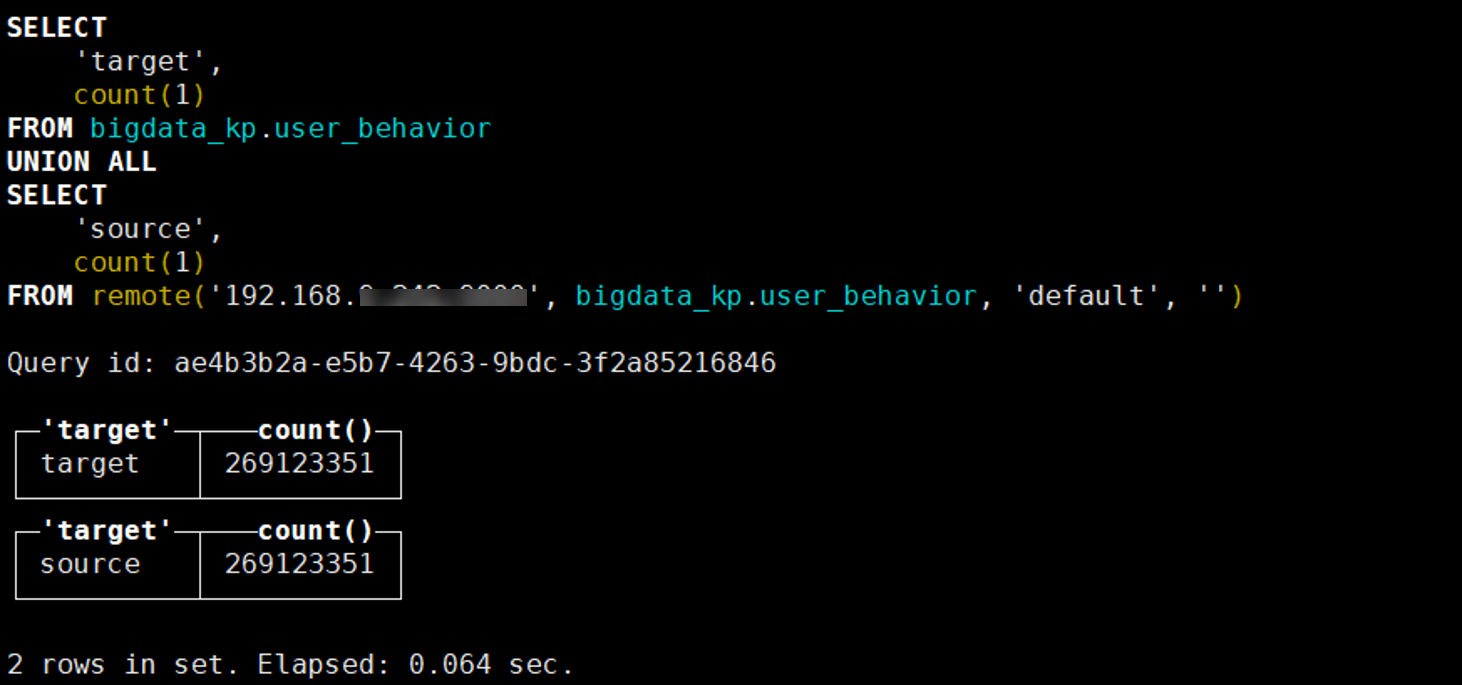
- Check the tables and data on the target and source databases after the migration.
SELECT
    'target',
    count(1)
FROM Target database name.Target table name
UNION ALL
SELECT
    'source',
    count(1)
FROM remote('IP address of the source ClickHouse node, Source database name.Source table name, 'Username for logging in to source ClickHouse cluster', 'Password for logging in to source ClickHouse cluster')
The result is as follows:
target indicates the target table data, and source indicates the source table data.

Migration FAQs
- Q1: What should I do if the following error message is displayed when there are too many queries being executed?
Code: 202. DB::Exception: Too many simultaneous queries. Maximum: 100. (TOO_MANY_SIMULTANEOUS_QUERIES) (version 23.3.2.1). (TOO_MANY_SIMULTANEOUS_QUERIES)
The error occurs because the number of queries being executed exceeds the upper limit of the database.
Check the value of max_concurrent_queries in the config.xml configuration file of the target ClickHouse cluster.
Solution:
- Check the number of queries that are being executed.
select count(1) from system.processes;
- Query the query ID of the current query.
select query_id from system.processes where xxx ... ;
- Terminate the query.
kill query where query_id = 'xxx';
- Check the number of queries that are being executed.
- Q2: What should I do if the following error message is displayed when too much data is written to the partitions at a time?
Code: 252. DB::Exception: Too many partitions for single INSERT block (more than 100). The limit is controlled by 'max_partitions_per_insert_block' setting. (TOO_MANY_SIMULTANEOUS_QUERIES) (version 23.3.2.1). (TOO_MANY_SIMULTANEOUS_QUERIES)
Solution:
Set the parameter settings max_partitions_per_insert_block to 1000 to avoid writing data that contains too many partitions at a time.
If a large number of tables are migrated and the migration speed is slow, you can adjust the value profiles.default.background_pool_size parameter.
Feedback
Was this page helpful?
Provide feedbackThank you very much for your feedback. We will continue working to improve the documentation.See the reply and handling status in My Cloud VOC.
For any further questions, feel free to contact us through the chatbot.
Chatbot


