Authorizing ModelArts to Use SFS Turbo
This section describes how to configure ModelArts agency permissions to enable you to associate and disassociate your dedicated resource pool network with an SFS Turbo file system.
- To add an agency and authorize it to perform operations on SFS Turbo, see Adding an Agency and Granting Permissions for SFS Turbo.
- To add permissions to an existing agency for SFS Turbo, see Adding Permissions to an Existing Agency for SFS Turbo.
Context
After creating a network on the console, you can click More in the Operation column to access the options of Associate SFS Turbo and Disassociate SFS Turbo on the Network page. When you associate a network with an SFS Turbo file system, the file system joins the network and becomes available for training and development purposes.
Before you can associate or disassociate an SFS Turbo file system, you must grant ModelArts the permissions to perform operations on SFS Turbo.
To control the permissions, configure the following permission policy items:
- sfsturbo:shares:addShareNic: allows you to create NICs.
- sfsturbo:shares:deleteShareNic: allows you to delete NICs.
- sfsturbo:shares:showShareNic: allows you to obtain NIC details.
- sfsturbo:shares:listShareNics: allows you to obtain NICs.
Constraints
This function is available in certain regions.
Adding an Agency and Granting Permissions for SFS Turbo
- Log in to the ModelArts console. In the navigation pane on the left, choose Permission Management. The Permission Management page is displayed.
- Click Add Authorization. On the displayed page, configure parameters.
- Authorized User: Select IAM user, Federated user, Agency, or All users as required.
- Authorized To: Choose an authorized object.
- Agency: Select Add agency.
- Permissions: In common mode, select sfsturbo:shares:addShareNic, sfsturbo:shares:deleteShareNic, sfsturbo:shares:showShareNic, and sfsturbo:shares:listShareNics under SFS Turbo.
- Click Create. After you authorize the agency, any user with the permission can associate or disassociate SFS Turbo.
Adding Permissions to an Existing Agency for SFS Turbo
- Log in to the management console as a tenant user, hover the cursor over your username in the upper right corner, and choose Identity and Access Management from the drop-down list to switch to the IAM management console.
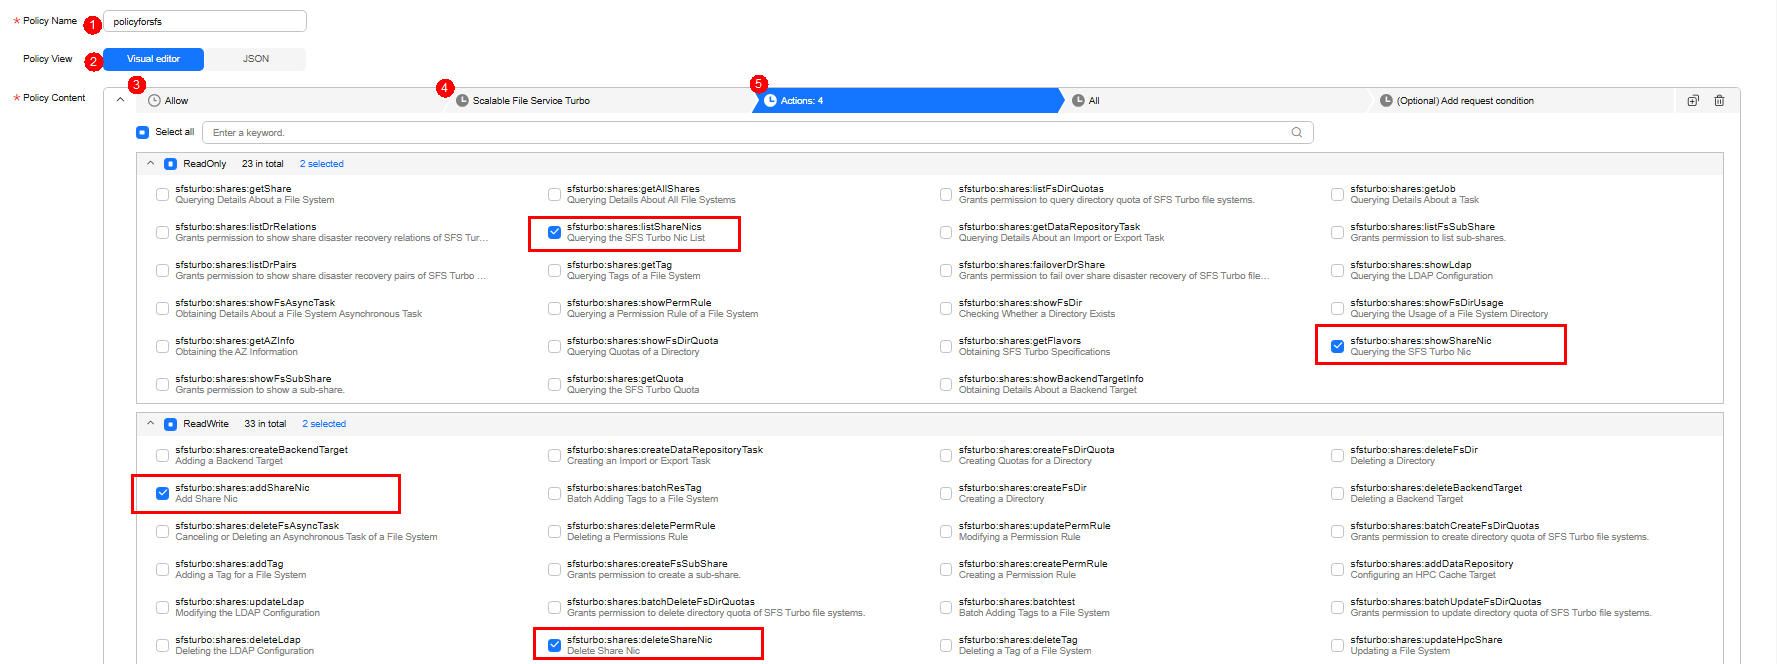
- In the navigation pane, choose Permissions > Policies/Roles. On the Policies/Roles page, click Create Custom Policy in the upper right corner, configure parameters, and click OK.
- Policy Name: Enter a custom policy name, for example, Authorizing ModelArts to use SFS Turbo.
- Policy View: Select Visual editor or JSON.
- Policy Content: Select Allow. In Select service, search for SFSTurbo and select it. In ReadOnly under Actions, search for sfsturbo:shares:showShareNic and sfsturbo:shares:listShareNics and select them. In ReadWrite under Actions, search for sfsturbo:shares:addShareNic and sfsturbo:shares:deleteShareNic and select them. Select All for All.
Figure 1 Creating a custom policy (visual editor)
 The policy content in JSON view is as follows:
{
    "Version": "1.1",
    "Statement": [
        {
            "Effect": "Allow",
            "Action": [
                "sfsturbo:shares:addShareNic",
                "sfsturbo:shares:listShareNics",
                "sfsturbo:shares:deleteShareNic",
                "sfsturbo:shares:showShareNic"
            ]
        }
    ]
}
- The modelarts_agency agency is used as an example. On the IAM console, click Agencies. Locate modelarts_agency and click Authorize in the Operation column. Choose the custom policy created in 2 and click Next. Then, specify the authorization scope and click OK.
After you authorize the agency, any user with the permission can associate or disassociate SFS Turbo.
Verification
Log in to the ModelArts management console, choose Dedicated Resource Pools > Network. Then, click More in the Operation column of the target network, and choose Associate SFS Turbo. The operation is successful.
Log in to the ModelArts management console, choose Dedicated Resource Pools > Network. Then, click More in the Operation column of the target network, and choose Disassociate SFS Turbo. The operation is successful.
Feedback
Was this page helpful?
Provide feedbackThank you very much for your feedback. We will continue working to improve the documentation.See the reply and handling status in My Cloud VOC.
For any further questions, feel free to contact us through the chatbot.
Chatbot


