
Distributing Traffic Based on the Same Domain Name but Different Paths
Scenarios
Dedicated load balancers can distribute client requests to different backend server groups based on domain names and paths, allowing for efficient, reasonable, and refined traffic distribution.
- Microservice architecture: In a microservice architecture, a backend service consists of multiple independent subservices. Each subservice is deployed on a different backend server but uses the same domain name to provide services. In such a scenario, path-based forwarding policies can be used to distribute client requests to backend servers to handle the required service logic.
- Dark launch or A/B testing: Development, test, and production services are deployed under the same domain name but different paths. In such a scenario, forwarding policies with the same domain name but different paths can be used to forward traffic to the backend server where the target service is running.
- Read/write separation: Services with high concurrency and strict data consistency requirements, such as order processing, need read/write separation to optimize performance and enhance data security. In this case, read operations need to be forwarded to the read database server, and write operations forwarded to the write database server.
Overview of Domain Name- and Path-based Forwarding Policies
Dedicated load balancers allow you to configure forwarding rules and actions for advanced forwarding policies to route client requests to specific backend servers based on the information (such as domain name and path) in each request.
For details about the domain name- and path-based forwarding rules, see Table 1. For more forwarding rules, see Advanced Forwarding.
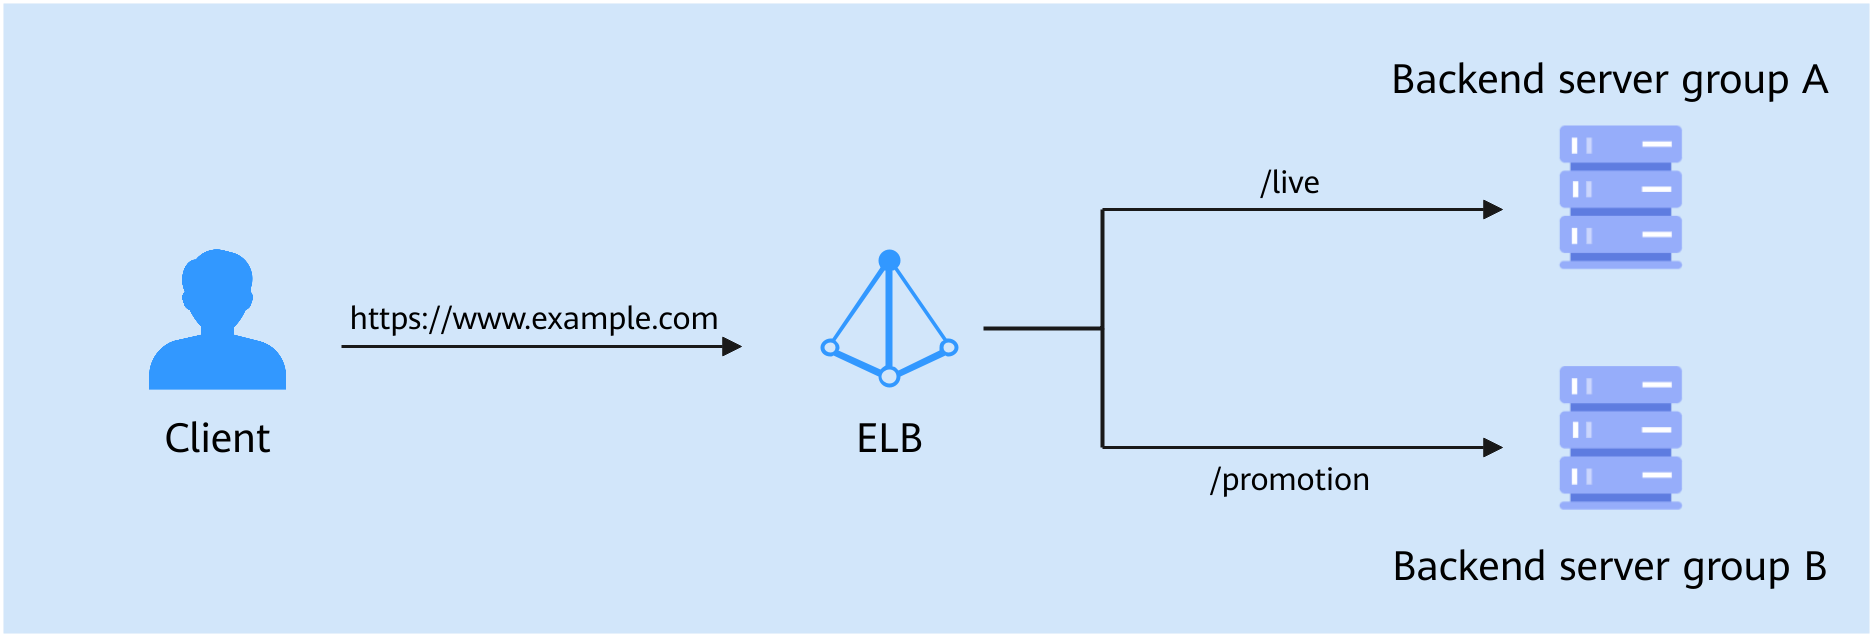
Solution Architecture
An e-commerce platform provides various microservices, including livestreaming and promotion services, through a domain name. Livestreaming requires high bandwidth and low latency, while promotions often face sudden traffic spikes, leading to heavy data read requests. If all services are deployed in the same backend server group, requests may be unevenly distributed. This impacts livestreaming performance during promotions because user surges overload the servers, causing unstable server running.
To address this issue, you can deploy each subservice of the e-commerce application on the server in different backend server groups, and configure forwarding policies with the same domain name but different paths for a dedicated load balancer to distribute client requests. This helps distribute traffic evenly and ensures each subservice can run efficiently and independently. As shown in Figure 1, requests matching the /live path are forwarded to backend server group A to provide enough bandwidths and processing capabilities for the livestreaming service. Requests matching the /promotion path are forwarded to backend server group B to optimize computing resources to handle queries and submissions faster.
Constraints
- Only HTTP/HTTPS/QUIC listeners of dedicated load balancers support advanced forwarding policies.
- A maximum of 100 forwarding policies can be configured for a listener. If the number of forwarding policies exceeds the quota, the excess forwarding policies will not be applied.
- If the advanced forwarding policy is enabled, each forwarding rule has up to 10 forwarding conditions.
Preparations
- Create a dedicated load balancer and bind an IPv4 EIP to it.
- Create two HTTP backend server groups (A and B), add ECS01 to backend server group A and ECS02 to backend server group B, and deploy a service on each ECS.
- Register a domain name and complete the ICP filing. In this practice, domain name www.example.com is used.
Step 1: Enable Advanced Forwarding
- Go to the load balancer list page.
- On the displayed page, locate the load balancer you want to add forwarding policies for and click its name.
- On the Listeners tab and click the target listener.
- On the Summary tab, click Enable next to Advanced Forwarding.
- Click OK.
Step 2: Configure Advanced Forwarding Policies
- Go to the load balancer list page.
- On the displayed page, locate the load balancer you want to add forwarding policies for and click its name.
- On the Listeners tab, add forwarding policies in either of the following ways:
- Locate the target listener and click Add/Edit Forwarding Policy in the Forwarding Policies column.
- Locate the target listener, click its name, and click the Forwarding Policies tab.
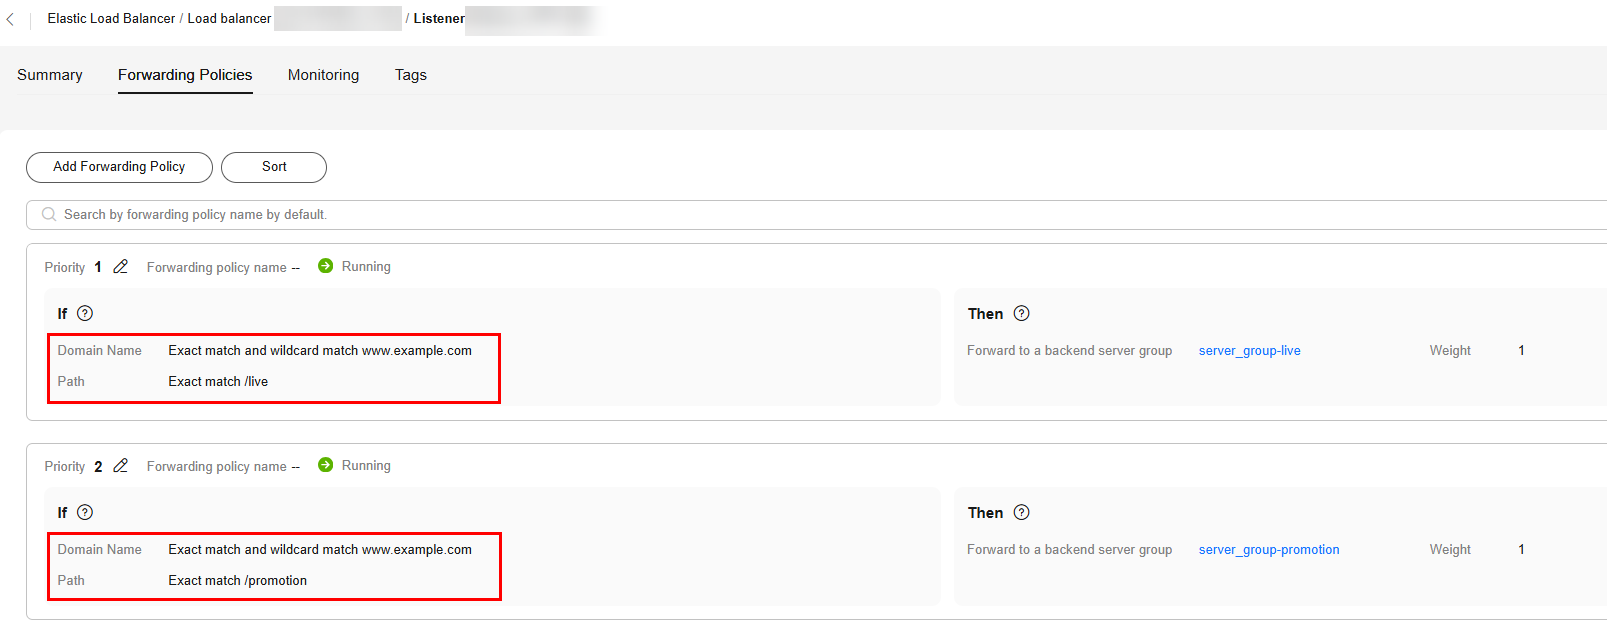
- Click Add Forwarding Policy and configure forwarding policies.
Domain name: Enter the domain name used in this practice.
Path: Requests matching the /live path are forwarded to backend server group A and those matching the /promotion path are forwarded to backend server group B.
- Click Save.
Step 3: Configure Domain Name Resolution
You can add an A record set to resolve the domain name to the public IP address of the load balancer so that clients can access the load balancer using the public domain name.
The following provides an example for resolving a website domain name to an IPv4 address. For details about how to configure an A record set, see Routing Internet Traffic to a Website.
- Go to the DNS console.
- In the navigation pane on the left, choose Public Zones.
The zone list is displayed.
- Locate the public zone and click Manage Record Sets in the Operation column.
- Click Add Record Set.
- Configure the parameters based on Table 2.
Table 2 Parameters for adding an A record set Parameter
Example Value
Description
Type
A – Map domains to IPv4 addresses
Type of the record set. In this example, set it to A - Map domains to IPv4 addresses.
Name
www
Prefix of the domain name to be resolved.
Line
Default
Resolution line. The DNS server will return the IP address of the specified line, depending on where end users come from.
The default value is Default.
Default: returns the default resolution result irrespective of where the visitors come from.
TTL (s)
300
Cache duration of the record set on a local DNS server, in seconds.
In this example, the default value 300 is used.
Value
192.168.12.2
IPv4 addresses mapped to the domain name. In this example, set this parameter to the EIPs bound to the load balancer.
Advanced Settings (Optional)
-
Click
 to expand the advanced settings, set the alias and weight of the record set, and add a description and tags. In this example, the default settings are used.
 - Click OK.
- Switch back to the Record Sets tab.
The added record set is in the Normal state.
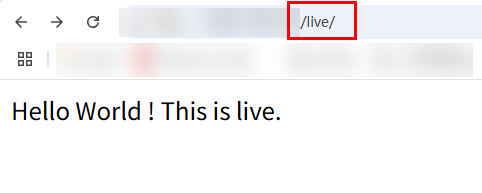
Step 4: Verify Traffic Distribution
Use a browser to access http://<domain name>/<path>/ to verify traffic routing.

Feedback
Was this page helpful?
Provide feedbackThank you very much for your feedback. We will continue working to improve the documentation.See the reply and handling status in My Cloud VOC.
For any further questions, feel free to contact us through the chatbot.
Chatbot


