Using ROMA Connect for Message Integration
Overview
ROMA Connect provides secure and standard message channels to implement integration with different message systems.
This chapter provides a configuration example of interworking with ROMA Connect using Kafka command-line tool to help you get familiar with the message integration process.
The steps for integrating messages with ROMA Connect are as follows:
Prerequisites
Before performing this operation, complete the following preparations:
- An EIP has been bound to the ROMA Connect instance.
- The Java JDK has been downloaded and installed on your local PC, and related environment variables have been configured.
- The open-source Kafka command-line tool of the corresponding version has been downloaded based on the Kafka version of the ROMA Connect instance. You can view the Kafka version in the MQS Information area on the Instance Information page of the ROMA Connect console.

The Kafka server version of ROMA Connect can be 1.1.0 or 2.3.0. Therefore, you must use the Kafka command-line tool of the same version as the server to avoid unpredictable problems.
- If MQS SASL_SSL has been enabled for the ROMA Connect instance, ensure that the has been downloaded. To download the client certificate, log in to the ROMA Connect console, choose Message Queue Service > Topic Management, and click Download SSL Certificate.
Step 1: Create a Message Topic
A topic is a channel for message transmission between the message client and ROMA Connect. The client sends messages to and receives messages from ROMA Connect through the topic.
- Create an integration application.
- Log in to the ROMA Connect console. On the Instances page, click View Console next to a specific instance.
- In the navigation pane on the left, choose Integration Applications. In the upper right corner of the page, click Create Integration Application.
- In the dialog box displayed, set Name and Description, and click OK.
- Create a message topic.
- In the navigation pane on the left, choose Message Queue Service > Topic Management. On the page displayed, click Create Topic in the upper right corner.
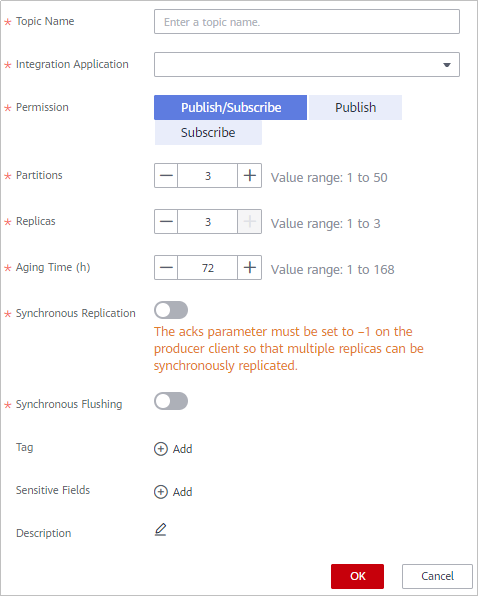
- In the Create Topic dialog box, set topic parameters and click OK.
Figure 1 Creating a topic

Table 1 Topic parameters Parameter
Description
Topic Name
Enter a topic name. It is recommended that you enter a name based on naming rules to facilitate search.
Integration Application
Select the integration application created in 1.
Permission
Select the topic permission for the integration application to which the topic belongs. In this example, select Publish/Subscribe, which indicates that the topic can be used to produce and consume messages.
Partitions
The appropriate number of partitions can improve the concurrent performance of message creation and retrieval. Retain the default value 3.
Replicas
ROMA Connect automatically backs up data on each replica. If one replica is faulty, data will still be available. The reliability increases with the number of replicas of a topic. Retain the default value 3.
Aging Period (h)
After the aging time expires, messages stored in the topic are deleted. Retain the default value 72.
Synchronous Replication
When a client creates a message to a topic, ROMA Connect determines whether to replicate the message to all replicas and then returns a response to the client. You do not need to enable this option.
Synchronous Flushing
Specifies whether each message created by a client to the topic is immediately written to the disk. You do not need to enable this option.
Tag
A tag can be added for a topic to facilitate topic search. You do not need to add a tag.
Sensitive Fields
If a message sent to a topic contains sensitive fields, the sensitive fields will be shielded. You do not need to add sensitive fields.
Description
Enter a brief description of the topic.
Step 2: Send and Receive Messages to and from a Topic
Use the Kafka command-line tool on the local PC to send messages to and receive messages from topics in CLI mode.
The operations for sending and receiving messages to and from a topic vary depending on whether SASL_SSL is enabled for the ROMA Connect instance. If SASL_SSL is enabled, messages sent and received by clients to and from topics are encrypted before transmission.
- Decompress the Kafka command-line tool and client certificates.
Locate the downloaded Kafka command-line tool and client certificate files on your local PC and decompress them.
The following uses Windows as an example. Assume that the Kafka command-line tool path is D:\kafka_2.11-1.1.0 and the client certificate file path is D:\cert.
- (Optional) Modify the kafka-run-class.bat file in the Kafka command-line tool. This step is required only if the Kafka command-line tool 1.1.0 is used. Otherwise, skip this step.
Find the kafka-run-class.bat file in the D:\kafka_2.11-1.1.0\bin\windows directory and add double quotation marks ("") to %CLASSPATH% in the following script line:
set COMMAND=%JAVA% %KAFKA_HEAP_OPTS% %KAFKA_JVM_PERFORMANCE_OPTS% %KAFKA_JMX_OPTS% %KAFKA_LOG4J_OPTS% -cp "%CLASSPATH%" %KAFKA_OPTS% %*
- (Optional) Modify the configuration file of the Kafka command-line tool. This step is performed only if SASL_SSL is enabled for the ROMA Connect instance. Otherwise, skip this step.
Locate the consumer.properties and producer.properties files in D:\kafka_2.11-1.1.0\config and add the following content to the files separately:
sasl.jaas.config=org.apache.kafka.common.security.plain.PlainLoginModule required \
username="**********" \
password="**********";
sasl.mechanism=PLAIN
security.protocol=SASL_SSL
ssl.truststore.location=D:/cert/client.truststore.jks
ssl.truststore.password=dms@kafka
ssl.endpoint.identification.algorithm=
In the preceding information:
- The values of username and password are the key and secret of the integration application to which the topic belongs. You can click the integration application name on the Integration Applications page of the ROMA Connect console to view and obtain the key and secret.
- The value of ssl.truststore.location is the path for storing the client certificate obtained in 1.

The certificate path in Windows must contain slashes (/).
- On the command line window, run the following command to go to the directory where the Kafka command-line tool is stored:
d:
cd kafka_2.11-1.1.0\bin\windows
- Produce messages to ROMA Connect.
- Run the following command to create a connection with the topic for producing messages:
If SASL_SSL is not enabled for the ROMA Connect instance, run the following command:
kafka-console-producer.bat --broker-list IP:9094,IP:9095,IP:9096 --topic TopicName
If SASL_SSL is enabled for the ROMA Connect instance, run the following command:
kafka-console-producer.bat --broker-list IP:9095,IP:9096,IP:9097 --topic TopicName --producer.config ../../config/producer.properties
In the preceding information:
- IP indicates the MQS connection address of ROMA Connect. You can obtain the address by viewing EIP on the Instance Information page of the ROMA Connect console.
- TopicName indicates the name of the topic created in Step 1: Create a Message Topic.
- Enter the message contents and send the messages to the topic.
>Message1
>Message2
>Message3
In the preceding information, Message1, Message2, and Message3 indicate the actual message contents sent to the topic. Each row indicates a message.
- On the ROMA Connect console, choose Message Queue Service > Message Query.
- Click Advanced Search to expand advanced search options.
- Enter search criteria and click Search to query the messages sent by the client.
- Select the message topic created in Step 1: Create a Message Topic for Topic Name.
- Select Creation time for Search By and select the time segment for the client to send messages to ROMA Connect.
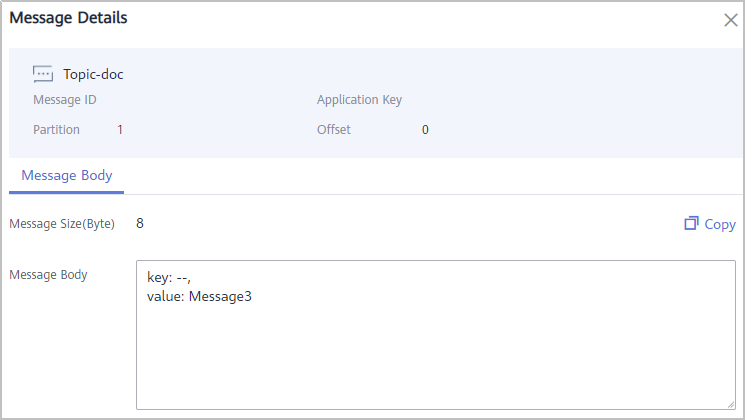
- Click Message Body next to the message record and check whether the message content is the same as that sent in 5.b.
Figure 2 Querying messages

- Run the following command to create a connection with the topic for producing messages:
- Consume messages from ROMA Connect.
- Run the following command to create a connection with the topic for reading messages:
If SASL_SSL is not enabled for the ROMA Connect instance, run the following command:
kafka-console-consumer.bat --bootstrap-server IP:9094,IP:9095,IP:9096 --topic TopicName --from-beginning
If SASL_SSL is enabled for the ROMA Connect instance, run the following command:
kafka-console-consumer.bat --bootstrap-server IP:9095,IP:9096,IP:9097 --topic TopicName --from-beginning --consumer.config ../../config/consumer.properties
In the preceding information:
- IP indicates the MQS connection address of ROMA Connect. You can obtain the address by viewing EIP on the Instance Information page of the ROMA Connect console.
- TopicName indicates the name of the topic created in Step 1: Create a Message Topic.
- After the command is executed, the system is continuously connected to the topic and reads messages. To stop reading messages, press Ctrl+C, enter Y, and press Enter.
- Run the following command to create a connection with the topic for reading messages:
Feedback
Was this page helpful?
Provide feedbackThank you very much for your feedback. We will continue working to improve the documentation.See the reply and handling status in My Cloud VOC.
For any further questions, feel free to contact us through the chatbot.
Chatbot


