
Using ROMA Connect for Service Integration
Overview
ROMA Connect can encapsulate APIs, data sources, and custom functions into standard RESTful APIs and expose them to external systems. ROMA Connect provides complete lifecycle management and multi-layer security protection for APIs.
This chapter provides a configuration example to help you get familiar with the service integration process.
The steps for integrating services with ROMA Connect are as follows:
Prerequisites
Before performing this operation, complete the following preparations:
- An EIP has been bound to the ROMA Connect instance, and the network where the local PC is located can communicate with the EIP network.
- The Postman tool has been downloaded and installed on your local PC.
Step 1: Prepare a Backend Service
You need to prepare an API that can be called as a backend service. In this example, you can customize a function API that does not require any authentication or contain any request parameters as the backend service.
- Create an integration application.
- Log in to the ROMA Connect console. On the Instances page, click View Console next to a specific instance.
- In the navigation pane on the left, choose Integration Applications. In the upper right corner of the page, click Create Integration Application.
- In the dialog box displayed, set Name and Description, and click OK.
- Create a function API.
- In the navigation pane on the left, choose API Connect > Custom Backend. On the Backends tab page, click Create.
- On the Create Backend page, set backend parameters and click Create.
Figure 1 Creating a backend

Table 1 Backend configuration Parameter
Description
Name
Enter a backend name. It is recommended that you enter a name based on naming rules to facilitate search.
Integration Application
Select the integration application created in 1.
Backend Request Method
Select GET as the request method of the backend.
Backend Request Path
Enter the request path of the backend in the /serviceName/interfaceName format.
Backend Security Authentication
Select None, which indicates that authentication is not required when the API is called.
Description
Enter a brief description of the backend.
Advanced Settings
You do not need to configure advanced settings.
After the backend is created, the online IDE page is automatically displayed.
- Use a reference script provided by ROMA Connect to implement a simple function backend.
In the upper left corner of the online IDE page, choose File > New Function Backend > Hello World Example. In the dialog box displayed, click Yes. The built-in script Hello world! is displayed in the editing box.
- Change Hello world! to ROMA TEST! so that the response ROMA TEST! will be returned when the backend is called. Then, click Save in the upper right corner of the page.
function execute(data){ return "ROMA TEST!" } - Click Test in the upper right corner of the page, and then click Test in the test bar.
In the Execution Result area, check whether the response is ROMA TEST! defined in 2.d.
- After the backend test is complete, click Deploy in the upper right corner of the page. In the dialog box displayed, click Yes to deploy the function backend.
- After the backend deployment is complete, click Publish in the upper right corner of the page.
- In the pane displayed, set required parameters and click Publish to create a frontend function API for the backend and publish the API in the environment.
Table 2 Parameters for publishing a backend Parameter
Description
Group
Select the API group to which the frontend API belongs.
If there is a default API group, select the default API group. If there is no default API group, click Create API Group. In the Create API Group dialog box, click OK to create an API group.
Environment
Select the default environment RELEASE.
Frontend Security Authentication
Select the security authentication mode used by the frontend API. In this example, select None.
Frontend Request Protocol
Enter the request protocol used to access the backend API. In this example, retain the default option HTTPS.
Timeout (ms)
Timeout interval for the frontend API to call a backend service. Retain the default value 60000.
Advanced Settings
You do not need to configure advanced settings.
- After the function API is published, the API details page is displayed. In the Request Definition area on the API Calling tab page, obtain and record the values of Subdomain Name, Protocol, Method, and Path of the function API.
Step 2: Create an API Group
Each open API belongs to an API group. Before creating an API, create an API group.
- Log in to the ROMA Connect console. On the Instances page, click View Console next to a specific instance.
- In the navigation pane on the left, choose API Connect > API Management. On the API Groups tab page, click Create.
- In the Create API Group dialog box, enter the group-related parameters and click OK.
Figure 2 Creating an API group
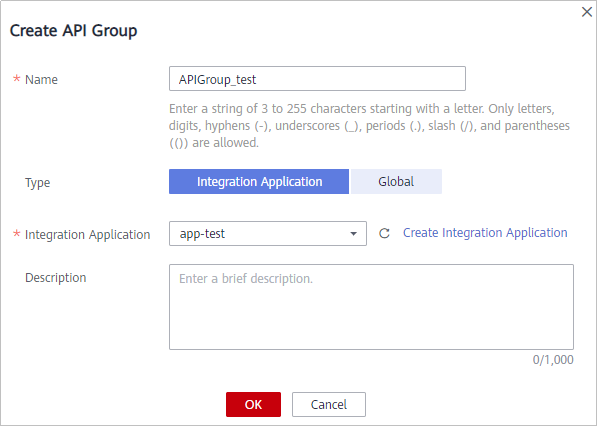
Table 3 Parameters for creating an API group Parameter
Description
Name
Enter an API group name. It is recommended that you enter a name based on naming rules to facilitate search.
Type
Select Integration Application as the API group type.
Integration Application
Select the integration application created in Step 1: Prepare a Backend Service. If no integration application is available, click Create Integration Application on the right to create an integration application.
Description
Enter a brief description of the API group.
Step 3: Create an API
Create an API on ROMA Connect and associate it with the backend service.
- On the APIs tab page, click Create API.
- On the Create API page, set the parameters of the API.
- Configure basic information and click Next.
Table 4 Basic API information Parameter
Description
Name
Enter an API name. It is recommended that you enter a name based on naming rules to facilitate search.
Integration Application
Select the integration application created in Step 1: Prepare a Backend Service. If no integration application is available, click Create Integration Application on the right to create an integration application.
API Group
Select the API group created in Step 2: Create an API Group.
Security Authentication
Security authentication mode used for the API. In this example, select None.
Two-factor Authentication
You do not need to enable this option.
Tag Name
You do not need to set this parameter.
Description
You do not need to enter a description.
- Define API request information, which will be exposed to external users. Then, click Next.
Figure 3 Defining API request information

Table 5 API request configuration Parameter
Description
Protocol
Select HTTPS as the request protocol used to access the API.
Path
Enter the request path of the API in the /serviceName/interfaceName format.
Matching
Select Exact match as the matching mode of the request path.
Method
Select GET as the request method of the API.
CORS
Specifies whether CORS is supported. You do not need to enable this option.
Input Parameters
Request parameters of the API. You do not need to add request parameters.
- Configure backend service information of the API, that is, the access information of the API functioning as the backend service.
If you have prepared a function API by referring to Step 1: Prepare a Backend Service, configure the access information of that API.
Then, click Next.Figure 4 Configuring the access to the backend service
Table 6 Backend service access parameters Parameter
Description
Backend Type
Select HTTP/HTTPS as a backend service.
Protocol
Select the request protocol of the function API recorded in Step 1: Prepare a Backend Service.
Method
Select the request method of the function API recorded in Step 1: Prepare a Backend Service.
Load Balance Channel
Select Do not configure.
Backend Address
Enter the access address of the backend service in the Host:Port format. Host indicates the IP address or domain name for accessing the backend service. If no port is specified, port 80 is used for HTTP by default, and port 443 is used for HTTPS by default.
Enter the subdomain name of the function API recorded in Step 1: Prepare a Backend Service.
Path
Enter the request path of the backend service in the /serviceName/interfaceName format. Enter the request path of the function API recorded in Step 1: Prepare a Backend Service.
Timeout (ms)
Retain the default value 5000 as the timeout interval for ROMA Connect to call the backend service.
Two-way Authentication
Determine whether to enable two-way authentication between ROMA Connect and backend services. You do not need to enable this option.
Backend Authentication
Determine whether the backend service authenticates the calling requests sent by ROMA Connect. You do not need to enable this option.
Backend Parameters
In this example, the backend service does not contain request parameters. You do not need to set this parameter.
Constant Parameters
In this example, the backend service does not contain request parameters. You do not need to set constant parameters.
System Parameters
In this example, the backend service does not contain request parameters. You do not need to set system parameters.
- Configure the response example returned by the API, which will be displayed in the API calling information. After the configuration is complete, click Finish.
Figure 5 Configuring the API response examples
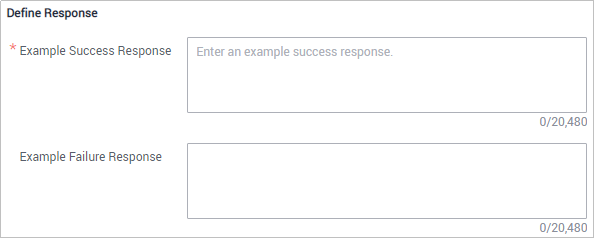
Table 7 Parameters for configuring API response examples Parameter
Description
Example Success Response
Set the success response example based on the response of the backend service. In this example, set this parameter to ROMA TEST!.
Example Failure Response
Example of a failure response returned by the system when an API fails to be called. You do not need to set this parameter.
- Configure basic information and click Next.
- After the API is created, click Back to API List. The created API is displayed in the API list.
Step 4: Debug the API
After you create an API, debug it to ensure that the API functions properly.
- On the APIs tab page, choose More > Debug in the Operation column of the API.
- Click Send Request on the API debugging page to test the API calling.
- On the right of the page, view the request and response sent by the API.
Step 5: Publish the API
After the API function test is successful, publish the API to the environment. An API can be called by external users only after it is published to the environment.
- On the APIs tab page, click Publish in the Operation column of the API.
- On the Publish API page, set Environment to RELEASE and click Publish.
Figure 7 Publishing the API
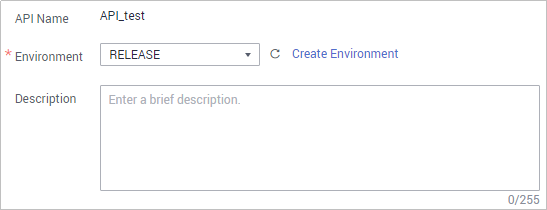
- Click Back to API List. In the API list, the running environment of the API changes to RELEASE.
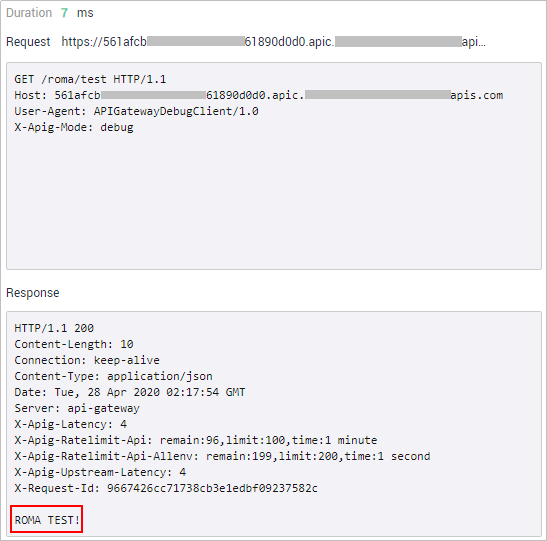
Step 6: Call the API
In this example, Postman will be used to call APIs.
- Obtain request information of the API.
- On the APIs tab page, click the API name to access the API details page.
- On the API Calling tab page, select API Request in the topology. View the API calling information, including the URL, subdomain name, request method, request path, and request parameters, in the lower part of the page.
Figure 8 API request information

- Call the exposed API.
Use Postman to call the API obtained in 1.
After the API is successfully called, check whether the response is the same as the test result in Step 4: Debug the API.
Figure 9 API calling response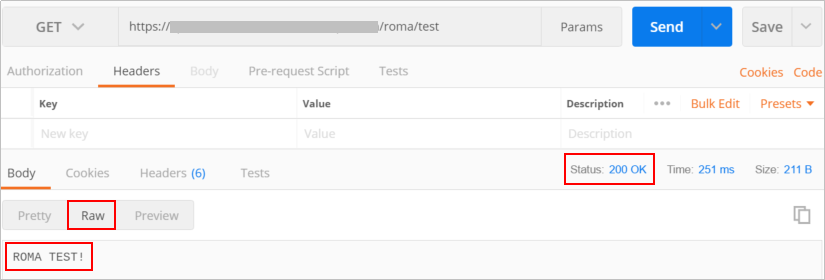
Feedback
Was this page helpful?
Provide feedbackThank you very much for your feedback. We will continue working to improve the documentation.See the reply and handling status in My Cloud VOC.
For any further questions, feel free to contact us through the chatbot.
Chatbot


