Plug-in Usage
After compiling the so and JSON files, upload the files to the PerfTest project and add custom requests and functions to the test cases.
Adding a Plug-in
- Log in to the CodeArts PerfTest console and choose PerfTest Projects in the left navigation pane.
- Click the name of the desired PerfTest project to go to the details page.
- On the Cases tab, click Plugin.
- In the displayed window, click Add Plugin. Click Select json file and Select so file. Then click Upload.
Figure 1 Adding a plug-in

The file restrictions are as follows:
- A JSON file cannot exceed 50 KB, and its name cannot exceed 64 characters.
- Restrictions on so files: The file size cannot exceed 80 MB, and the number of files cannot exceed 20.
Adding a Custom Request
Ensure that you have added the custom request plug-in.
- Log in to the CodeArts PerfTest console and choose PerfTest Projects in the left navigation pane.
- Click the name of the desired PerfTest project to go to the details page.
- On the Cases tab, select the desired test case in the case list on the left.
- On the Case Script tab, choose .
- In the window that is displayed, select a request.
Figure 2 Adding a custom request

- Click OK.
Adding a Custom Function
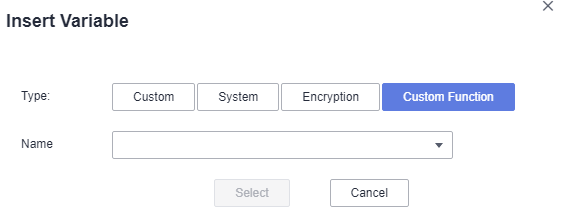
After adding a custom function plug-in, enter $ in the text box and set variable type to Custom Function. Select the name of the imported function, and click Select.

Adding a Custom Checkpoint
Ensure that you have added the custom checkpoint plug-in.
- Log in to the CodeArts PerfTest console and choose PerfTest Projects in the left navigation pane.
- Click the name of the desired PerfTest project to go to the details page.
- On the Cases tab, select the desired test case in the case list on the left.
- On the Case Script tab, select the request for which a custom checkpoint is to be added and click
 in the operation column.
 - On the Checkpoint tab, enable result check and set the response code, header, or response content.
When enabling the checkpoint, set at least one of the following three parameters: response code, header, and response content.
- Click Add Custom. In the displayed dialog box, select the imported checkpoints.
Figure 4 Adding a custom checkpoint

Feedback
Was this page helpful?
Provide feedbackThank you very much for your feedback. We will continue working to improve the documentation.See the reply and handling status in My Cloud VOC.
For any further questions, feel free to contact us through the chatbot.
Chatbot


