Generating a Combinatorial Test Case on Mind Map
You can combine test factors to generate test cases. Data factor combinations enable full coverage of test factors for generation of test cases, and diversify test design functions.
Test factors refer to the factors that affect a test, such as the environment, test mode, and test difficulty. The number of test factors of a test is the number of factors that affect the test. By combining these factors, each test case can cover multiple conditions, which helps avoid missing tests.
Prerequisites
You have created a Test Point node, for example, Test the basic mobile phone functions. Note that combination can be done only on test points.

By Adding Action and Data Factors
During test design, you can add Action Factor, Data Factor, Valid Value, and Invalid Value to mind map nodes.
- Go to a mind map.
- On the top toolbar bar, click
 on the right of Expected Result. The Action Factor, Data Factor, Valid Value, and Invalid Value tag icons are displayed.
 - Select the node to which you want to add action or data factors (max. 100 action factors and 100 data factors per mind map).
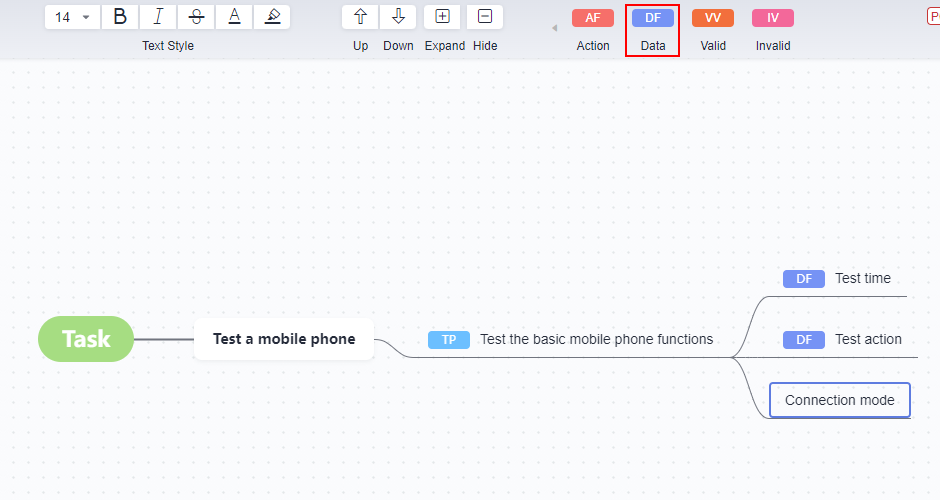
Click
 on the toolbar above the mind map. Take the node Test the basic mobile phone functions as an example. If the test process is to use a mobile phone to perform {test action} in {connection mode} at {test time}, the data factors can be {test time}, {connection mode}, and {test action}, to cover all scenarios.
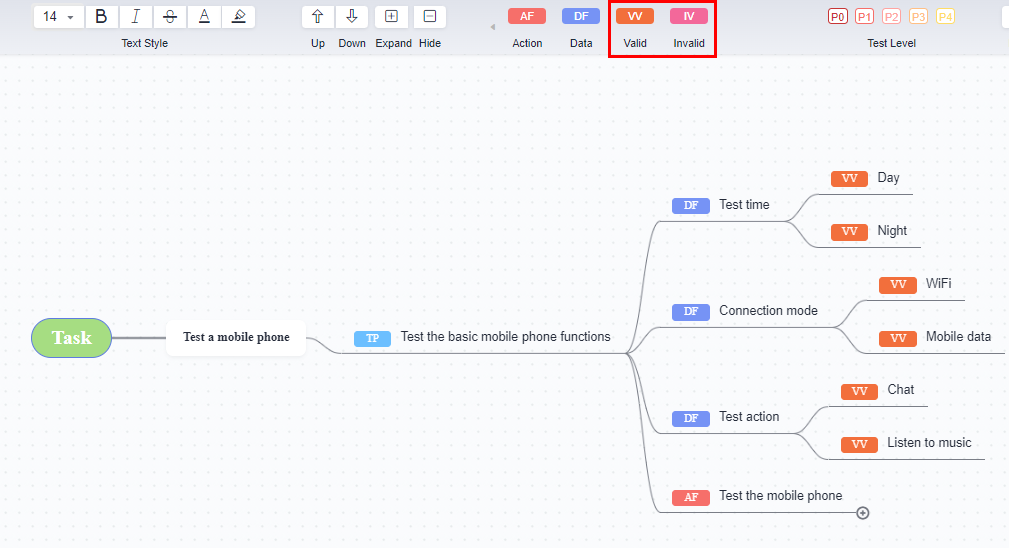
- Add a valid or invalid value: Add subnodes to the data factor nodes, select the subnodes, and click the valid value icon
 or the invalid value icon
  on the toolbar.
- Valid Value: A normal system value of a data factor to be tested.
- Invalid Value: An abnormal system value to be tested, or a value not within the range of a data factor. A good test model should include both valid and invalid values to test whether the system program can correctly process errors. Only one invalid value is allowed in a test case. There is no need for multiple invalid values as any single one will trigger system exceptions.
The following figure shows the valid and invalid value subnodes of the data factor nodes Test time, Connection mode, and Test action.

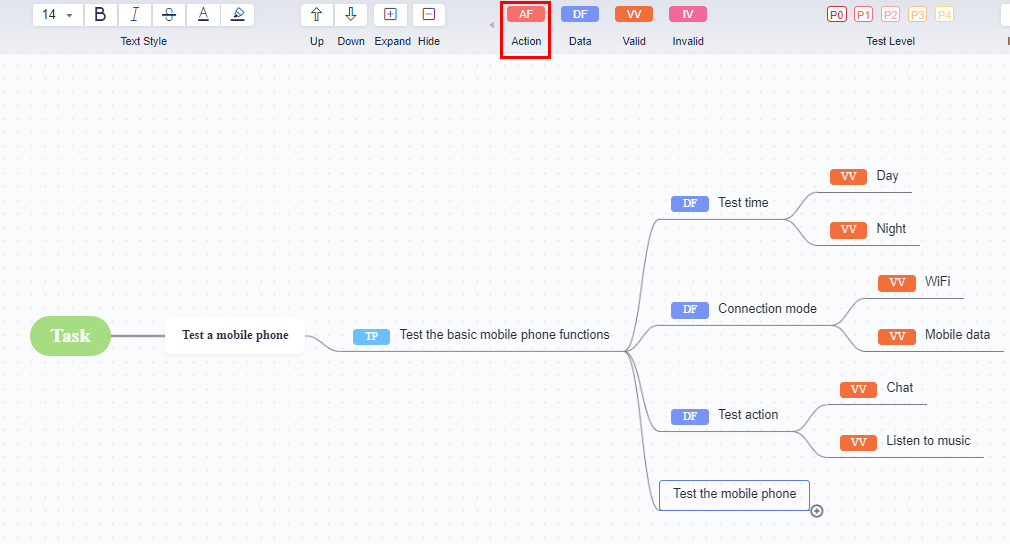
- Add an action factor: Select a subnode and click the action factor icon
 on the toolbar. For example, set Test the mobile phone to be an action factor.

- Right-click a test point node and choose Generate Combinatorial Case from the shortcut menu.

The system finds the parent node of the DF nodes and displays their valid and invalid values from top to bottom.
- On the Generate Combinatorial Case page, select the factors you need. By default, all action and data factors are selected.
- Click Next.
- Hover over a combinatorial algorithm and click Use and Preview. For details about the combinatorial algorithms, see the following table.
Data Combination Coverage Type
Description
All Combinations (AC)
All values of each test factor are combined. AC is the most comprehensive coverage mode.
N-Wise
This combination covers N inputs. When N equals the number of parameters, this mode generates AC.
Tests prove that when N=2 (pair-wise), the generated test data provides the highest efficiency, making this one of the most widely used algorithms.
PairWise
Pair-wise testing is N-wise testing when N is 2.
TripleWise
Triple-wise testing is N-wise testing when N is 3. It generates more combinations than pair-wise testing.
Basic Choice (BC)
Use this algorithm if you want to compare single-factor changes. You need to set a base combination first. From the base combination, new combinations are created by varying one factor value at a time.
Each Choice (EC)
Each test factor value appears at least once in any combination.
To change the algorithm, click Change Algorithm and select another algorithm.

If you go back to the mind map, modify or delete a test factor node, and click Generate Combinatorial Case again, then you need to click Refresh to synchronize the modification.
- (Optional) Add data factor constraints to limit the values to be used for generating combinatorial cases.
- Select Data Constraint and click Add. You can add up to 20 constraints.
- Select the required operation relationship, set Variable to the data factor to which the constraint is to be added, select the operator, and set Value to the valid or invalid value of the data factor.
To clear the value, click
 .
. - In the condition expression box, check the configured algorithm and click Preview Constraint to view the constraint.
- Click Confirm.
- If you modify the data constraints, click Refresh in the upper right corner of the combination preview.
Example variables and values:
Type: Primary, Logical, Single, Span, Stripe, Mirror, RAID-5
Size: 10, 100, 500, 1000, 5000, 10000, 40000
Format method: quick, slow
File system1: FAT, FAT32, NTFS
File system2: FAT, FAT32, NTFS
Cluster size: 512, 1024, 2048, 4096, 8192, 16384, 32768, 65536
Compression: ON, OFF
- Non-conditional constraints
To limit parameter values, use non-conditional constraints.
[Size] > 10000: The value of Size in the case set can only be 40000.
[File system1] <> [File system2]: The values of File system1 and File system2 in the case set must be different.
[Size] > 10000 and [Compression]="ON": The value of Size in the case set can only be 40000 and the value of Compression can only be ON.
- IF condition constraints
To set an IF condition, use this format: IF expression1 THEN expression2, where the expressions are in the format [Data factor] Operator [Value].
For example, the expression IF [File system1]="FAT" THEN [Cluster Size] <= 4096 indicates that if File system1 is FAT, then the value of Cluster Size can only be 512, 1024, 2048, or 4096.
- AND/OR/NOT
For complex expressions, use AND, OR, and NOT, and then enclose them with parentheses (required).
For example, the expression IF ([File system1]="NTPS" OR ([File system2]="NTPS" AND [Cluster Size] <= 4096)) THEN [Compression]="OFF" indicates that if either File system1 or File system2 is NTPS, and Cluster Size is 512, 1024, 2048, or 4096, then Compression is OFF.
- IN/LIKE
To limit a factor value within a specific value set, use the IN operator.
For example, the expression IF [File system1] IN {"FAT","FAT32"} THEN [Cluster Size] <= 4096 indicates that if File system1 is FAT or FAT32, the value of Cluster Size can only be 512, 1024, 2048, or 4096. This constraint is equivalent to IF ([File system1]="FAT" OR [File system1]="FAT32") THEN [Cluster Size] <= 4096.
For wildcard matching, use the LIKE operator together with asterisk (*) or question mark (?). For example, use FA*, *FA, and ?A to match the values starting with FA, ending with FA, and containing A, respectively.
For example, the expression IF ([File system1] LIKE "FA*") THEN [Cluster Size] <= 4096 indicates that if File system1 is set to FAT or FAT32, the value of Cluster Size can only be 512, 1024, 2048, or 4096.

- Constraints differentiate between integer and string variables. If all values of a variable are numbers, it is regarded as a number. If any one of the values is not a number, the variable is regarded as a string.
- When an operator is used to constrain two data factors in the format [Data factor 1] Operator [Data factor 2], both data factors must be of the same type.
- Do not use the LIKE operator to constrain two integer variables. Do not use operators >, <, >=, and <= to constrain two string variables.
- In the Combination Preview list, select the data combination to be created.
Move the cursor over the first check box, select Select All Pages or Select Current Page, and click Next.
- On the Configure Test Case page, set the following parameters:
- Test Case: The default case name is in the format of TP node name_${Data factor}.
- ID: The case IDs will be generated based on the auto-increment rule you set.
- Case Level: Select P0, P1, P2, P3, or P4.
- Test Case Description: Enter a description. Max. 500 characters.
- Prerequisite: Enter the prerequisites. Max. 2,000 characters.
- Write test steps. Use $ to reference data factors. Click Confirm.

- Click
 to view the test case list.
 - The generated test cases are displayed by default. Choose Combination Strategies to view the history of combinatorial algorithms.
- Click
 in the Operation column of the test case to be archived, and click Archive Cases. Other operations:
- Archive multiple test cases: Select multiple test cases and click Archive Cases.
- Edit a test case: Click
 in the Operation column, and view and edit the test case.
 - Delete a test case: Click
 in the Operation column and click Delete.
 - Delete test cases in batches: Select multiple test cases and click Delete.
- Search for a test case: Enter a keyword in the search box, and click
 .
. - Filter test cases: Click the drop-down list box under Test Cases, and select All, Unarchived, or Archived.
- On the Archive Case page, select the target test cases on the left. On the right area, select the version, test plan, execution mode, and feature directory, and click Confirm.
- In the navigation pane, choose . Select the required version, test plan, and test type tab, and view the archived test cases.
By Factor Library
Creating a Factor
- In the navigation pane, choose .
- Click Test Factor Center in the upper right corner of the page.
- Create a directory if there is only the root directory: Click
 next to the root directory and click Create Directory.
 - Enter a subdirectory name within 1 to 500 characters.
- Click the directory and click Create Factor.
- Configure the following information and click Confirm.
Configuration Item
Mandatory
Description
Factor Name
Yes
Max. 500 characters.
Factor Type
Yes
Data Factor or Action Factor.
Factor Description
No
Brief description of a factor. Max. 500 characters.
Prerequisite
Yes
Prerequisites for action factors.
Test Steps
Yes
Step descriptions and expected results for action factors. Max. 5,000 characters. Click + in the Operation column to add more test steps.
Data Type
No
The default value is String.
Valid Value/Invalid Value
No
Valid or invalid values for data factors.
Click Add to add more valid or invalid values.
Remarks
No
Max. 500 characters.
- The new factor is displayed in the directory. You can:
- Copy a factor: Click
 in the Operation column. On the displayed page, modify the factor information and click Copy.
 - Edit a factor: Click
 in the Operation column. On the displayed page, modify the factor information.
 - Delete a factor: Click
 in the Operation column and click Delete.
 - Delete factors in batches: Select factors and click Delete on the tool bar below.
- Export factors: Select factors, click Export on the tool bar below, and save the file to the local PC.
- Filter factors: Click the drop-down list box on the right of Create Factor and select All Factor, My Factor, Action Factor, or Data Factor.
- Search for a factor: Type a keyword in the search box and click the search icon.
- Edit the factor list headers: Click
 in the Operation column of the factor list. In the displayed dialog box, select headers and adjust the display sequence on the right.
 - Import: Click Import in the upper right corner. In the displayed dialog box, click Download Template to download the template to the local PC. Edit the template file, click
 in the dialog box, select the file, and click OK.
- Copy a factor: Click
Associating a Mind Map with the Factor Library
- In the navigation pane, choose .
- Create or select a mind map.
- Right-click a node and choose Associate Factor Library from the shortcut menu.

Association can be done only on test point nodes.
- On the Associate Factor Library page, select factors and click Confirm. The factors are displayed in the mind map.
- For details about how to generate a case, see 6.
Feedback
Was this page helpful?
Provide feedbackThank you very much for your feedback. We will continue working to improve the documentation.See the reply and handling status in My Cloud VOC.
For any further questions, feel free to contact us through the chatbot.
Chatbot


