
Creating and Managing a Workspace
ModelArts workspaces enable enterprise customers to split their resources into multiple spaces that are logically isolated and to manage access to different spaces. After workspace is enabled, a default workspace is created. All resources you have created are in this workspace. You can create multiple workspaces. Each acts as a separate ModelArts instance. Workspaces do not interfere with each other, making management easier.
- PUBLIC: publicly accessible to tenants (including both the tenant account and all its IAM accounts)
- PRIVATE: accessible only to the creator and the tenant account
- INTERNAL: accessible to the creator, the tenant account, and specified IAM users. When the authorization type is set to INTERNAL, specify one or more accessible IAM users.
A default workspace is allocated to each IAM project of each account. The access control of the default workspace is PUBLIC.
Scenario
- Education: A teacher allocates an INTERNAL workspace to each student and allows the workspace to be accessed only by specified students. In this way, students can separately perform experiments on ModelArts.
- Enterprises: An administrator creates a workspace for production tasks and allows only O&M personnel to use the workspace, and creates a workspace for routine debugging and allows only developers to use the workspace. In this way, different enterprise roles can use resources only in a specified workspace.
Prerequisites
You have configured the basic permissions for using ModelArts. For details, see Configuring Agency Authorization for ModelArts with One Click.
Choosing a Workspace
- Log in to the ModelArts console.
- Switch the workspace in the upper left corner of the console.
- The system creates a default workspace, binds the default enterprise project, and sets the authorization type to PUBLIC.
- If the workspace does not meet service needs, you can Creating a Workspace or Modifying a Workspace.
Figure 1 Switching the workspace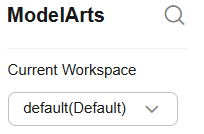
Creating a Workspace
- Log in to the ModelArts console.
- In the navigation pane on the left, choose Workspace.
- Click Create workspace.
Table 1 Creating a workspace Parameter
Description
Workspace name
Enter the name of the workspace. This parameter is mandatory.
The value can contain 4 to 64 visible characters, including letters, digits, hyphens (-), and underscores (_).
Description
Enter the description of the workspace, with a maximum of 256 characters.
Enterprise Project
Select an enterprise project. This parameter is mandatory. If no enterprise project is available, click Create Enterprise Project to go to the Enterprise Project Management page, create an enterprise project, and bind it to the workspace.
Enterprise projects provide a cloud resource management mode, in which cloud resources and members are centrally managed by project.
Authorization Type
Select the access control mode for the workspace.
- PUBLIC: publicly accessible to tenants (including both the tenant account and all its sub-accounts)
- PRIVATE: accessible only to the creator and the tenant account
- INTERNAL: accessible to the creator, the tenant account, and specified sub-users When Authorization Type is set to INTERNAL, you need to set Authorized User and Authorized To to specify the sub-users who can access the workspace.
When Authorized User is set to IAM user, select one or more IAM users in Authorized To.
If Authorized User is set to Federated user, enter one or more usernames or IDs of federated users in Authorized To.
When Authorized User is set to Agency, select one or more agencies in Authorized To.
- After setting the workspace parameters, click Create Now.
Managing Workspace Quotas
After a workspace is created, you can view and modify the quota information.
- In the navigation pane of the ModelArts console, choose Workspace.
- On the Workspace page, locate the target workspace, and click Quota Management in the Operation column to go to the workspace details page.
- In the Quota Info area, view the quota value, used quota, and last modification time.
- Click Modify Quota on the right of Quota Info to change the quota value. For details about the configurations, see Table 2.
Table 2 Quota information Quota
Value Description
Unit
GPU-based training job duration (calculated based on a single Pnt1 per node)
The value ranges from 1 to 60000 and is unlimited by default.
Minute
CPU-based training job duration (calculated based on a single vCPU per node)
The value ranges from 1 to 60000 and is unlimited by default.
Minute
Visualization job duration
The value ranges from 1 to 60000 and is unlimited by default.
Minute
CPU-based development environment duration (calculated based on the number of vCPUs)
The value ranges from 1 to 60000 and is unlimited by default.
Minute
GPU-based development environment duration (calculated based on the number of Pnt1 GPUs)
The value ranges from 1 to 60000 and is unlimited by default.
Minute
CPU-based inference service duration (calculated based on the number of nodes)
The value ranges from 1 to 60000 and is unlimited by default.
Minute
GPU-based inference service duration (calculated based on the number of nodes)
The value ranges from 1 to 60000 and is unlimited by default.
Minute
vCPUs for CPU-based training jobs
The value ranges from 1 to 10000 and is unlimited by default.
vCPU
Cards for GPU-based training jobs
The value ranges from 1 to 1000 and is unlimited by default.
Card
RAM size for training jobs
The value ranges from 1 to 100000 and is unlimited by default.
GB
GPU-based auto labeling duration
The value ranges from 1 to 60000 and is unlimited by default.
Minute
- After changing the quota values of the workspace, click Submit. If data in the Quota Value column is refreshed, the quotas have been modified successfully.
Modifying a Workspace
After a workspace is created, you can modify its information.
- In the navigation pane of the ModelArts console, choose Workspace.
- On the Workspace page, locate the target workspace and click Modify in the Operation column.
You can modify the name, description, enterprise project, and authorization type of the workspace. For details, see Table 2.
- After modifying the parameters, click Modify Now.
Deleting a Workspace
You can delete a workspace that is no longer needed. However, you need to delete all resources in the workspace first, including created notebooks, training jobs, deployment services, and associated resource pools and networks.

Deleting a workspace will delete all resources in the workspace, including created notebooks, training jobs, and deployed services. The deleted resources cannot be restored.
- In the navigation pane of the ModelArts console, choose Workspace.
- In the workspace list, click Delete in the Operation column. In the displayed dialog box, confirm the information about the workspace you want to delete.
If there are resource pools and networks that have not been deleted in the workspace, delete them first.
Confirm the information, enter DELETE, and click OK. The workspace status changes to Deleting. After the resources are cleared, the workspace is deleted from the list.
Feedback
Was this page helpful?
Provide feedbackThank you very much for your feedback. We will continue working to improve the documentation.See the reply and handling status in My Cloud VOC.
For any further questions, feel free to contact us through the chatbot.
Chatbot


