Getting Started: Creating an Object Detection Dataset
This section uses preparing data for training an object detection model as an example to describe how to analyze and label sample data. During actual service development, you can select one or more data management functions to prepare data based on service requirements. The operation process is as follows:

Data management is being upgraded and is invisible to users who have not used data management.
Preparations
Before using data management of ModelArts, complete the following preparations:
When using data management, ModelArts needs to access dependent services such as OBS. Therefore, grant permissions on the Global Configuration page. For details, see Configuring Agency Authorization (Recommended).
Creating a Dataset
In this example, an OBS path is used as the input path to create a dataset. Perform the following operations to create an object detection dataset and import the data to the dataset:
- Log in to the ModelArts management console.. In the navigation pane, choose Asset Management > Datasets.
- Click Create. On the Create Dataset page, create a dataset based on the data type and data labeling requirements.
- Set the basic information, the name and description of the dataset.
Figure 1 Basic information of a dataset

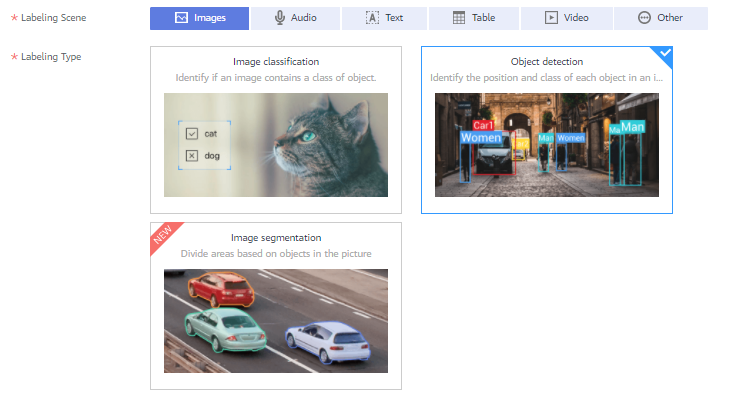
- Set labeling scene and type. In this example, choose Images and Object detection.
Figure 2 Dataset labeling scene and type
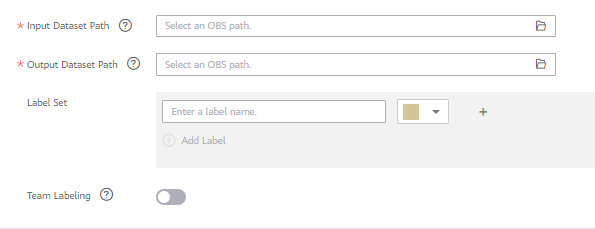
- Select an OBS path as Input Dataset Path, and select another OBS path as Output Dataset Path.
Figure 3 Input and output dataset path
- After setting the parameters, click Create in the lower right corner to create a dataset.
- Set the basic information, the name and description of the dataset.
Analyzing Data
After a dataset is created, you can perform data analysis based on image features, such as blurs and brightness, to better understand the data quality and determine whether the dataset meets your algorithm and model requirements.
- Create a feature analysis task.
- Before performing feature analysis, publish a dataset version. On the dataset Dashboard page, click Publish in the upper right corner to publish a new version of the dataset.
- After the version is published, go to the Dashboard page. Click View Data Feature and Feature Analysis. In the displayed dialog box, select the newly published dataset version and click OK to start feature analysis.
Figure 4 Starting feature analysis

- View the task progress.
You can click View Task History to view the task progress. When the task status changes to Successful, the task is complete.
Figure 5 Feature analysis progress
- View feature analysis results.
After feature analysis is complete, you can select Version, Type, and Data Feature Metric on the View Data Feature tab page. Then, the selected versions and metrics are displayed on the page. The displayed chart helps you understand data distribution for a better understanding of your data.
- Version: Select one or more versions for comparison.
- Type: Select types to be analyzed. The values all, train, eval, and inference are available for you to select. They indicate all, training, evaluation, and inference, respectively.
- Data Feature Metric: Select the metrics to be displayed. For details about the metrics, see Data feature metrics.
Figure 6 Viewing feature analysis results
In feature analysis results, for example, image brightness distribution is uneven, which means images of a certain brightness are lacking. This greatly affects model training. In this case, increase images of that brightness to make data more even for subsequent model building.
Labeling Data
- Manual labeling
- On the Unlabeled tab page, click an image. The system automatically directs you to the page for labeling the image.
- On the toolbar of the labeling page, select a proper labeling tool. In this example, a rectangle is used for labeling.
Figure 7 Labeling tools

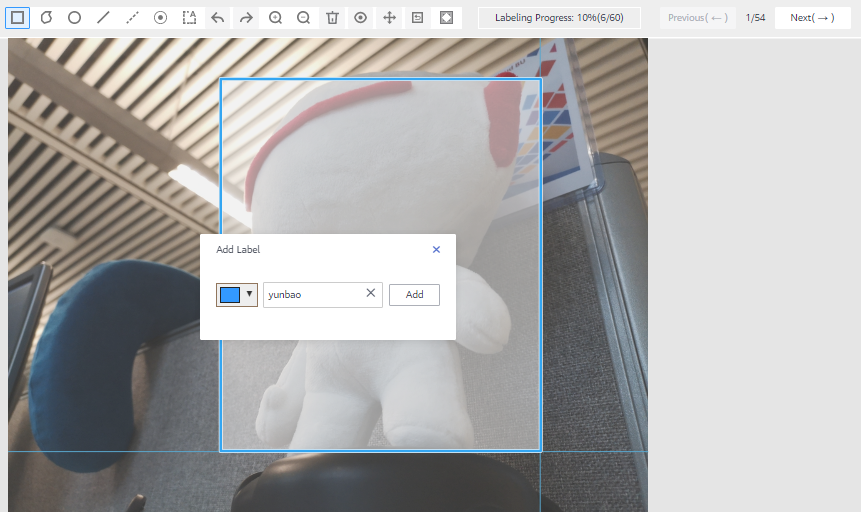
- Drag the mouse to select an object, enter a new label name in the displayed text box. If labels already exist, select one from the drop-down list box. Click Add.
Figure 8 Adding an object detection label
- Click Back to Data Labeling Preview in the upper left part of the page to view the labeling information. In the dialog box that is displayed, click Yes to save the labeling settings. The selected image is automatically moved to the Labeled tab page. On the Unlabeled and All tab pages, the labeling information is updated along with the labeling process, including the added label names and the number of images for each label.
- Auto labeling
Auto labeling allows you to automatically label remaining data after a small amount of data is manually labeled.
- On the dataset details page, click Auto Label in the upper right corner.
- In the Enable Auto Labeling dialog box, set the following parameters and click Submit.
- Auto Labeling Type: Active learning
- Algorithm Type: Fast
Retain the default values of other parameters.
Figure 9 Starting auto labeling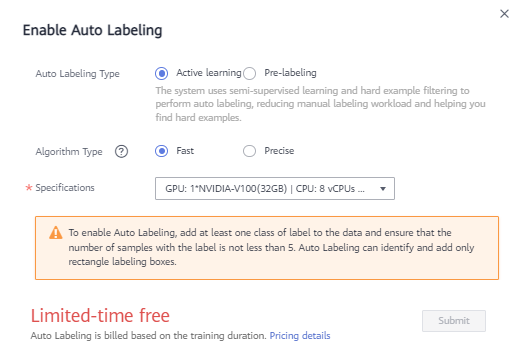
- View auto labeling progress.
After auto labeling is started, you can view the task progress on the To Be Confirmed tab page. After a task is complete, you can view the automatically labeled data on the To Be Confirmed tab page.
Figure 10 Viewing auto labeling progress
- Confirm auto labeling results.
After auto labeling is complete, click the image on the To be confirmed tab page. On the labeling details page, you can view or modify the auto labeling result.
For correct labeling, click Labeled on the right. For wrong labeling, correct wrong labels. For auto labeling of object detection datasets, confirm images one by one. Ensure that all images are confirmed and go to the next step.
Figure 11 Confirming auto labeling results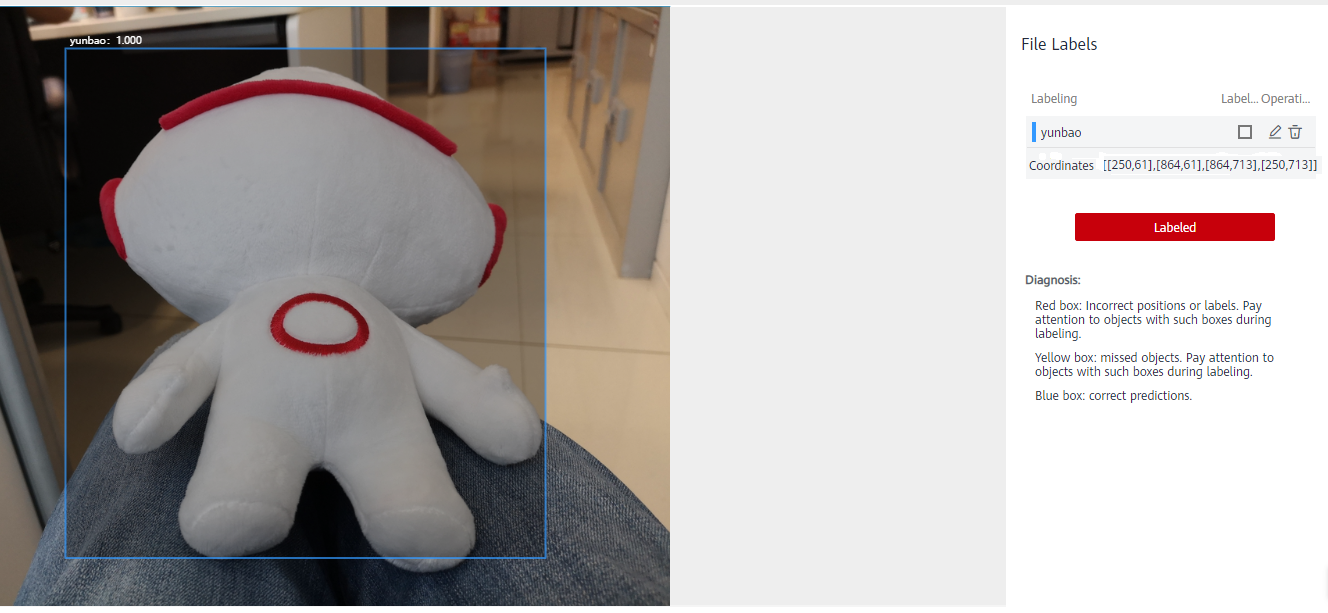
Publishing Data
ModelArts training management allows you to create training jobs using ModelArts datasets or files in an OBS directory. If a dataset is used as the data source of a training job, specify a dataset and version. Therefore, you must have published a dataset version. For details, see Labeling Images.

Data that is from the same source and labeled in different batches are differentiated by version. This facilitates subsequent model building and development. You can select specified versions.
Exporting Data
ModelArts training management allows you to create training jobs using ModelArts datasets or files in an OBS directory. If you create a training job using an OBS directory, export the prepared data to OBS.
- Export data to OBS.
- On the dataset details page, select or filter the data to be exported, and click Export in the upper right corner.
- Set Type to OBS, enter related information, and click OK.
Storage Path: path where the data to be exported is stored. You are advised not to save data to the input or output path of the current dataset.
Figure 12 Exporting to OBS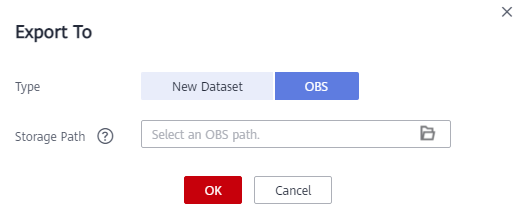
- After the data is exported, view it in the specified path.
- View task history.
After exporting data, you can view the export task details in Export History.
- On the dataset details page, click Export History in the upper right corner.
- In the View Task History dialog box, view the export task history of the current dataset. You can view the task ID, creation time, export type, export path, total number of exported samples, and export status.
Figure 13 Export history

Feedback
Was this page helpful?
Provide feedbackThank you very much for your feedback. We will continue working to improve the documentation.See the reply and handling status in My Cloud VOC.
For any further questions, feel free to contact us through the chatbot.
Chatbot


